

1 Overview
Enhance Magento 2 with customizable registration forms using AI and theme compatibility.
Ewebecommerce's Registration Field Suite offers a comprehensive solution for creating custom registration forms on Magento 2 platforms. Utilizing intuitive drag-and-drop functionality, merchants can quickly design and implement tailored registration experiences to fit various business needs. The integrated AI form generator adds another layer of efficiency by allowing automated form creation from simple text prompts.
The module supports a wide variety of use cases, from B2B registrations to medical and education form requirements, ensuring businesses can handle diverse customer onboarding scenarios. Enhanced security options, multi-store compatibility, and seamless integration with Hyva and Luma themes provide a robust foundation for efficient customer data collection and management.
At a Glance
- Drag-and-drop form builder for easy design
- AI-generated forms from simple text prompts
- Secure with multiple captcha options
- Supports multiple customer groups
- Fully compatible with Hyva and Luma
- Pending registration for manual approvals
- Role-based ACL permissions
- SEO-friendly URLs for each form
| Module | Ewebecommerce_RegistrationFieldSuite |
|---|---|
| Composer | ewebecommerce/module-registration-field-suite |
| Version | 2.0.0 |
| PHP | ~8.1.0||~8.2.0||~8.3.0 |
| Compatibility | Magento Framework >=103.0.0 |
| Hyva | Compatible |
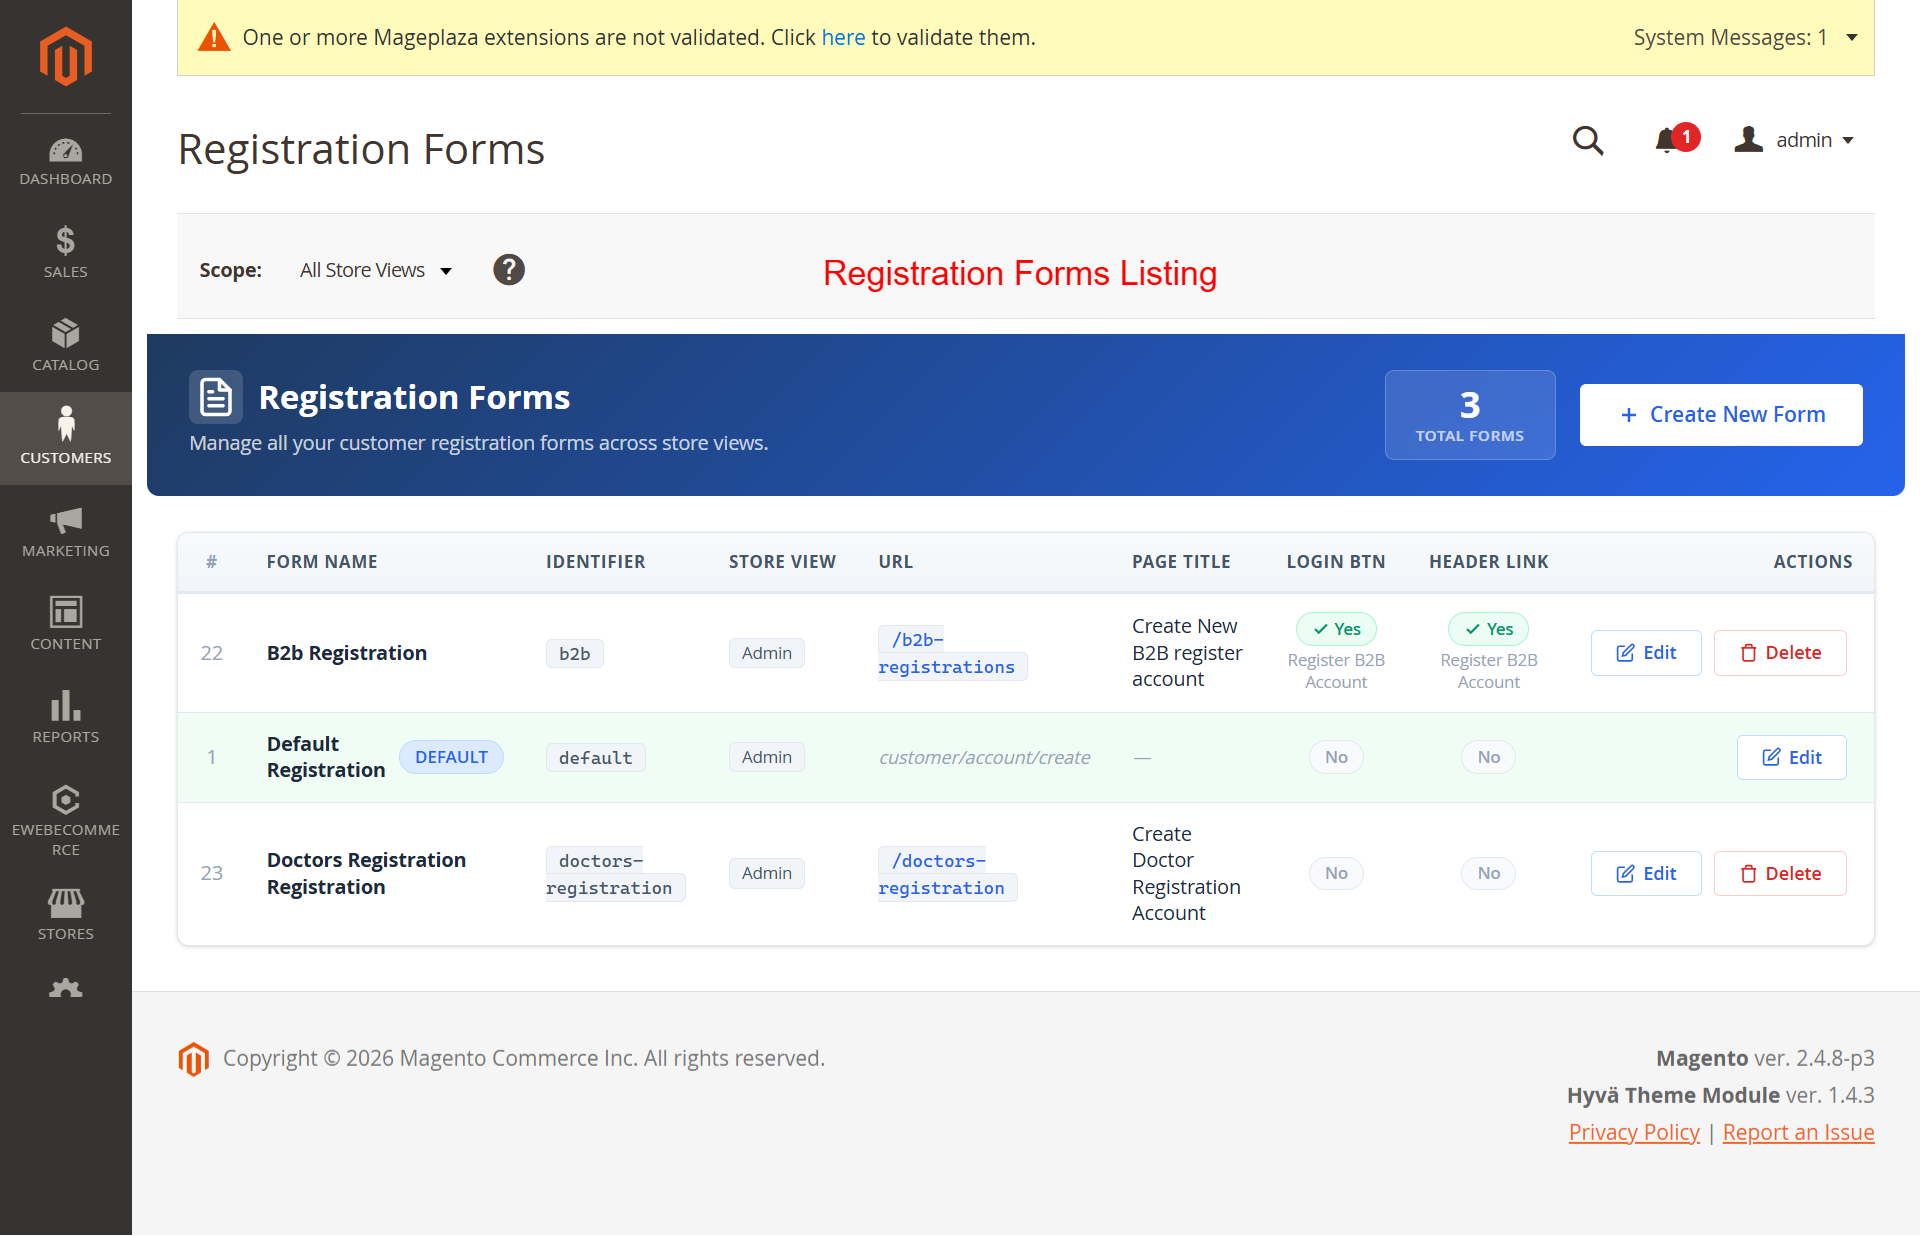
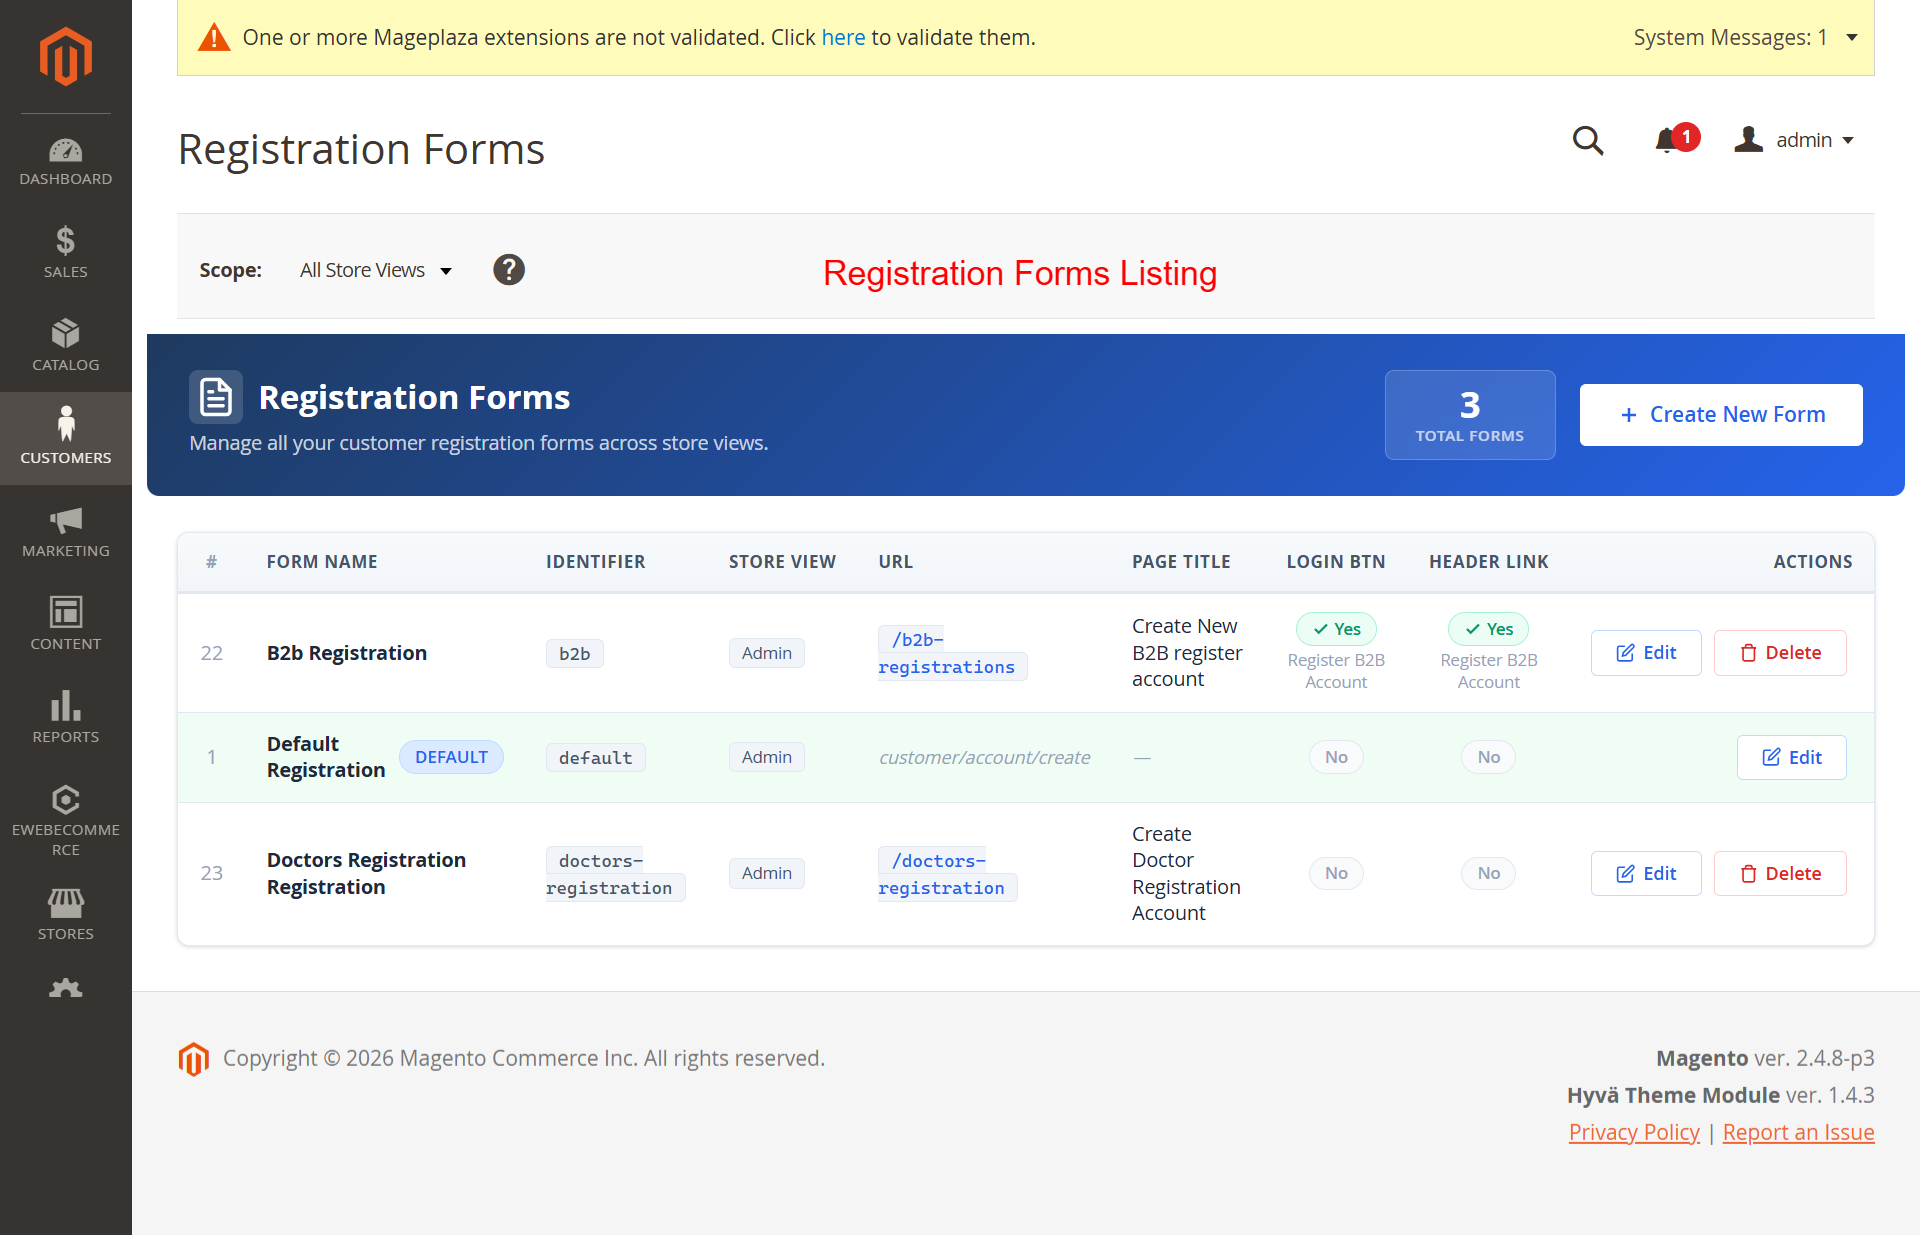
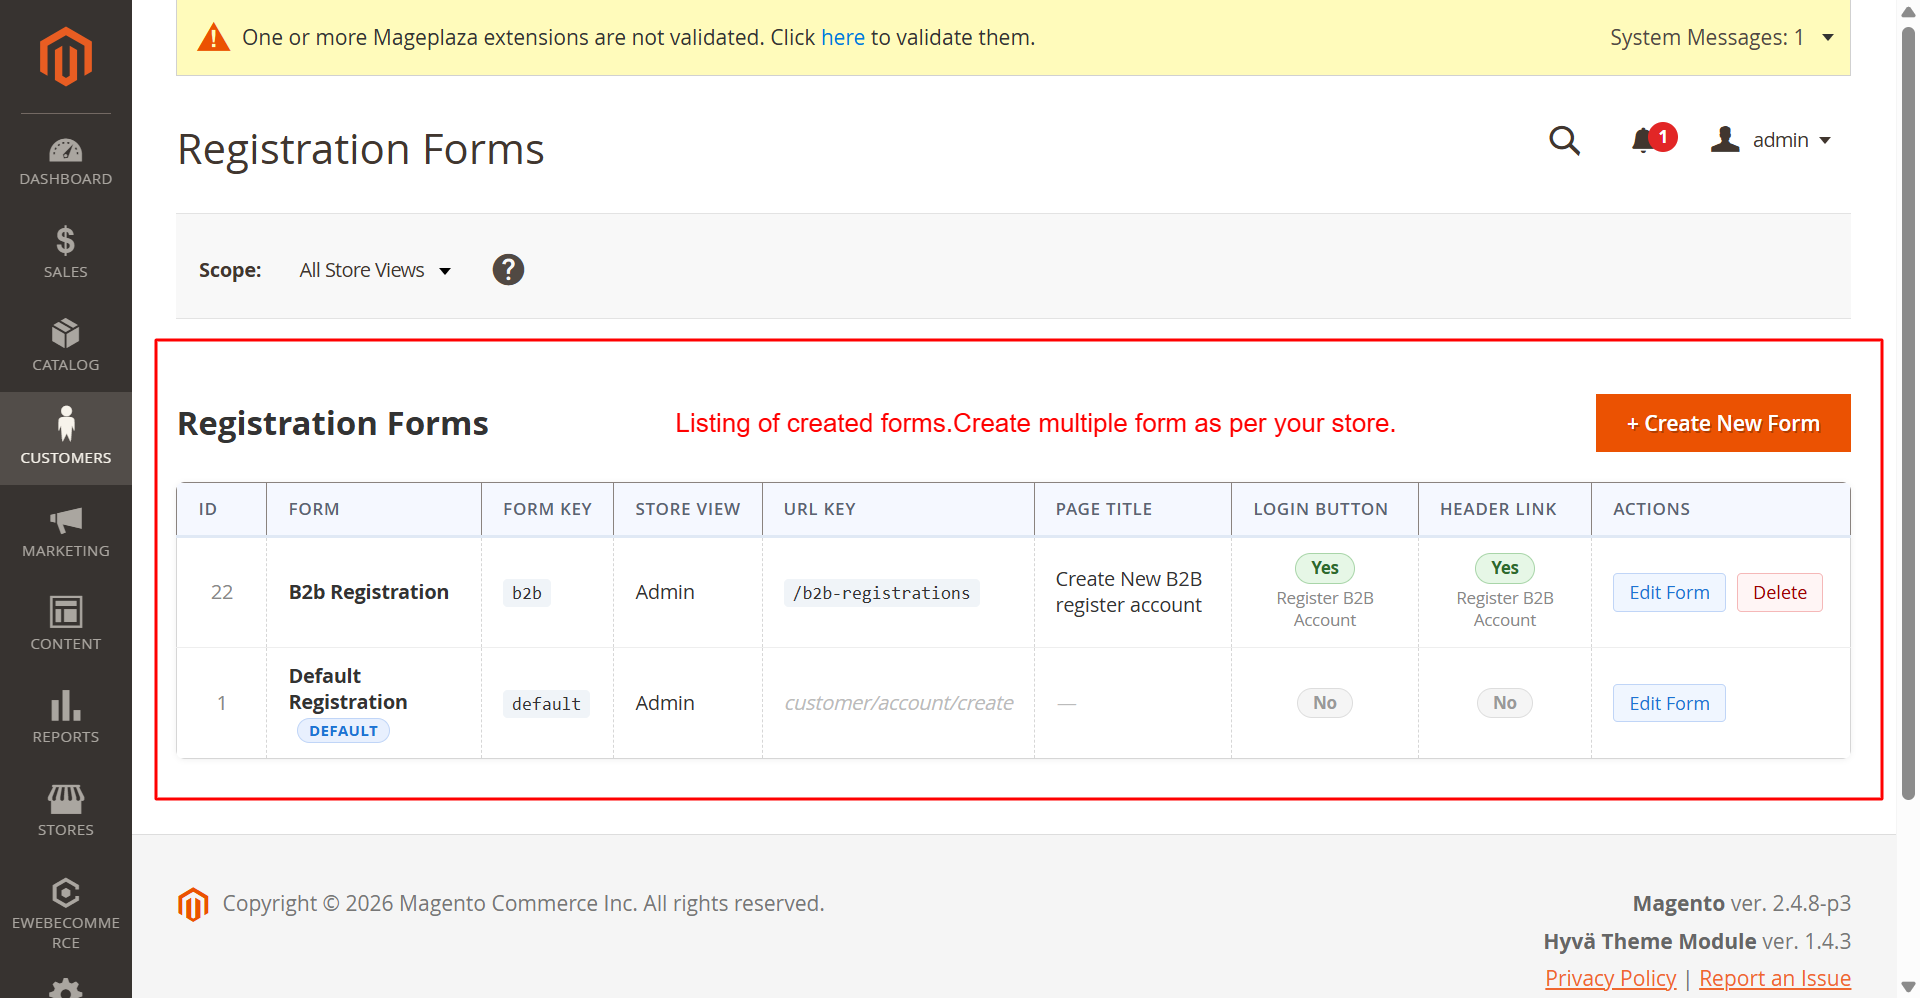
This screen provides an overview of all existing registration forms. Administrators can view key details for each form and quickly access actions to edit or delete forms. The ability to manage forms from a single interface streamlines the process of maintaining and customizing registration flows for different store views.
2 Features
Create unlimited registration forms
Visual drag-and-drop builder
AI-driven form generation
Custom field types and validation
Form-specific SEO optimization
Multi-store view support
Secure with captcha options
Pending status for new registrations
Role-based permissions
Supports OpenAI, Anthropic, and Google AI
Streamlines form setup with AI prompts
Allows custom model and key configuration
Instantly generate forms based on descriptions
Customizes forms for diverse needs
Enhances faster rollout of registration forms
Improves efficiency in managing complex forms
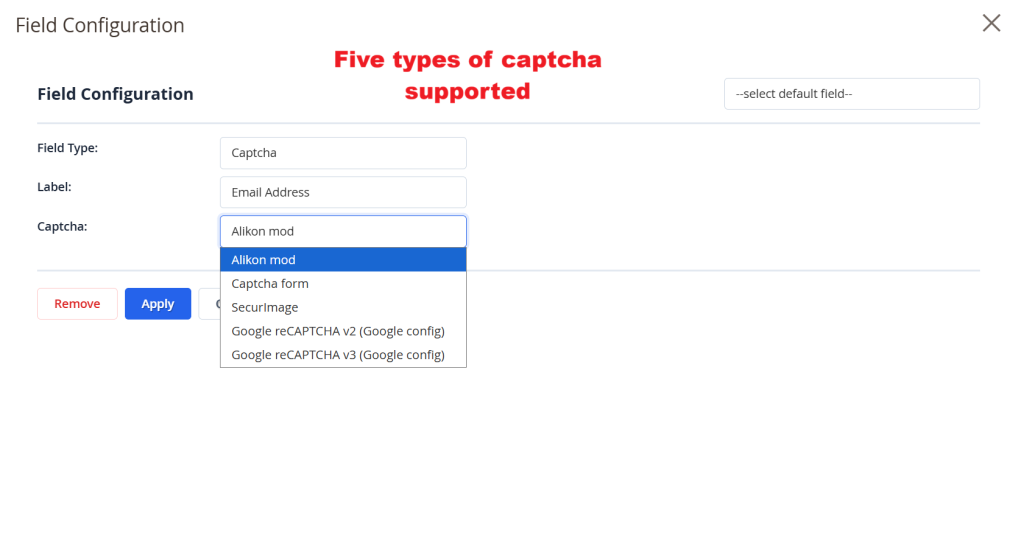
5 captcha options including reCAPTCHA v2/v3
Encrypted API key storage
Server-side verification
Email notifications for registration events
Pending registration for manual approval
Multi-layered notification settings
Custom email templates
Hyva theme full compatibility
Luma theme support
Automatic detection of theme settings
Consistent user experience across themes
Flexible design adapts to theme styles
Responsive form designs
Optimized for theme-specific navigation
Pending registration status defaults
Manual approval or declination of accounts
Automatic email notifications for status changes
Manage customer status directly in admin panel
Detailed control over customer access levels
Seamless handling of customer progress
Form Management
Effortlessly manage and customize registration forms.
- Create unlimited registration forms
- Visual drag-and-drop builder
- AI-driven form generation
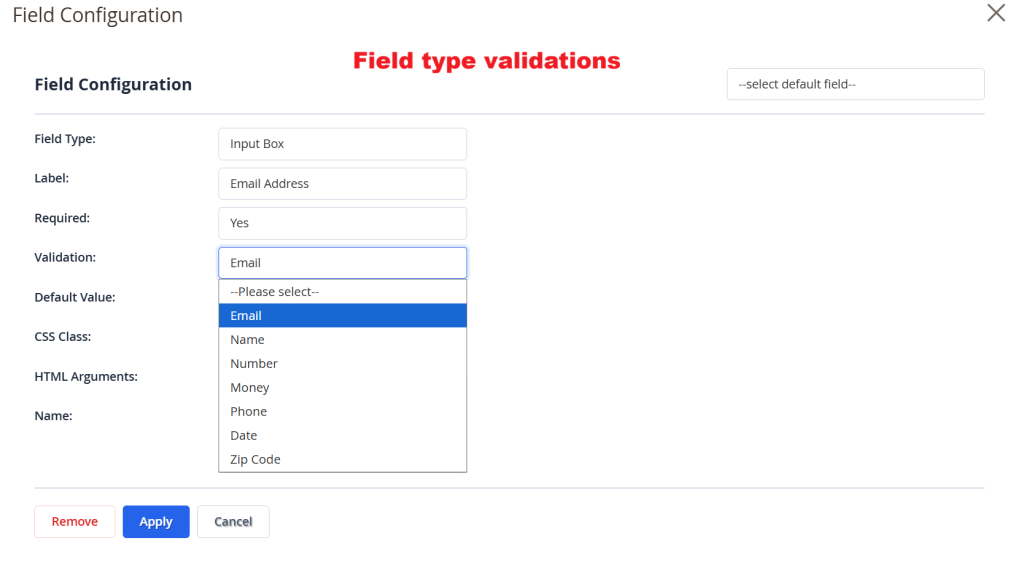
- Custom field types and validation
- Form-specific SEO optimization
- Multi-store view support
- Secure with captcha options
- Pending status for new registrations
- Role-based permissions
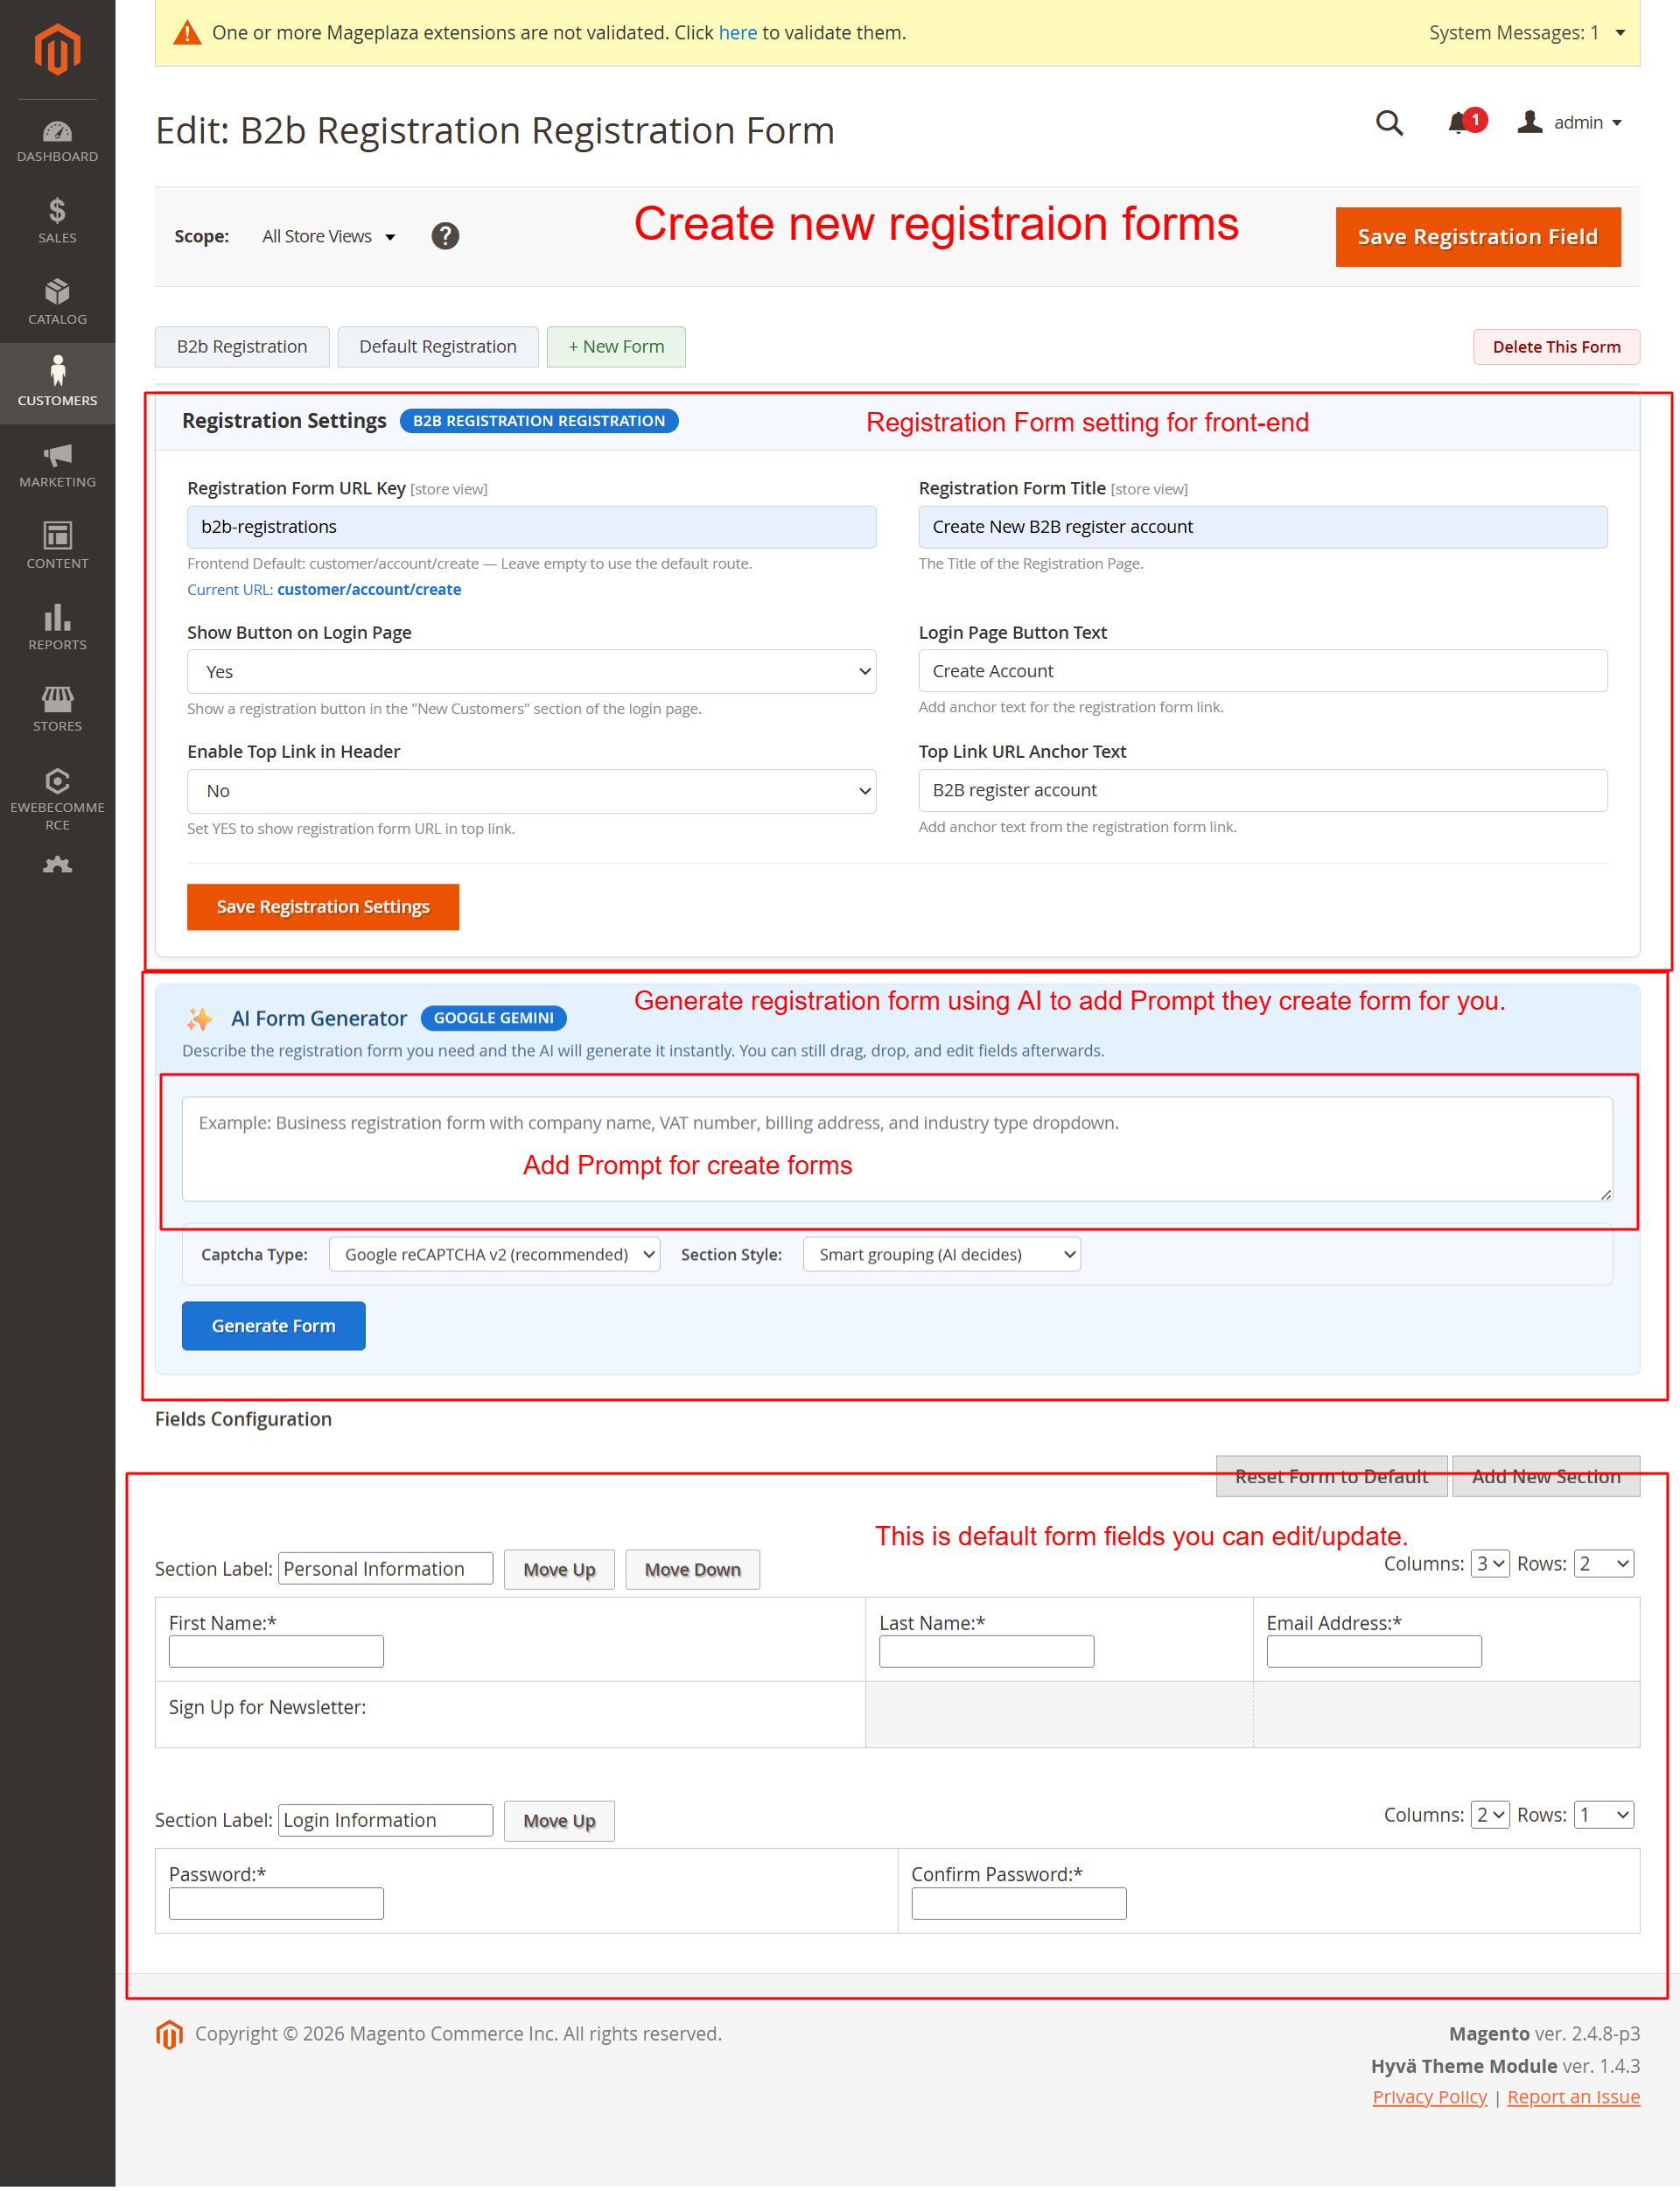
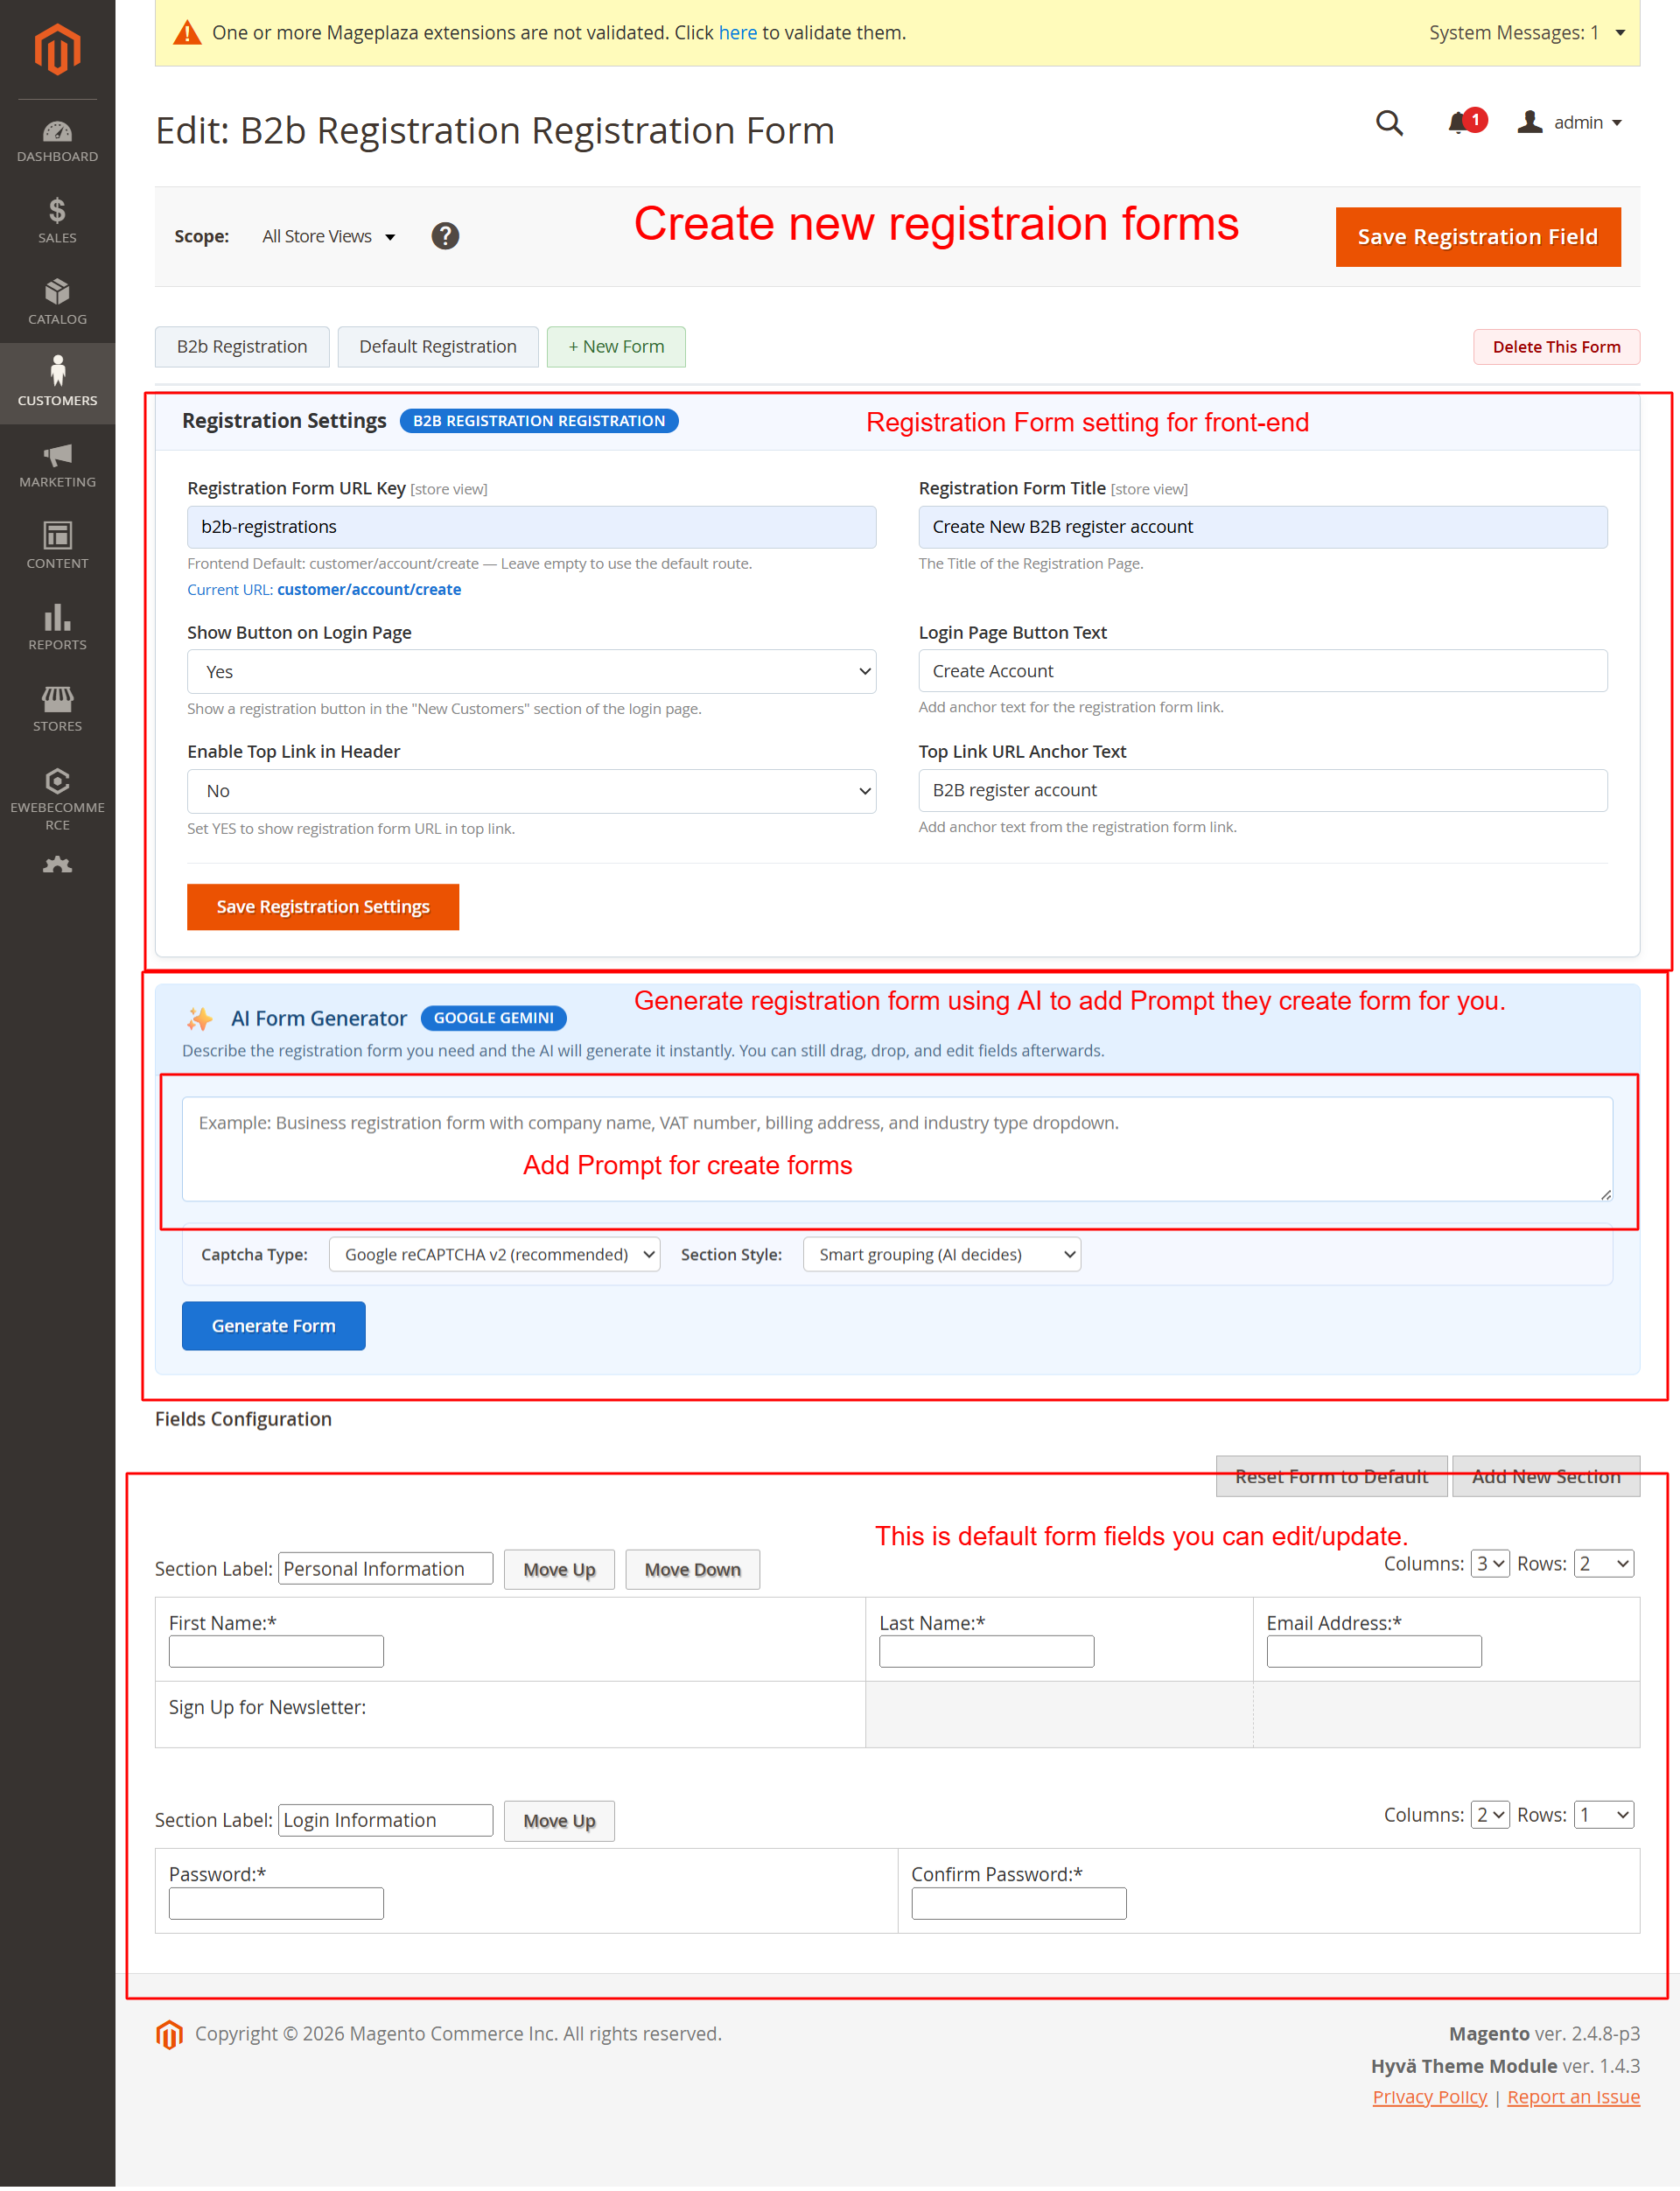
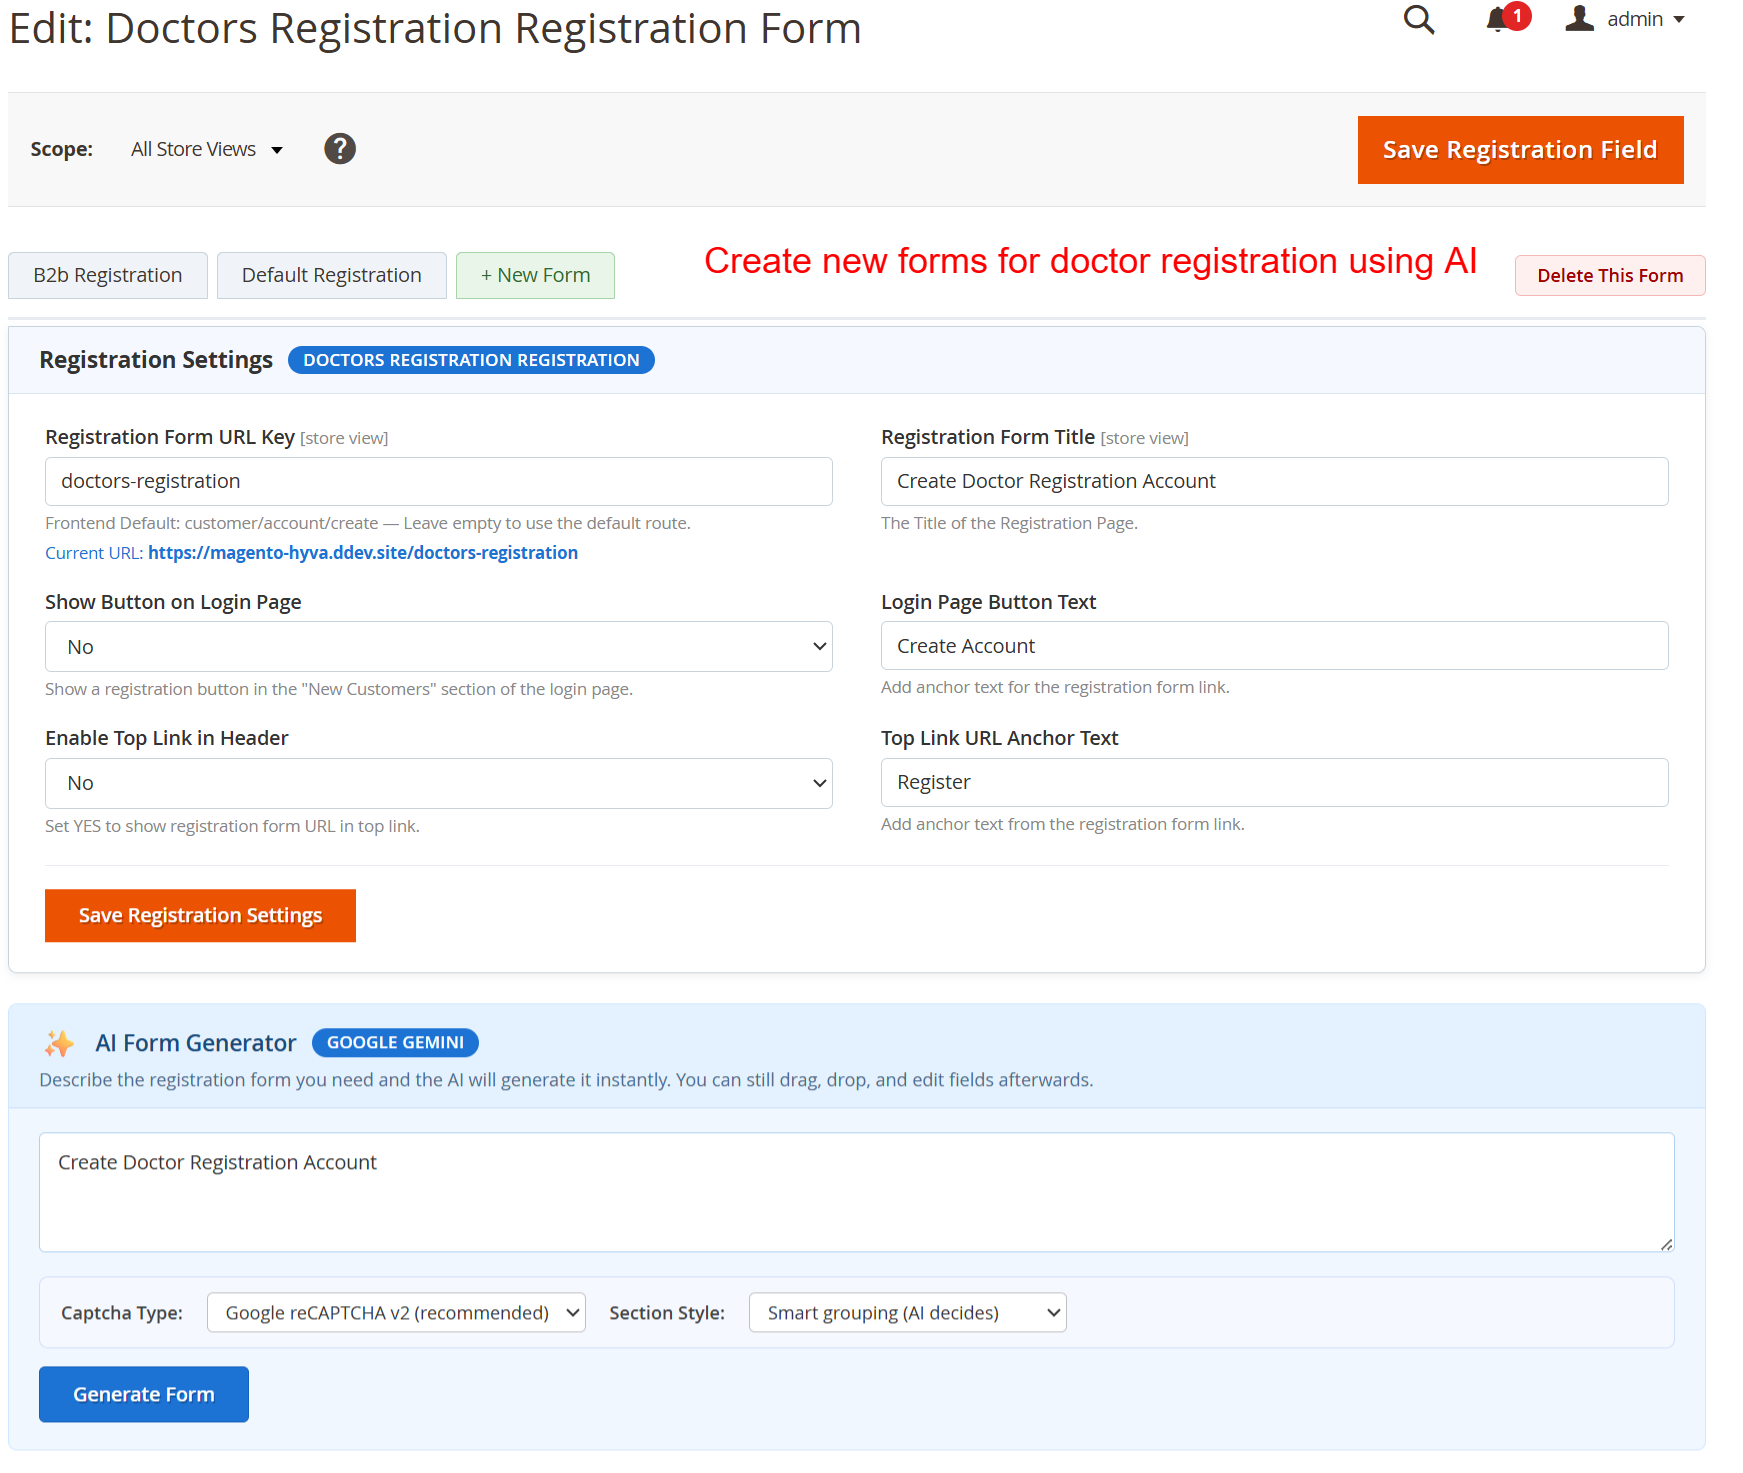
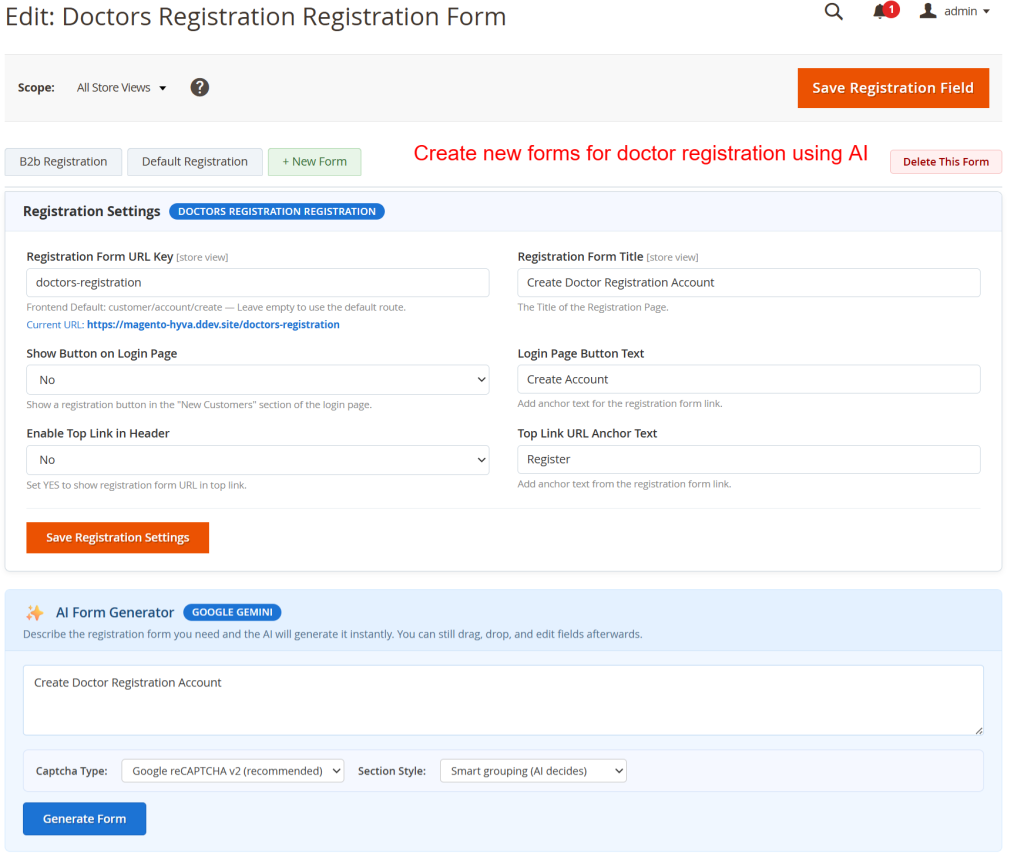
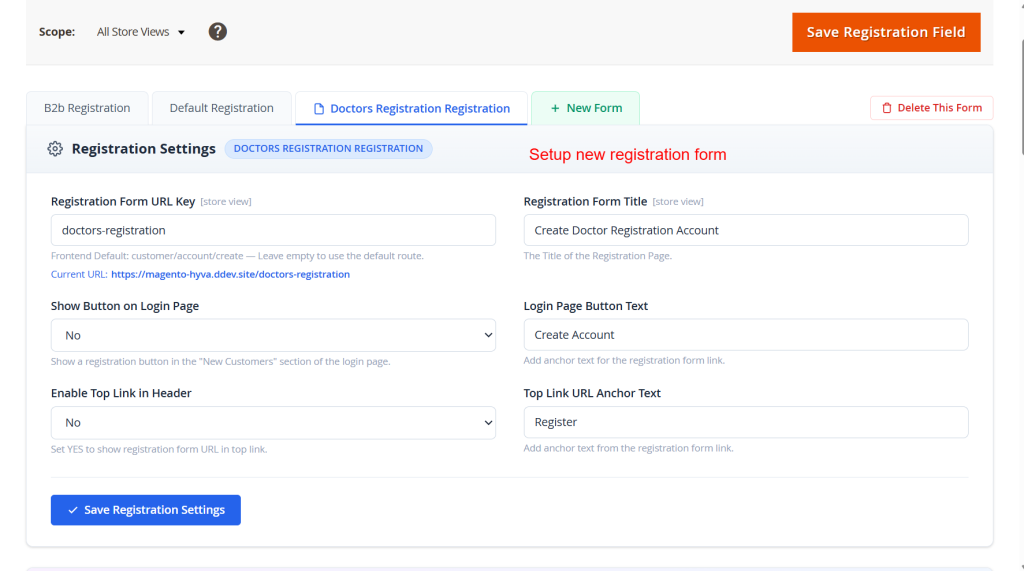
On this screen, administrators customize specific aspects of the B2B registration form, such as URL and title. AI tools can be leveraged to generate forms based on prompts, allowing for efficient creation and customization. This flexibility is crucial for optimizing user registration experiences tailored to business needs.
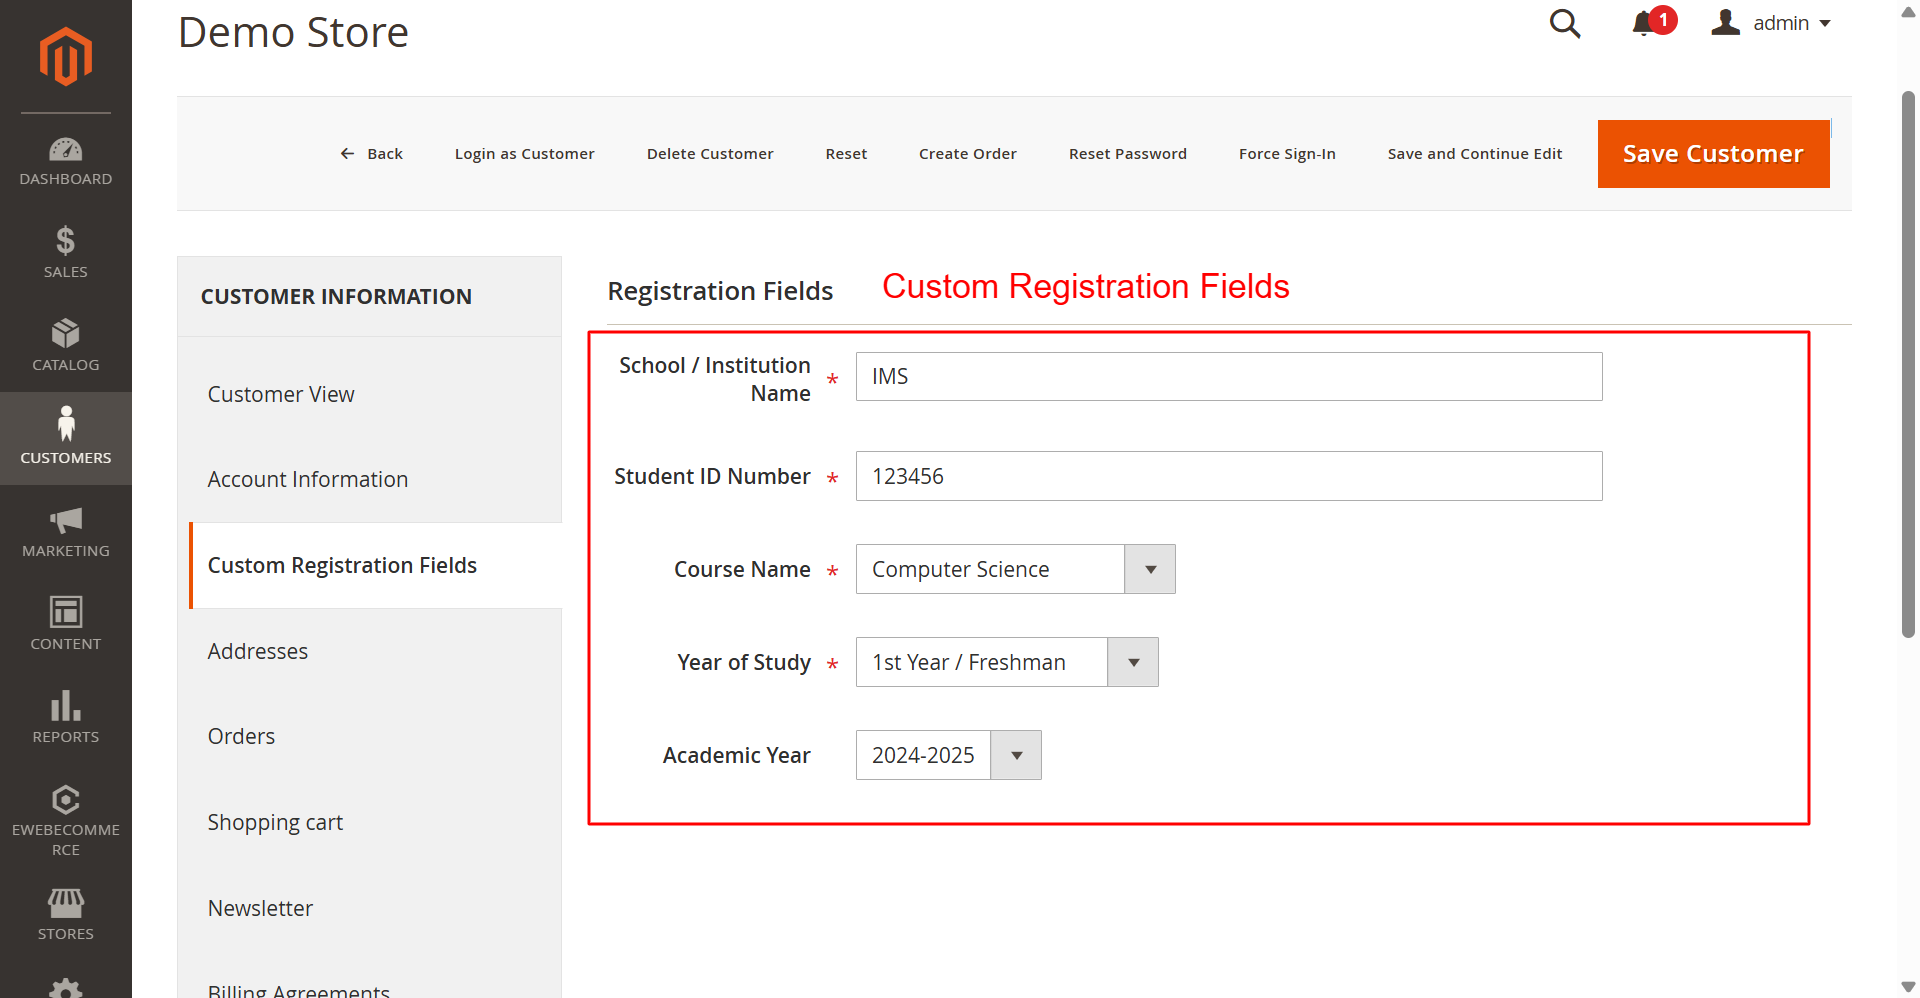
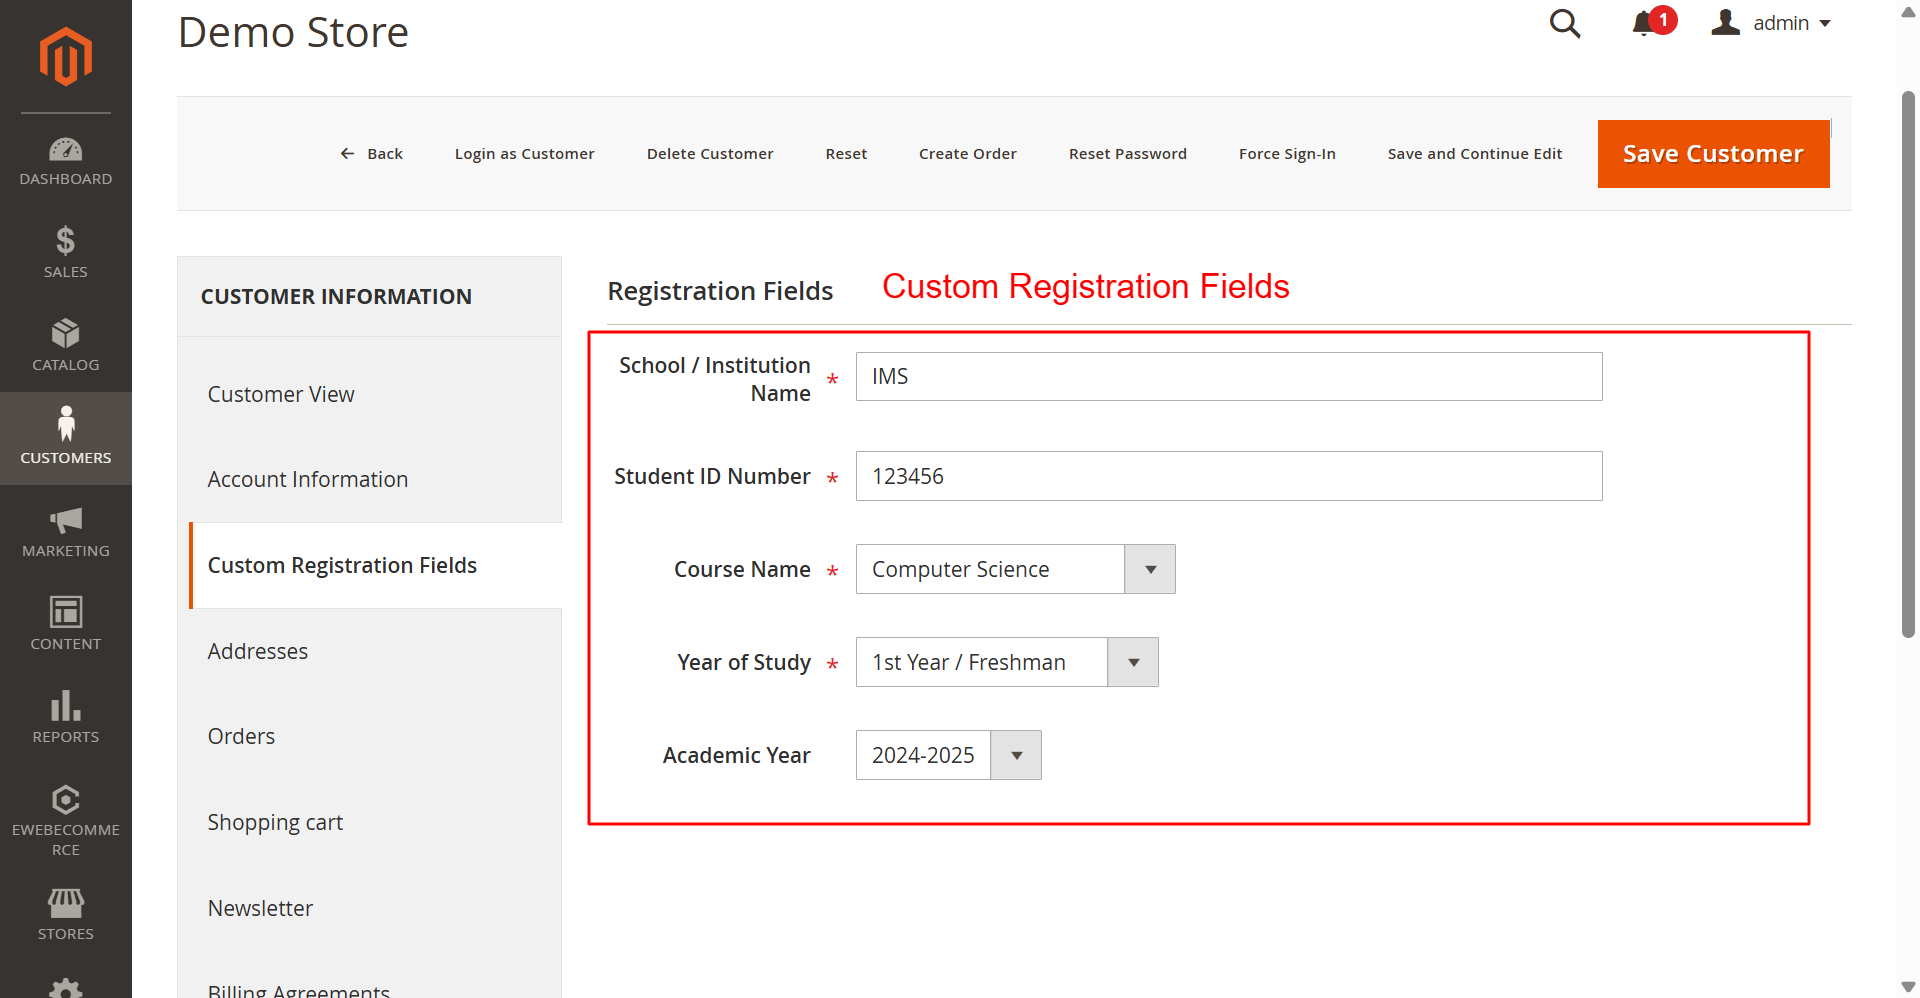
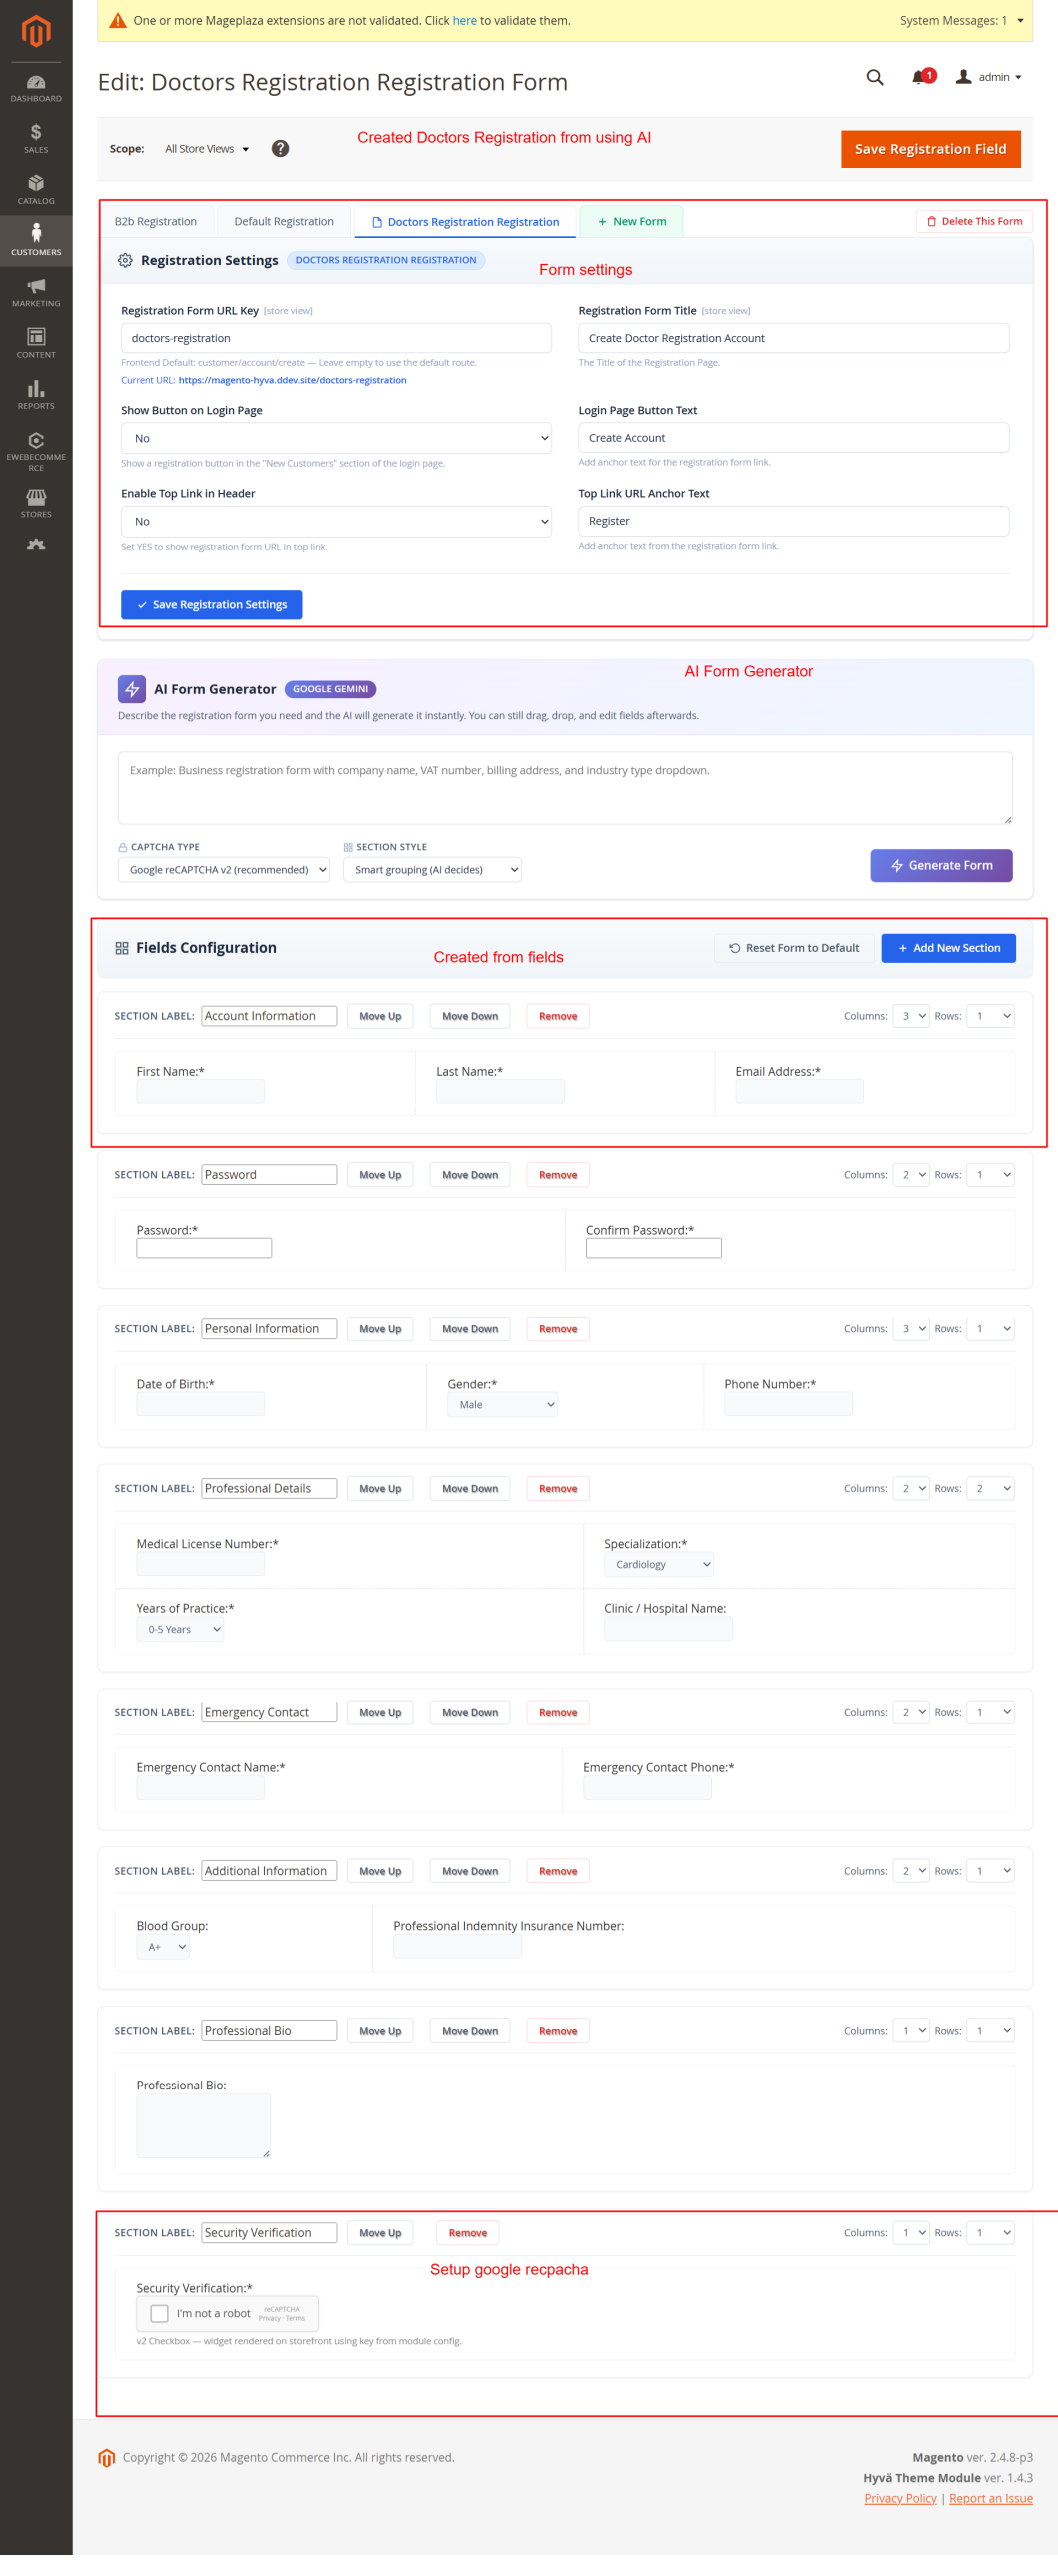
Administrators create tailored registration fields to gather specific customer information. This customization is essential for businesses requiring detailed user data for account creation, allowing flexibility and precise user profiling.
AI Form Generation
Harness AI technology to streamline form creation.
- Supports OpenAI, Anthropic, and Google AI
- Streamlines form setup with AI prompts
- Allows custom model and key configuration
- Instantly generate forms based on descriptions
- Customizes forms for diverse needs
- Enhances faster rollout of registration forms
- Improves efficiency in managing complex forms
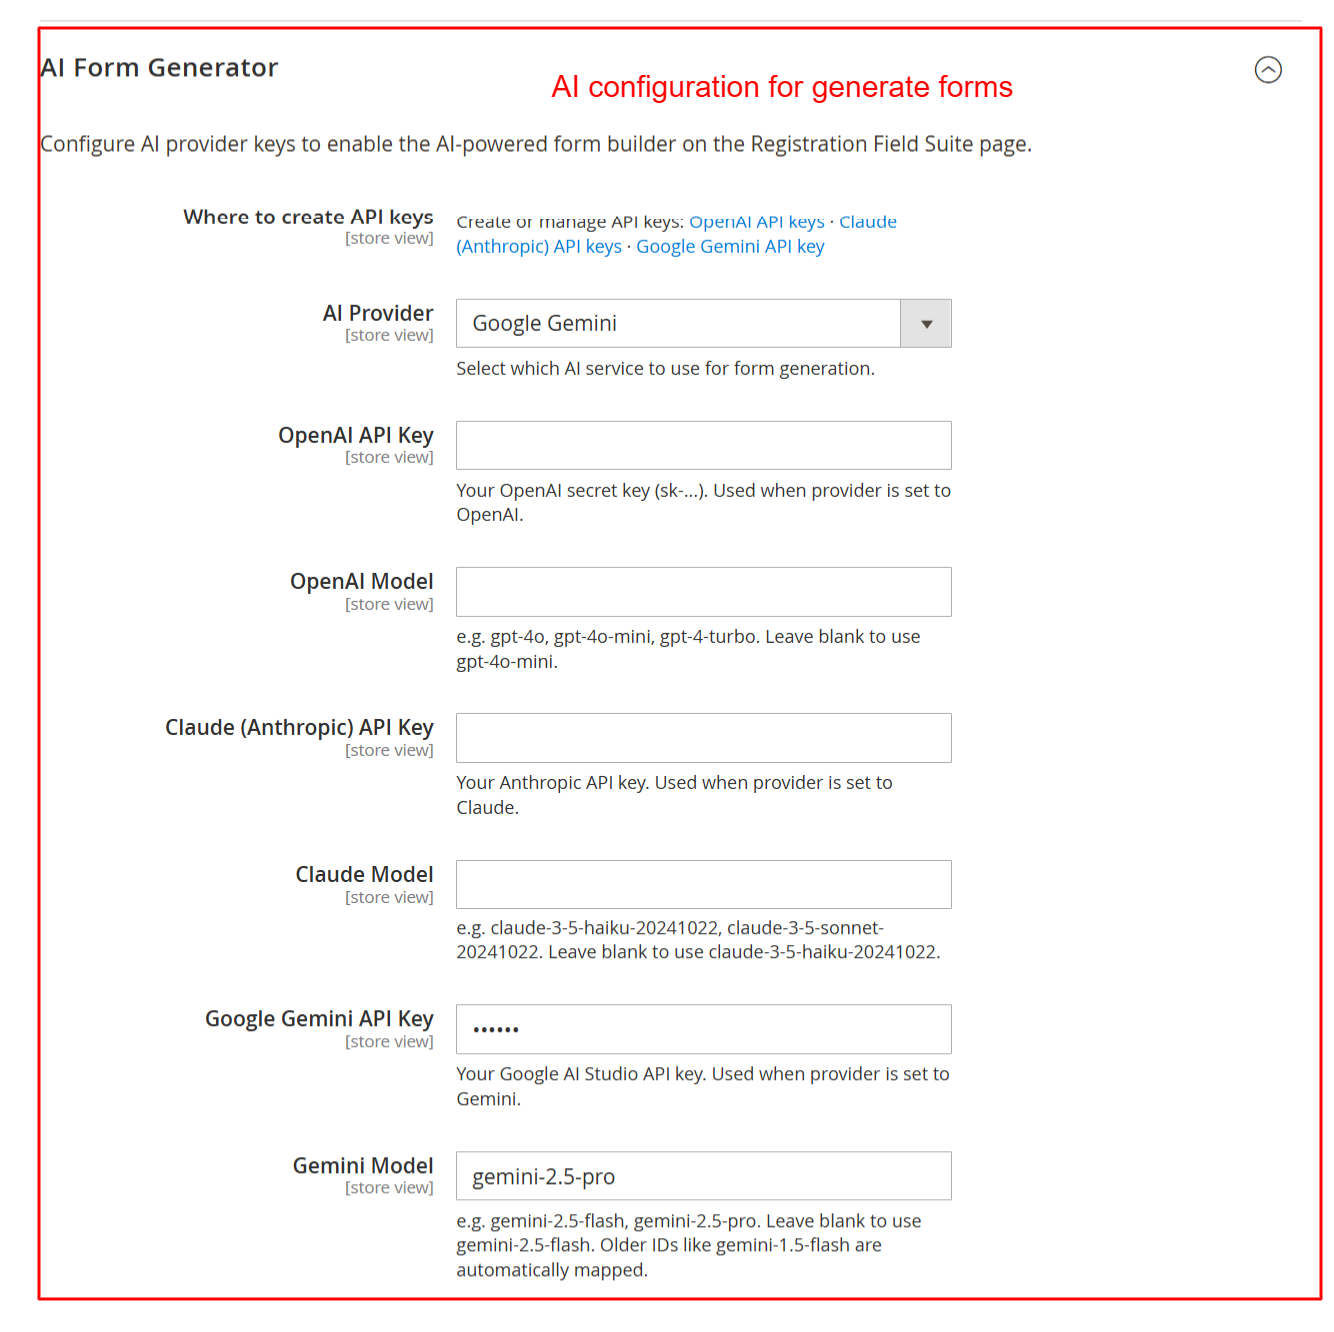
Configure API keys for various AI providers here to leverage AI-driven form generation features. Selecting the appropriate provider and model enables the dynamic generation of registration forms, which can adapt based on AI recommendations, facilitating efficient form setup.
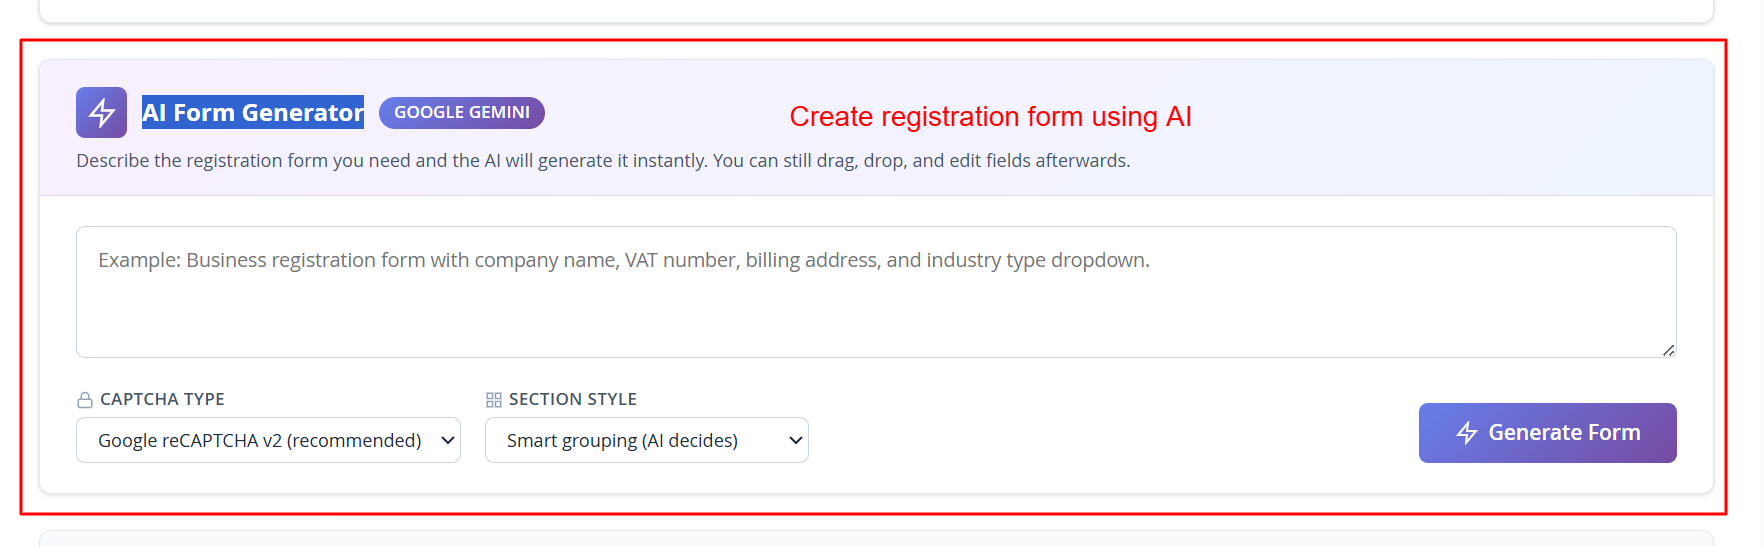
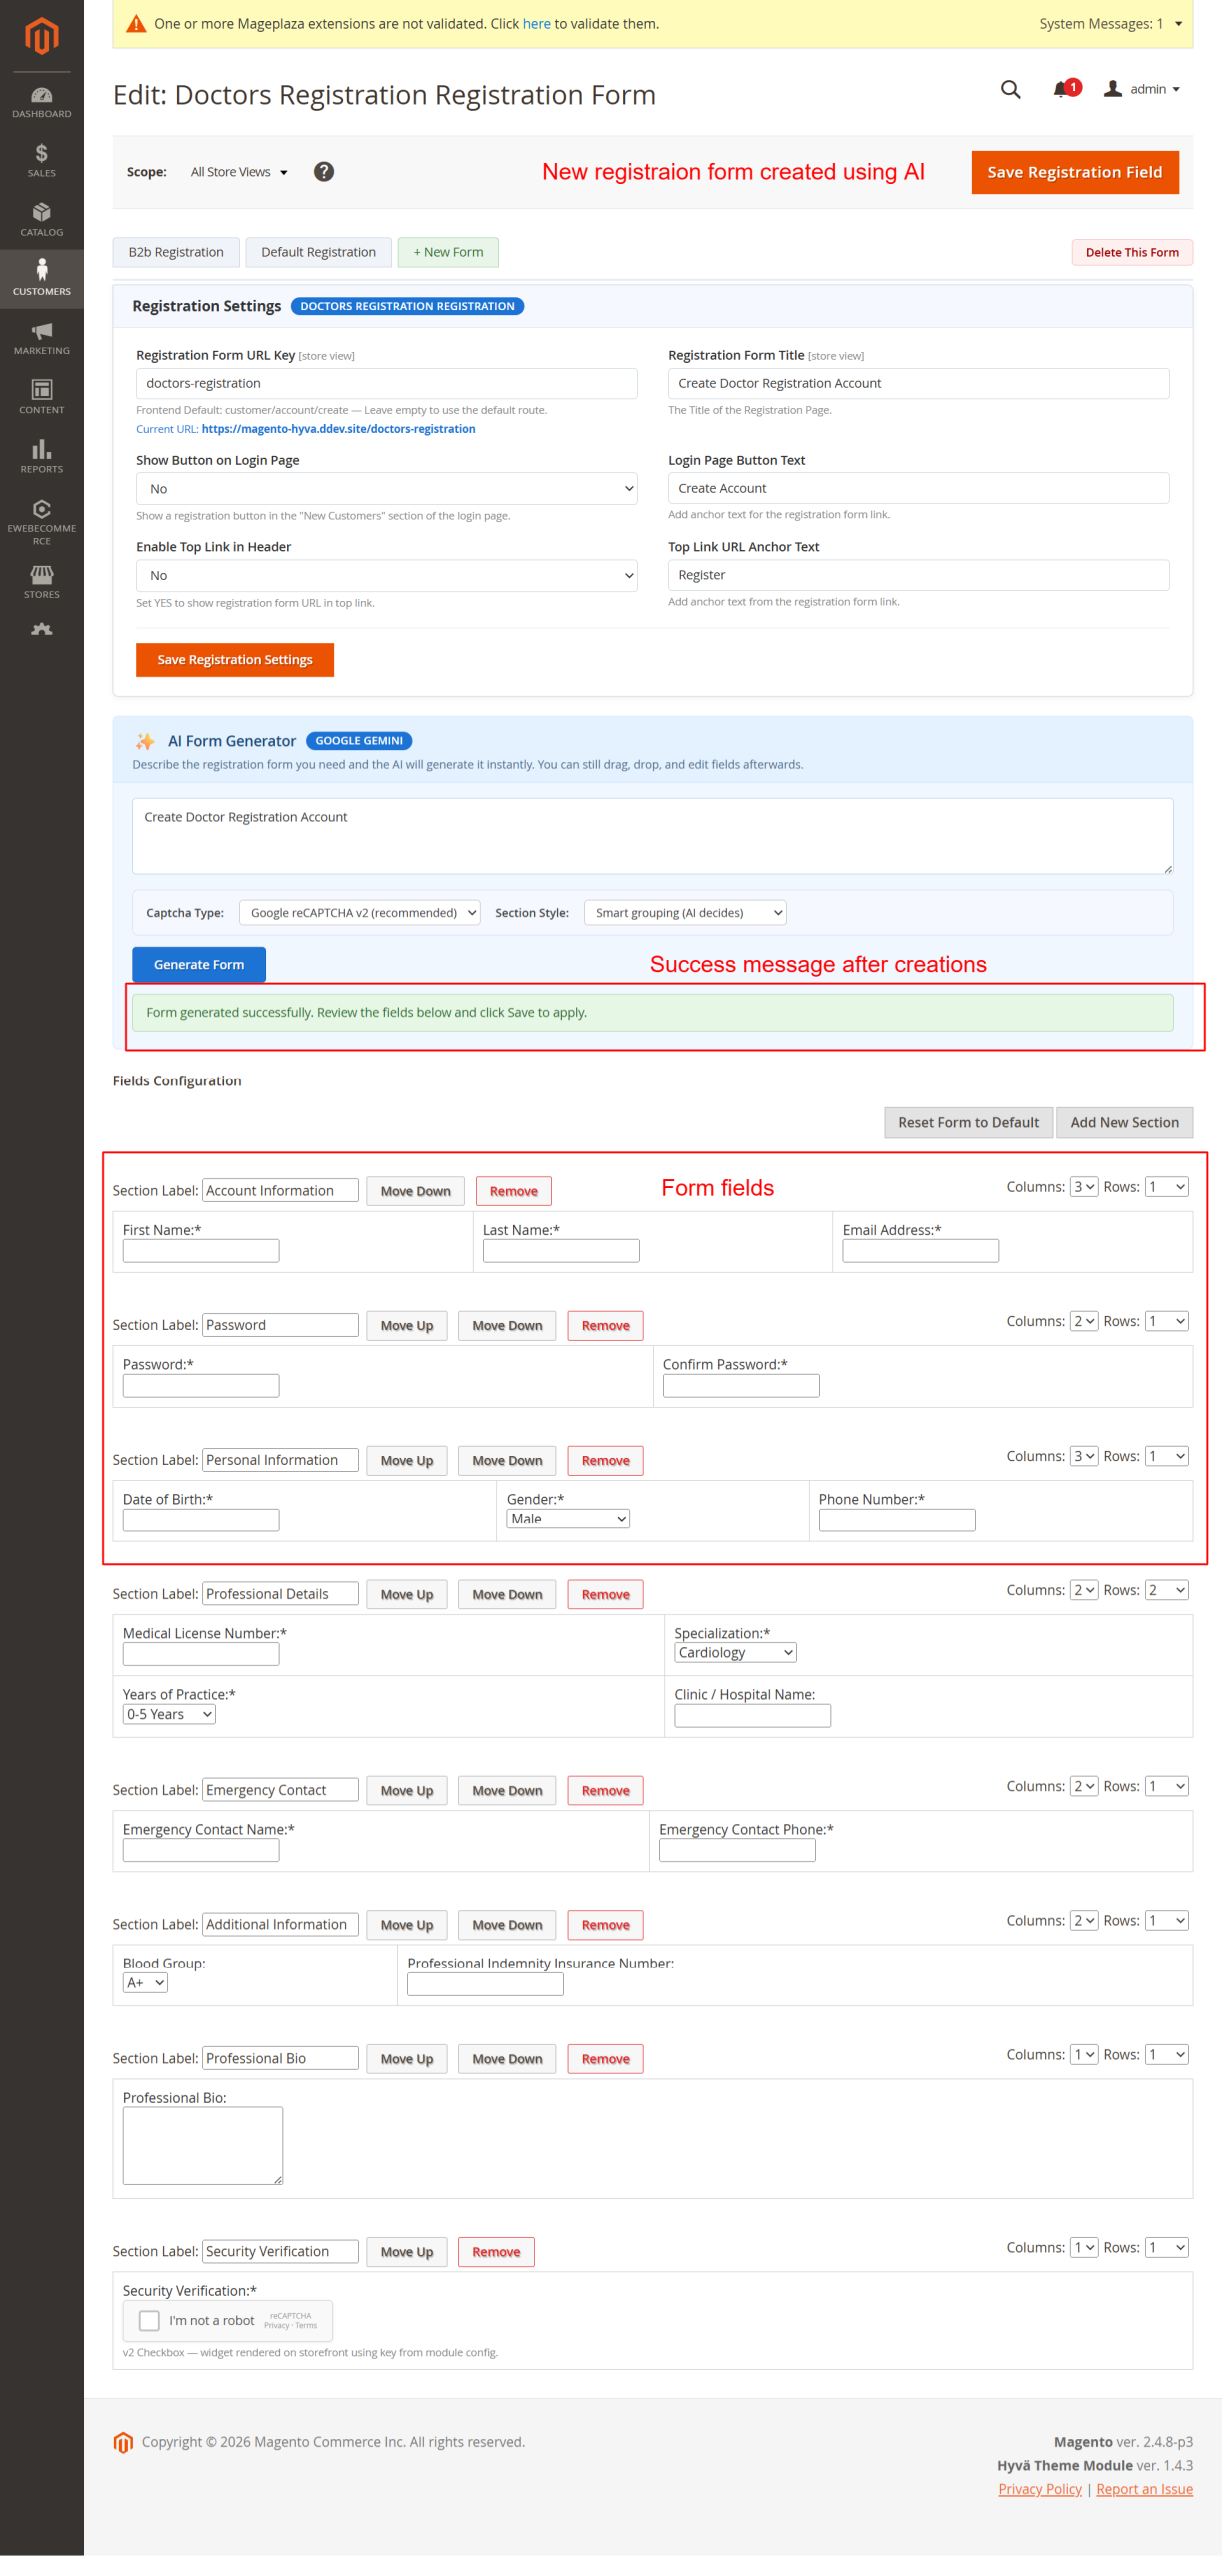
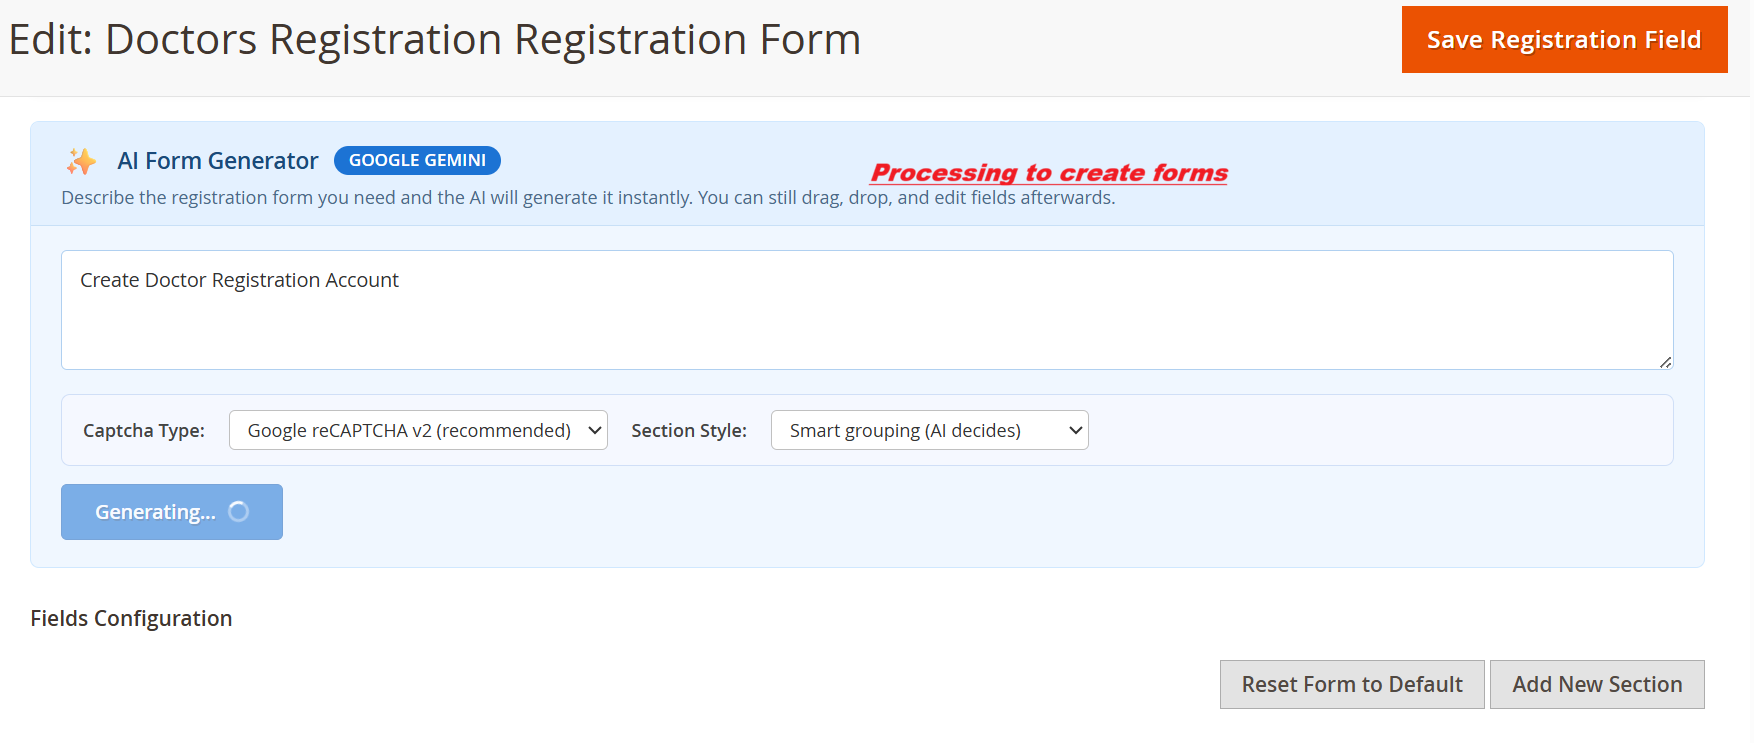
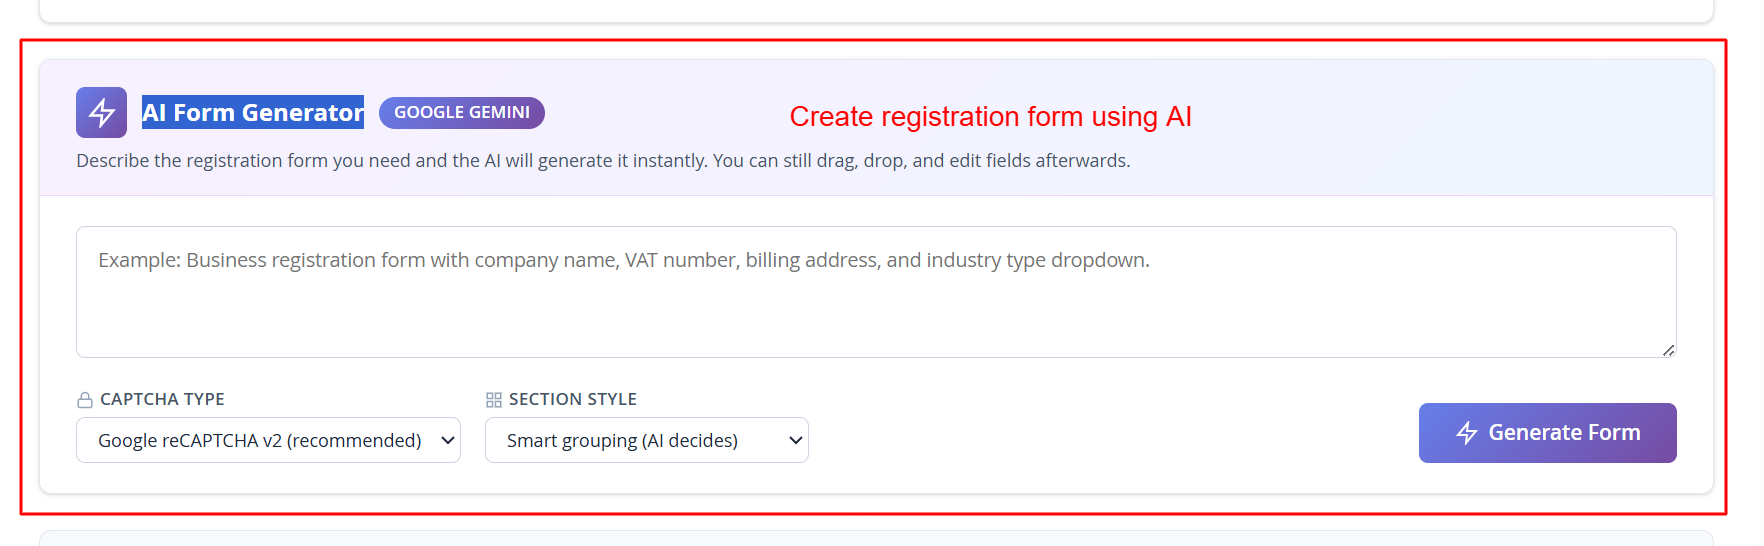
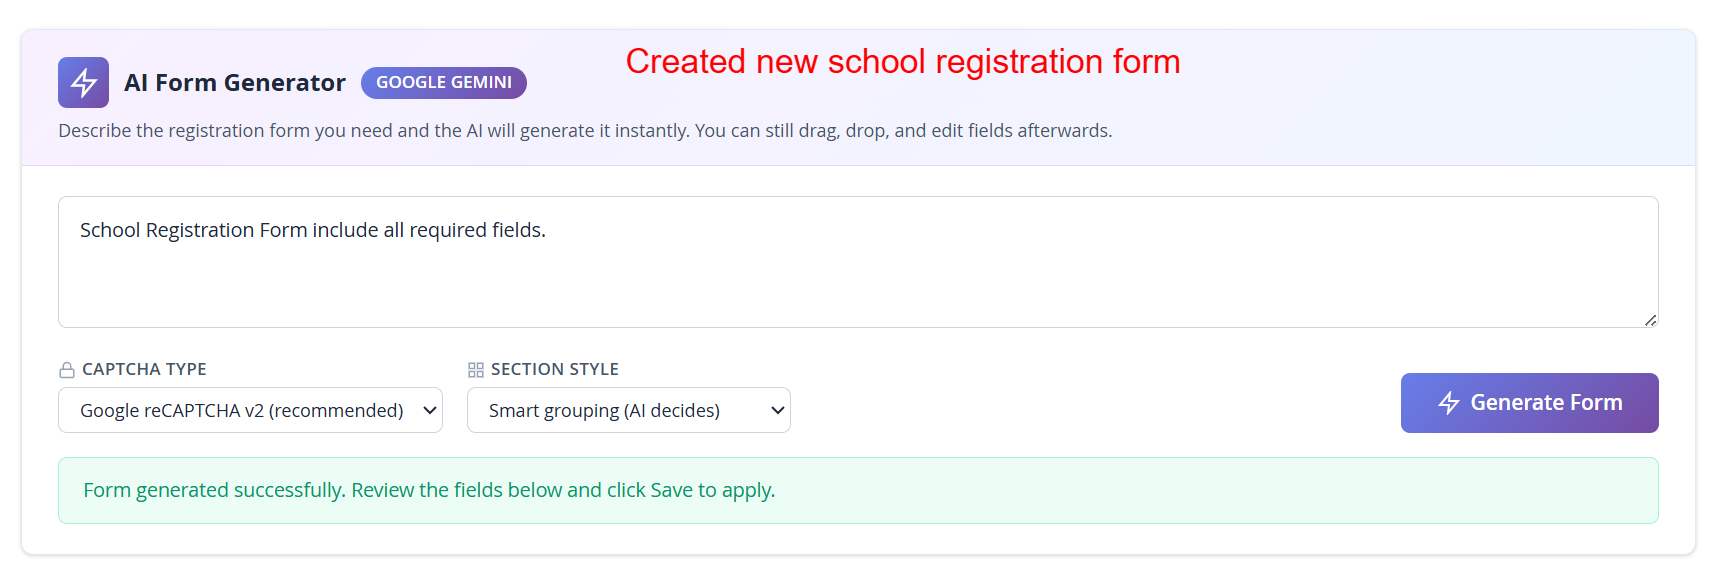
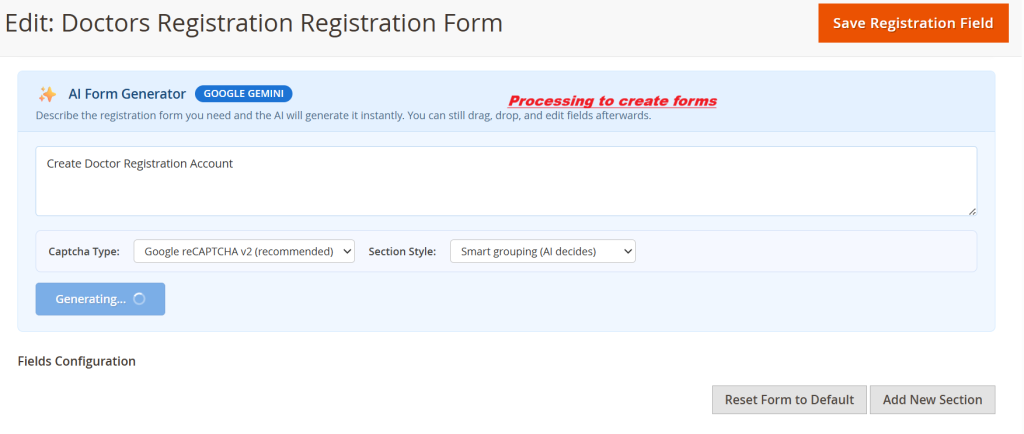
This interface empowers administrators to use AI to rapidly create registration forms by entering descriptive prompts. The AI generates forms matching the specified characteristics, which can be fine-tuned post-generation. This offers a significant efficiency boost, enabling quick rollout of diverse forms for varied registration needs.
Security Enhancements
Protect registration forms with robust security features.
- 5 captcha options including reCAPTCHA v2/v3
- Encrypted API key storage
- Server-side verification
- Email notifications for registration events
- Pending registration for manual approval
- Multi-layered notification settings
- Custom email templates
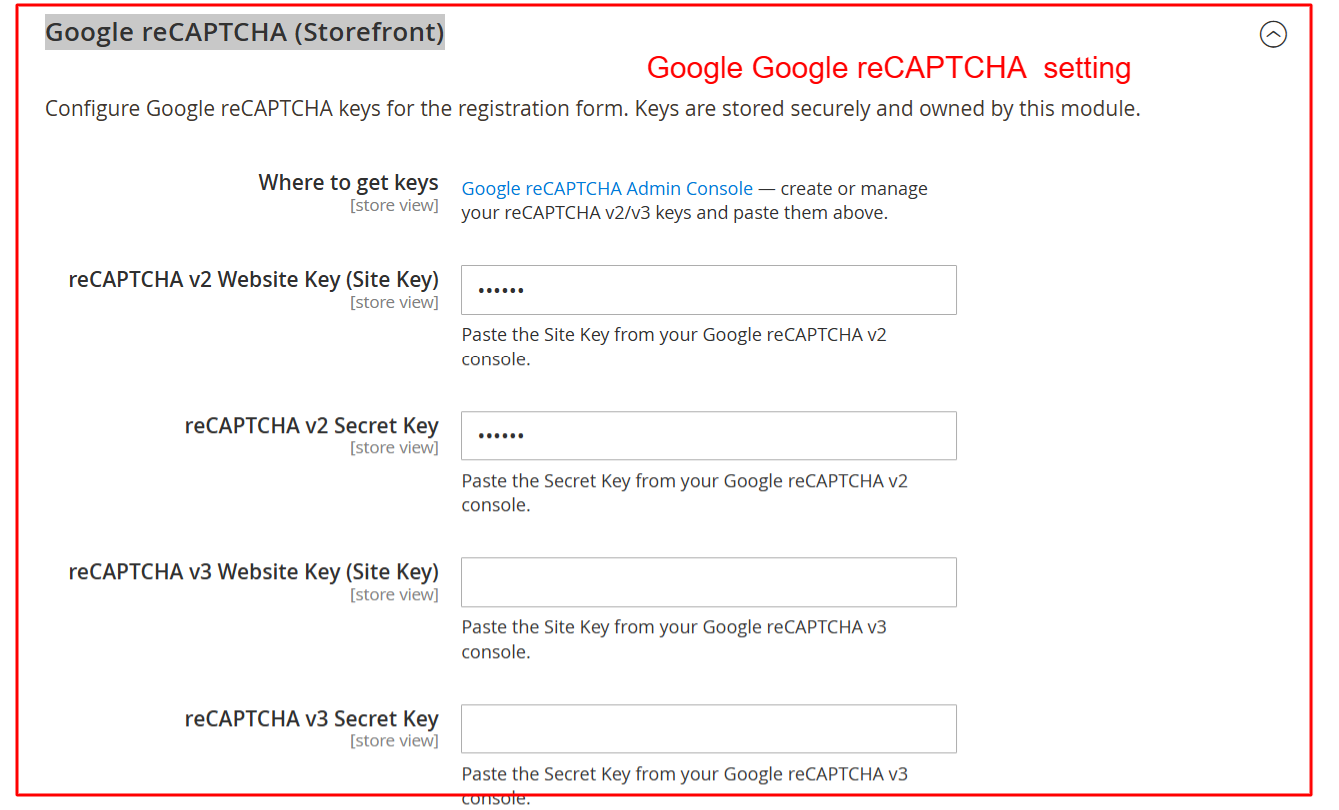
This configuration section allows you to enhance security by adding Google reCAPTCHA to the registration forms. By entering the necessary site and secret keys, you can protect your registration page from automated submissions, ensuring only legitimate user registrations.
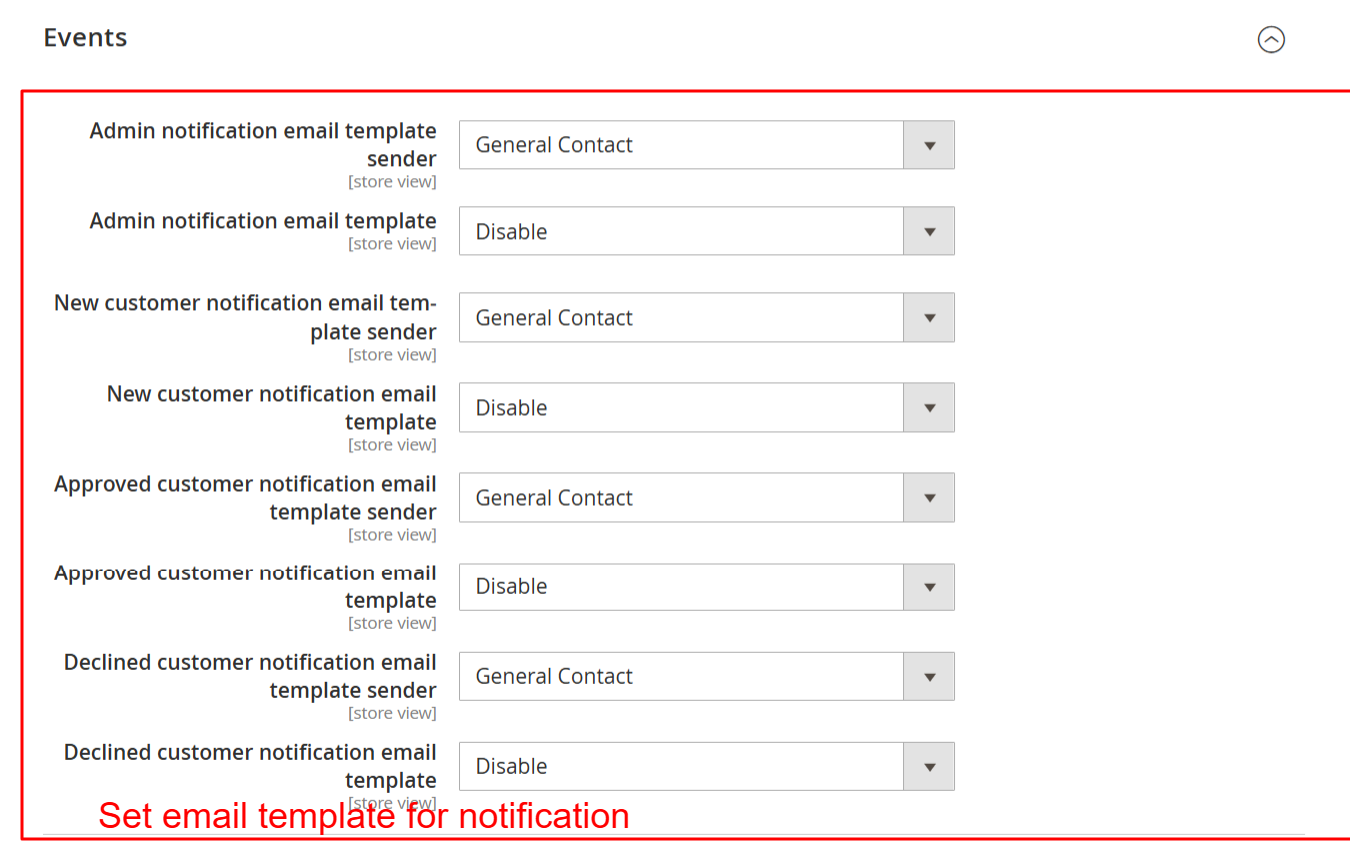
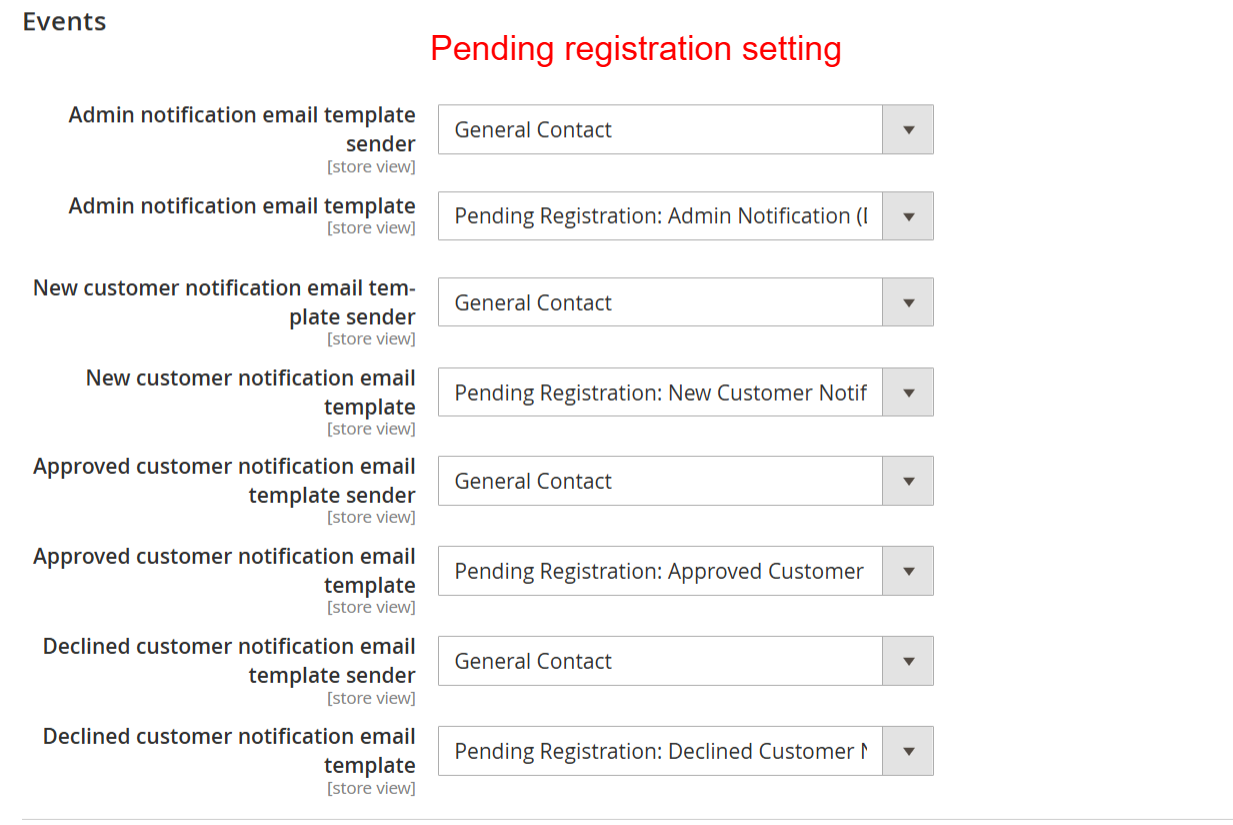
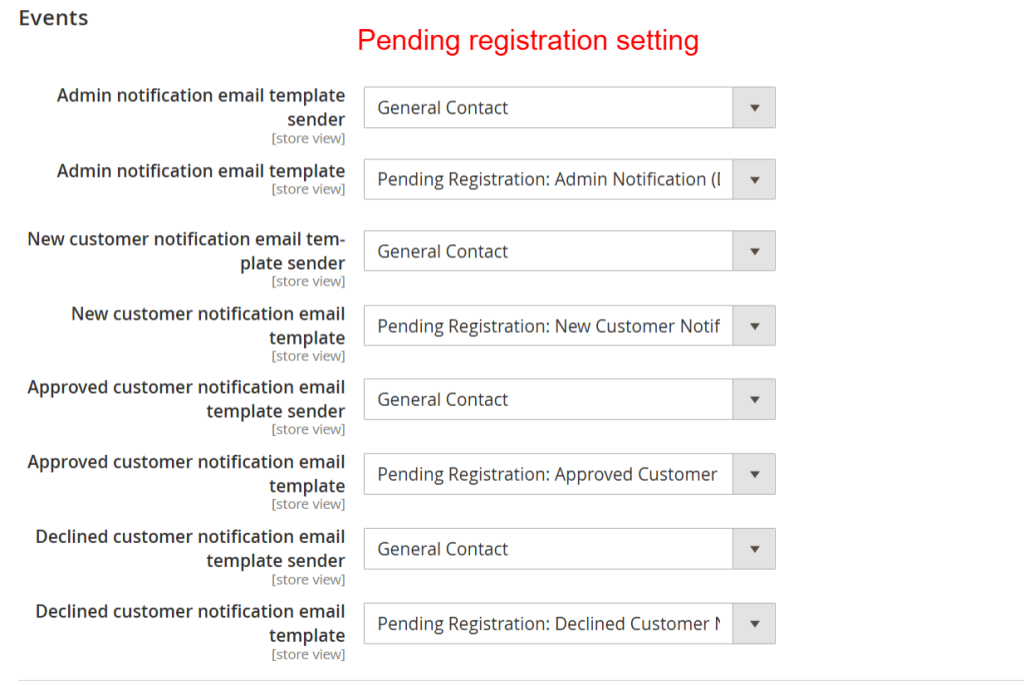
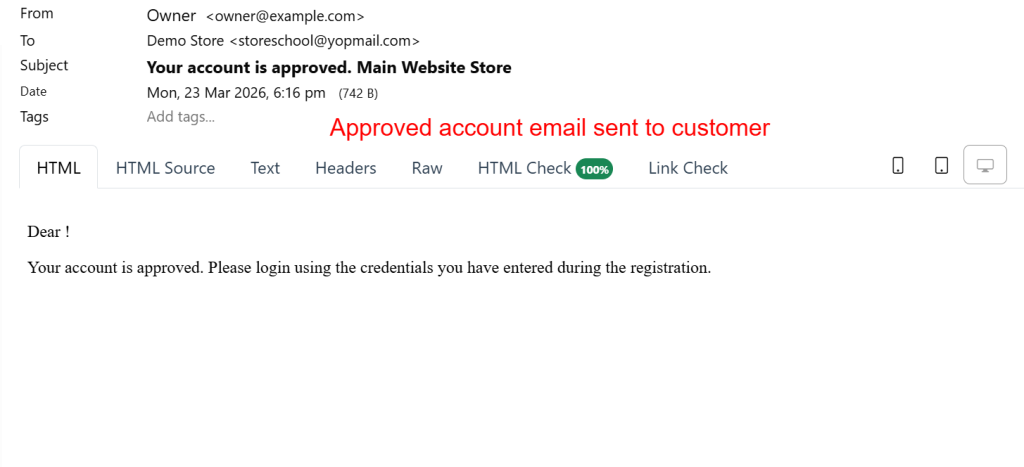
Setup automated email notifications for registration events by configuring templates and senders here. This ensures timely communication with both admins and customers regarding registration status updates, helping maintain clear and efficient communication channels.
Theme Compatibility
Seamlessly integrate with popular Magento themes.
- Hyva theme full compatibility
- Luma theme support
- Automatic detection of theme settings
- Consistent user experience across themes
- Flexible design adapts to theme styles
- Responsive form designs
- Optimized for theme-specific navigation
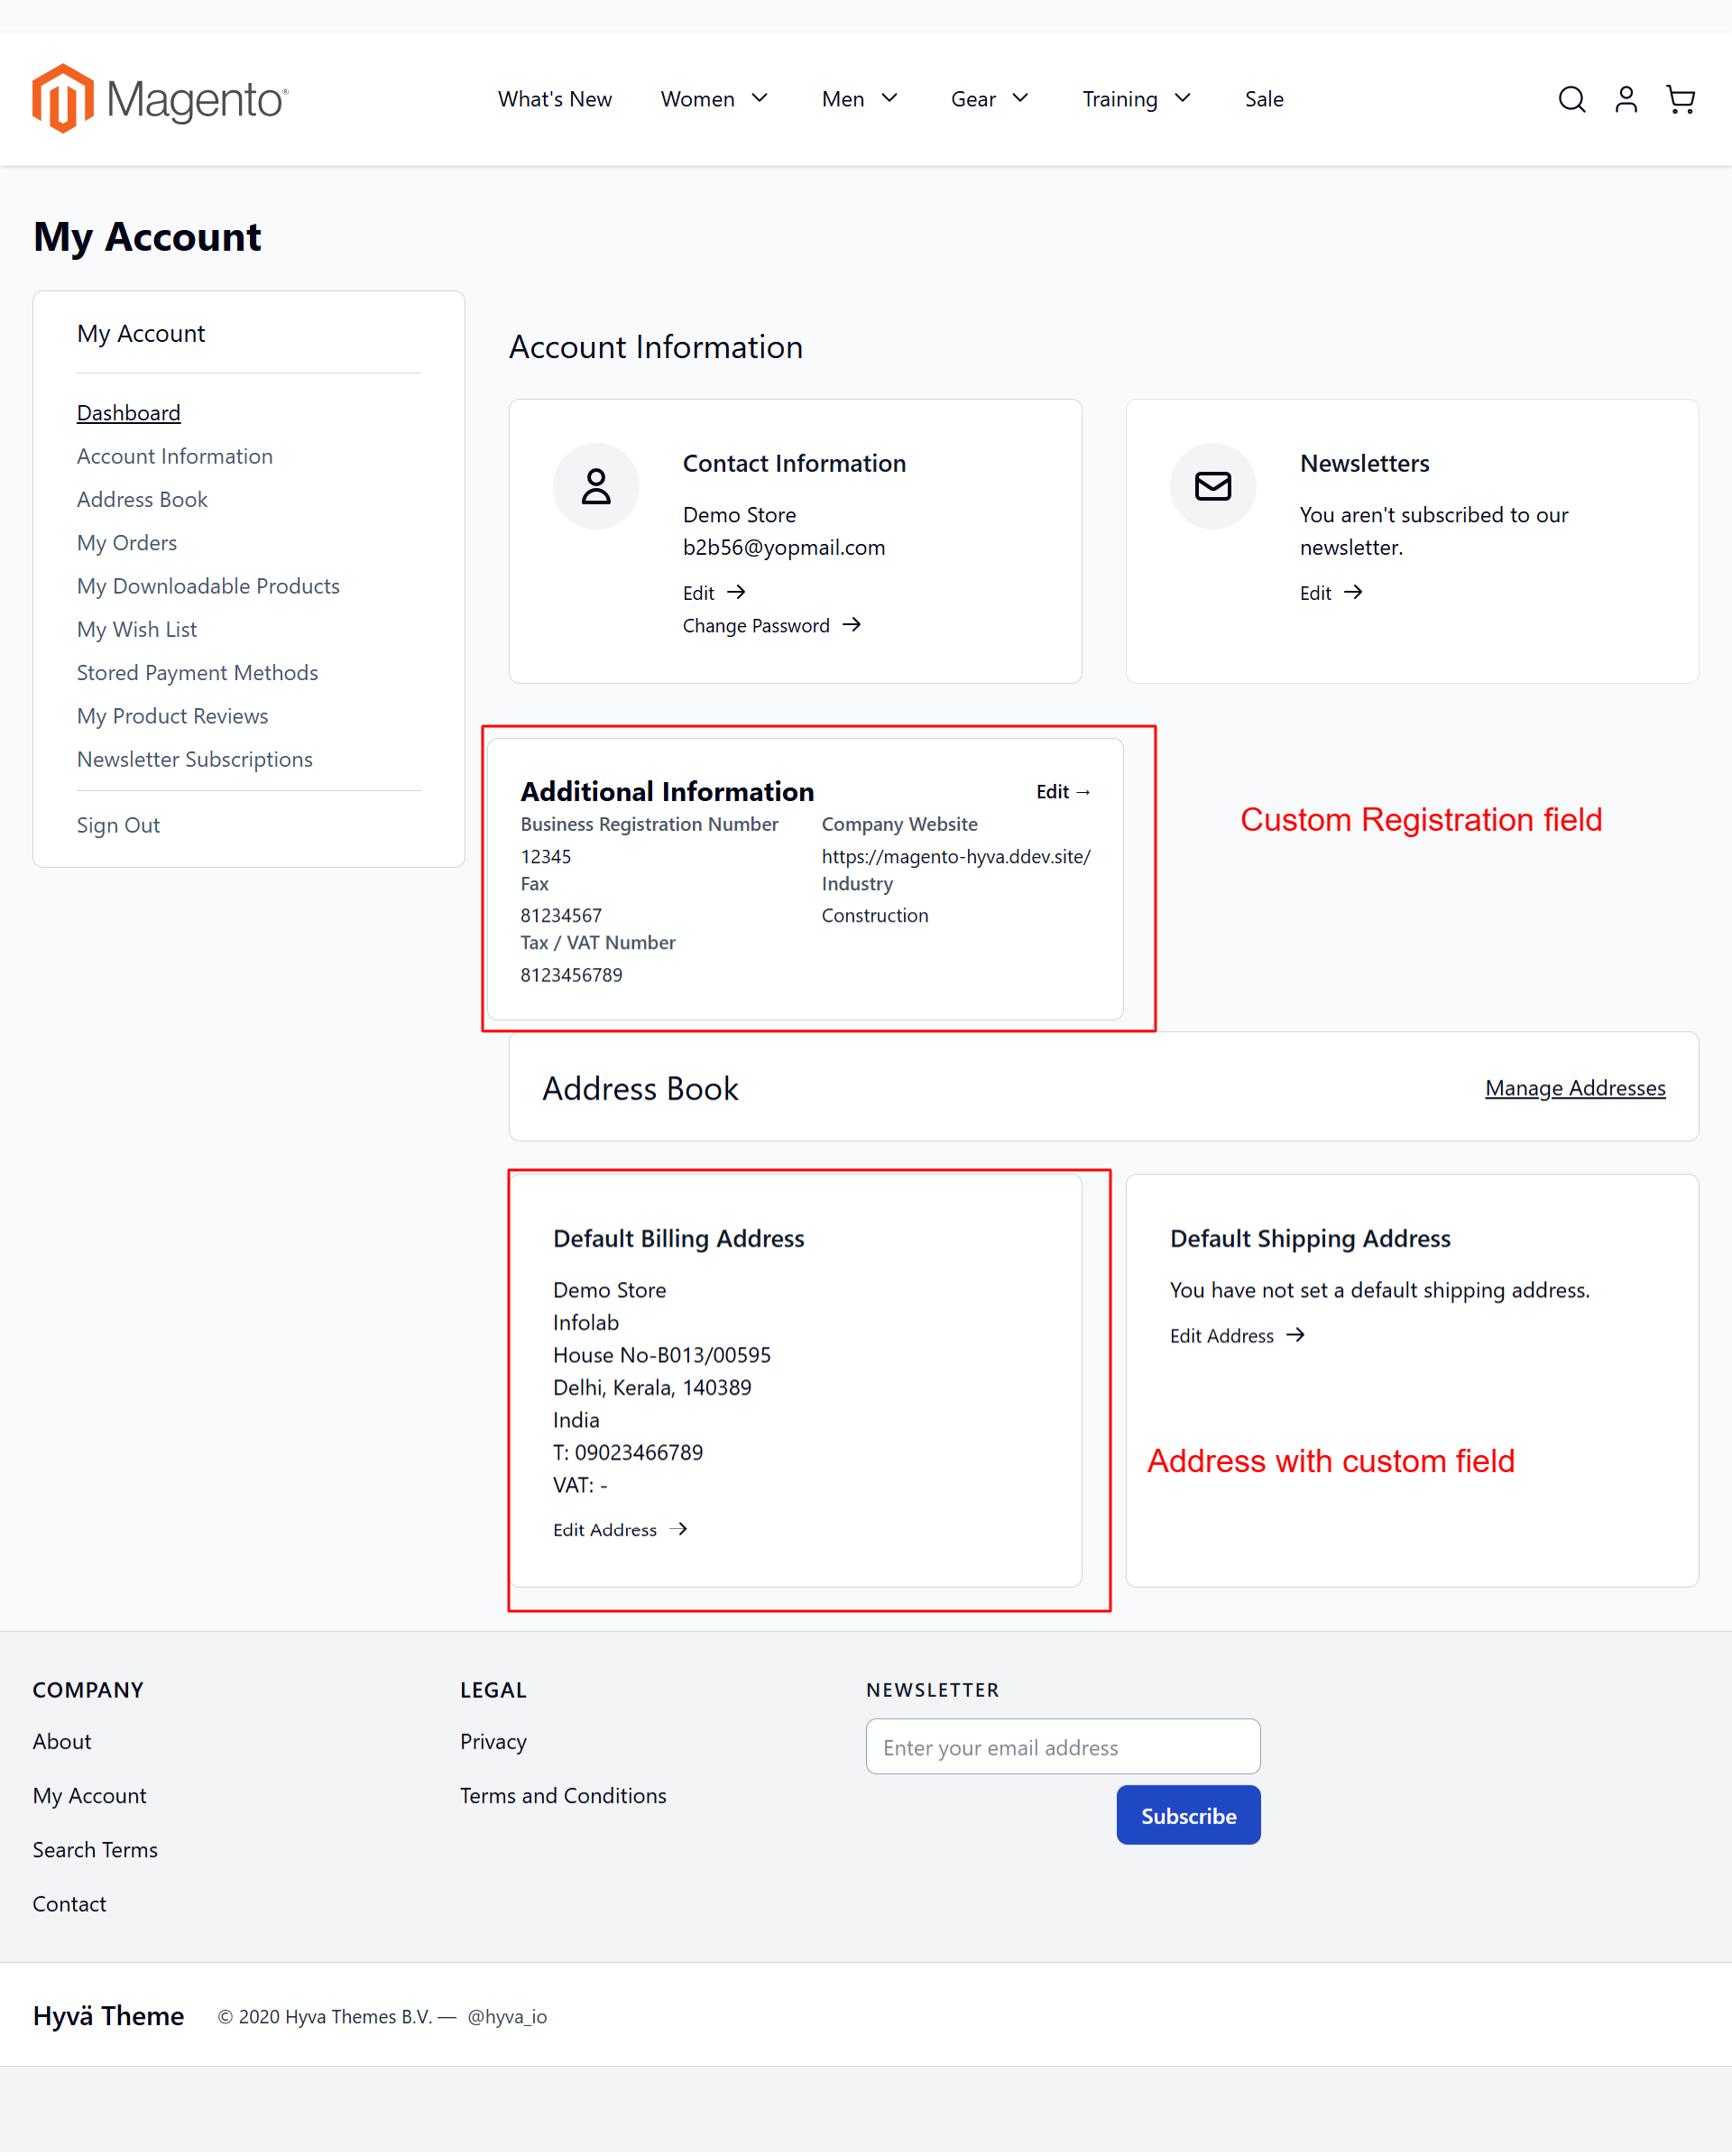
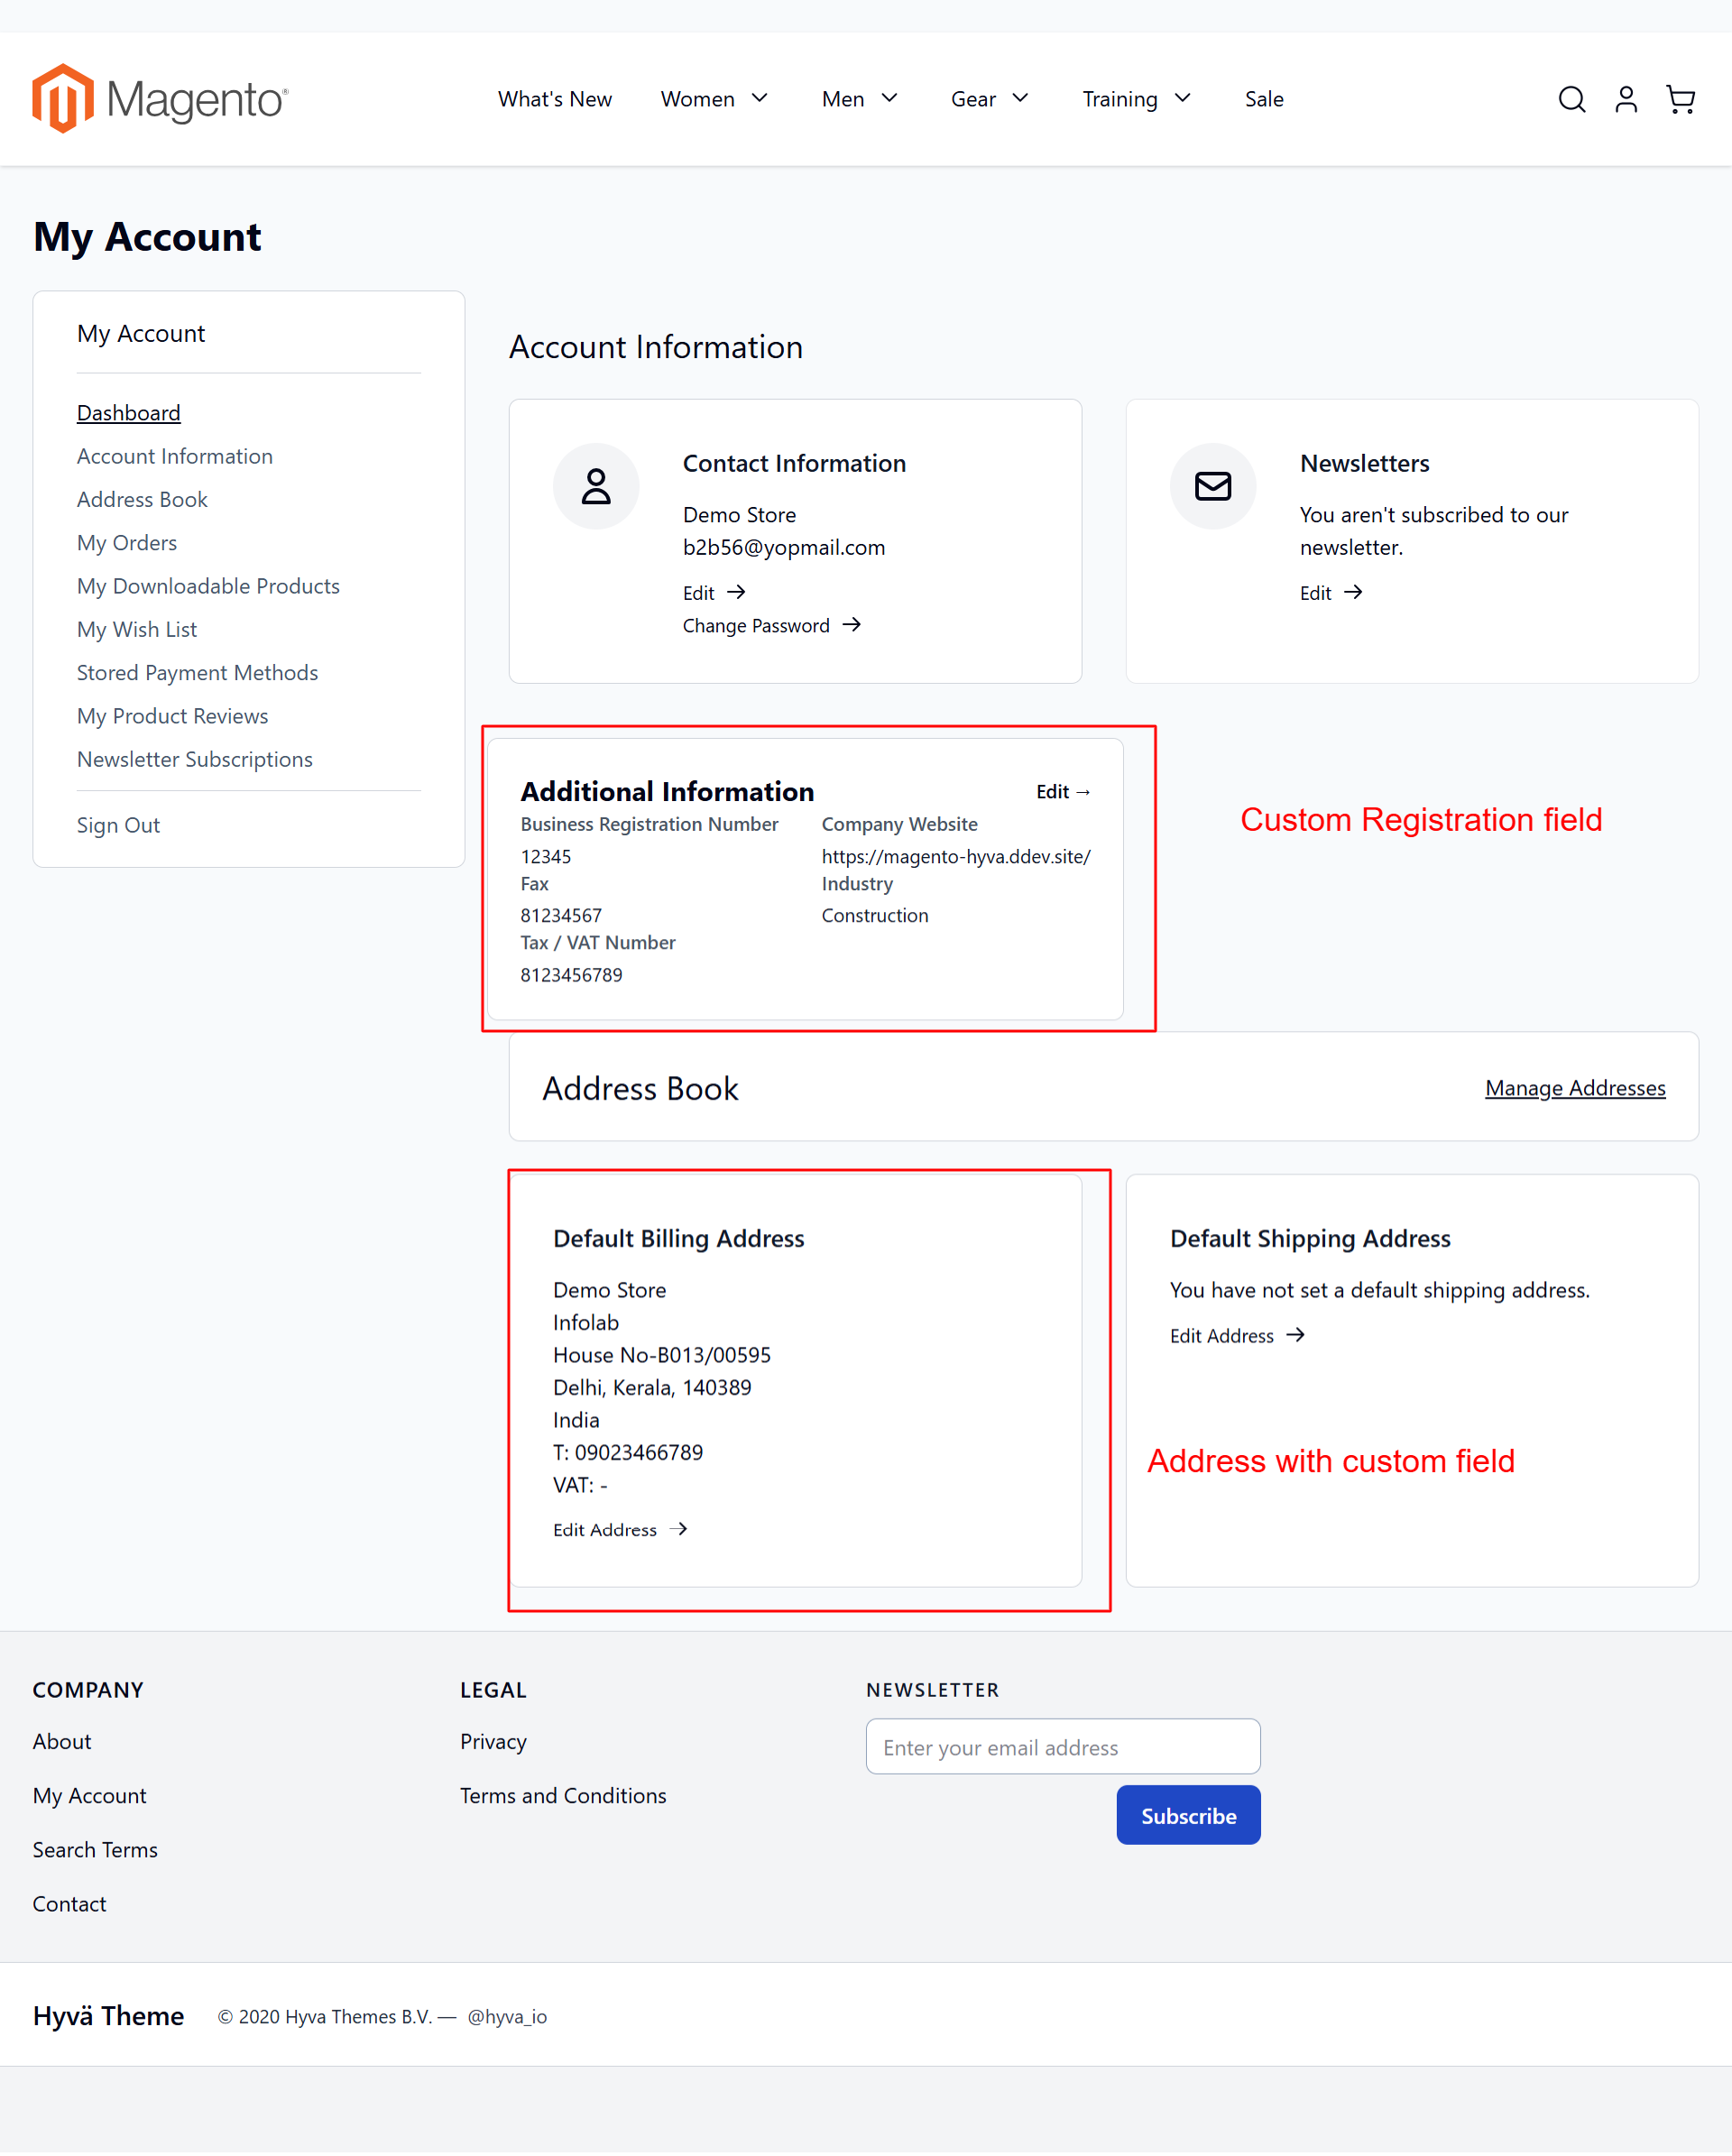
In the My Account Dashboard, users can access and manage their full profile, including custom fields enabled by the extension. The Hyva theme compatibility ensures a seamless user experience, facilitating easy navigation through personal and business data.
Customer Approval Workflow
Manage new registrations with a professional approval system.
- Pending registration status defaults
- Manual approval or declination of accounts
- Automatic email notifications for status changes
- Manage customer status directly in admin panel
- Detailed control over customer access levels
- Seamless handling of customer progress
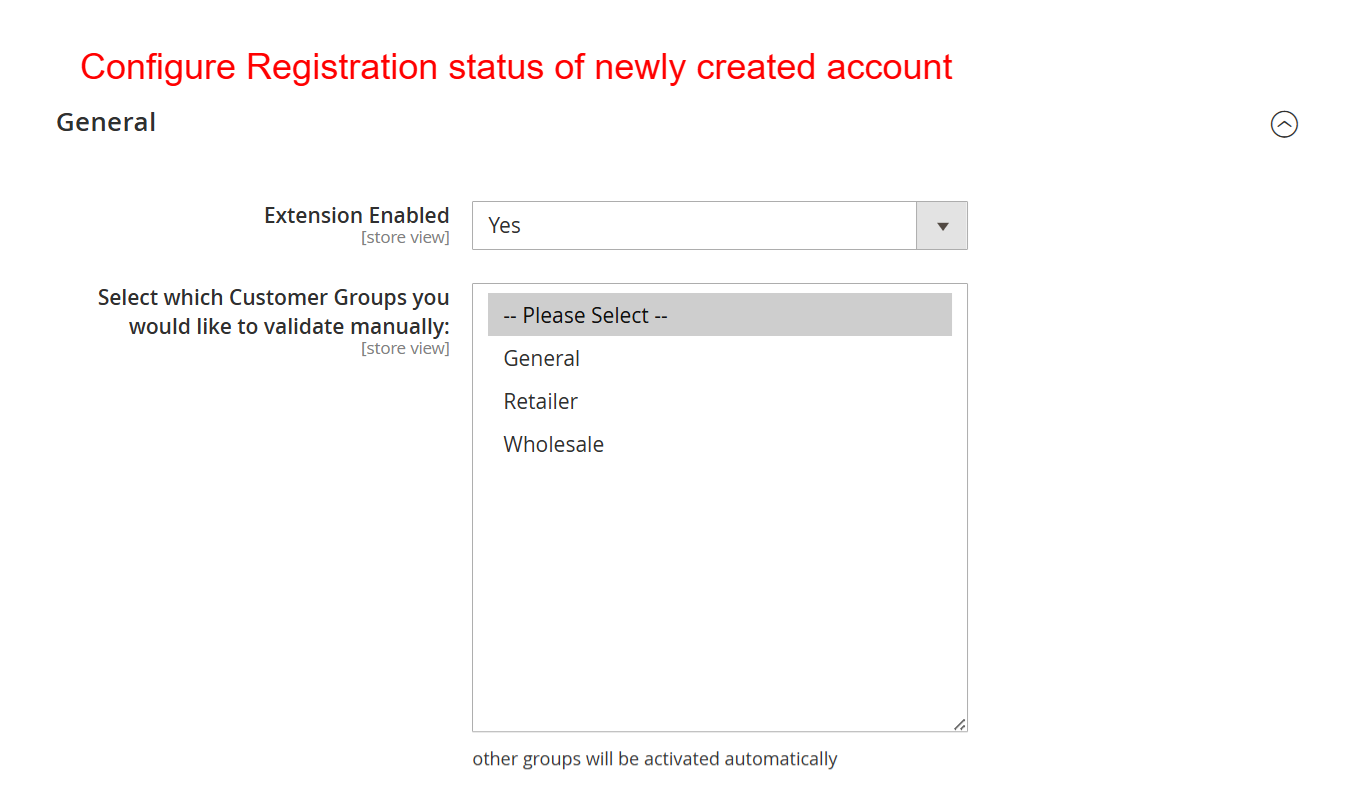
This configuration allows you to activate the Pending Registration feature and select which customer groups require manual validation. By controlling registration status through this setting, you ensure that certain user groups meet predefined criteria before gaining access, enhancing customer management.
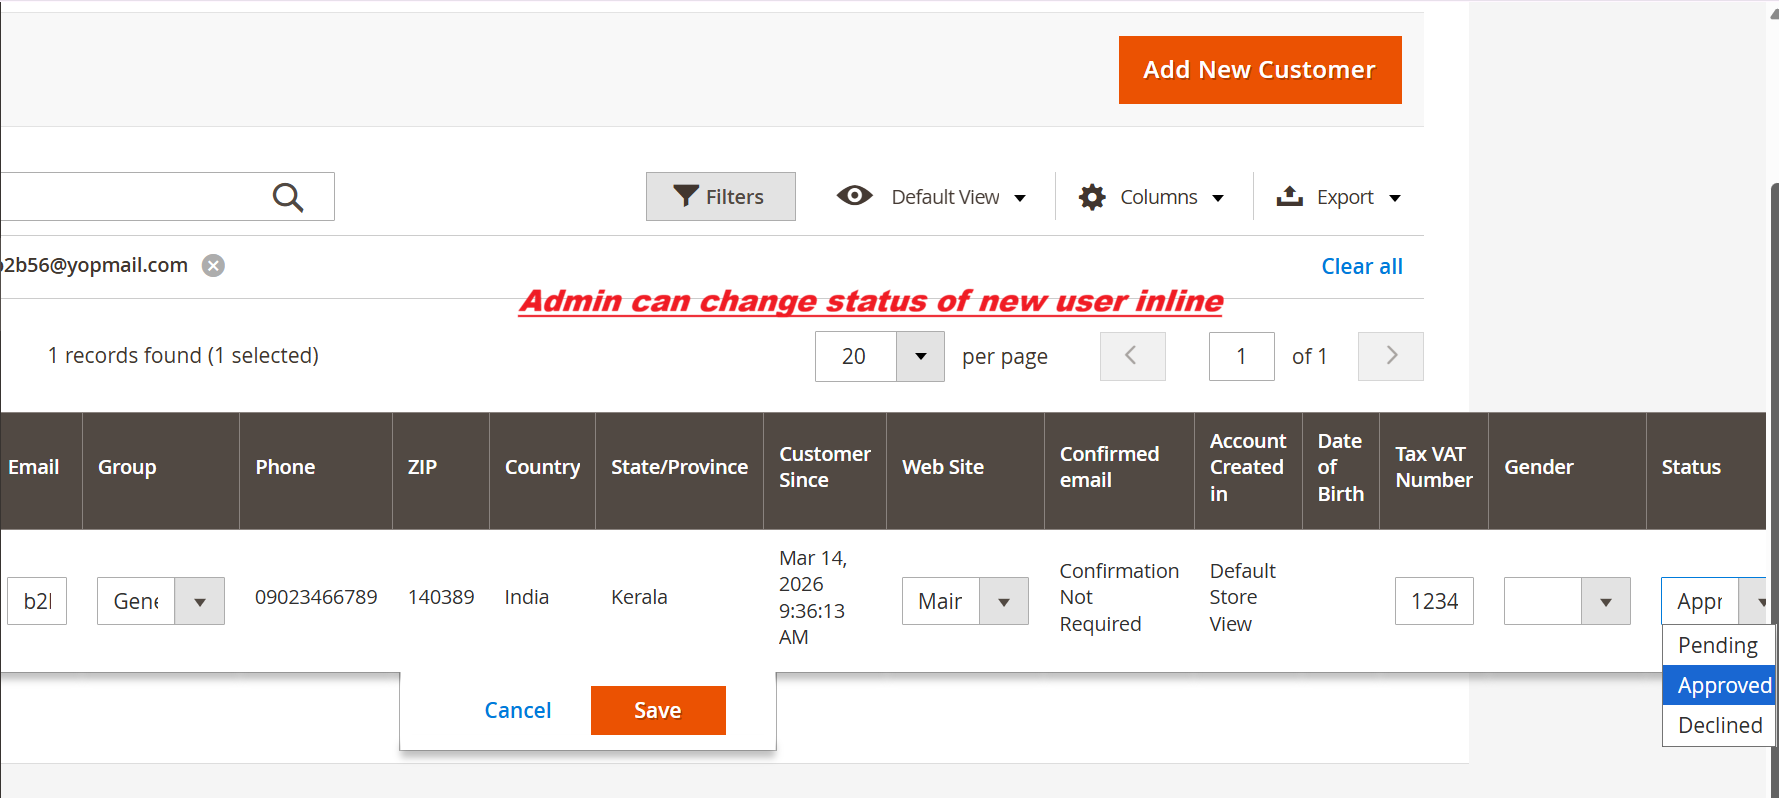
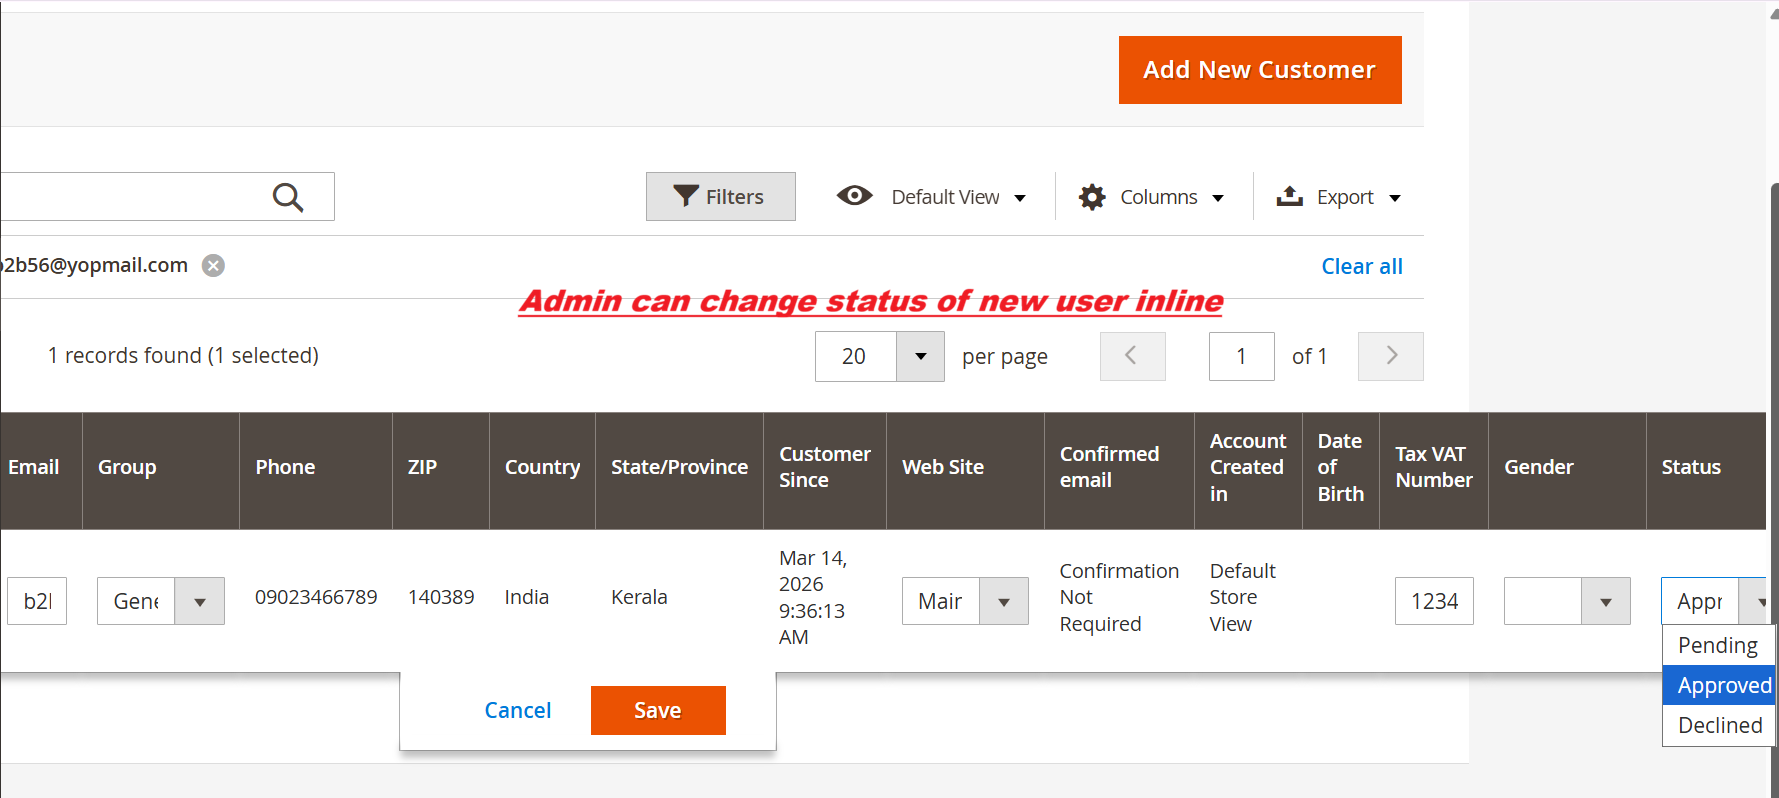
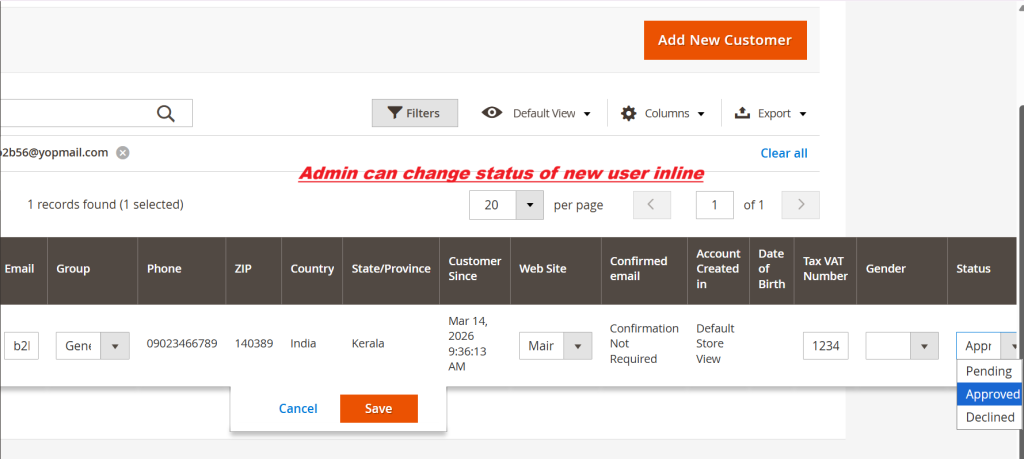
This interface allows admins to quickly modify a new customer's registration status. Inline editing enables efficient status updates, crucial for managing customer onboarding. It streamlines operations by allowing admins to approve or reject applications directly from the grid view.
3 Configuration Walkthrough
Navigate to Stores → Configuration in Magento Admin and follow these steps:
Enable the Module
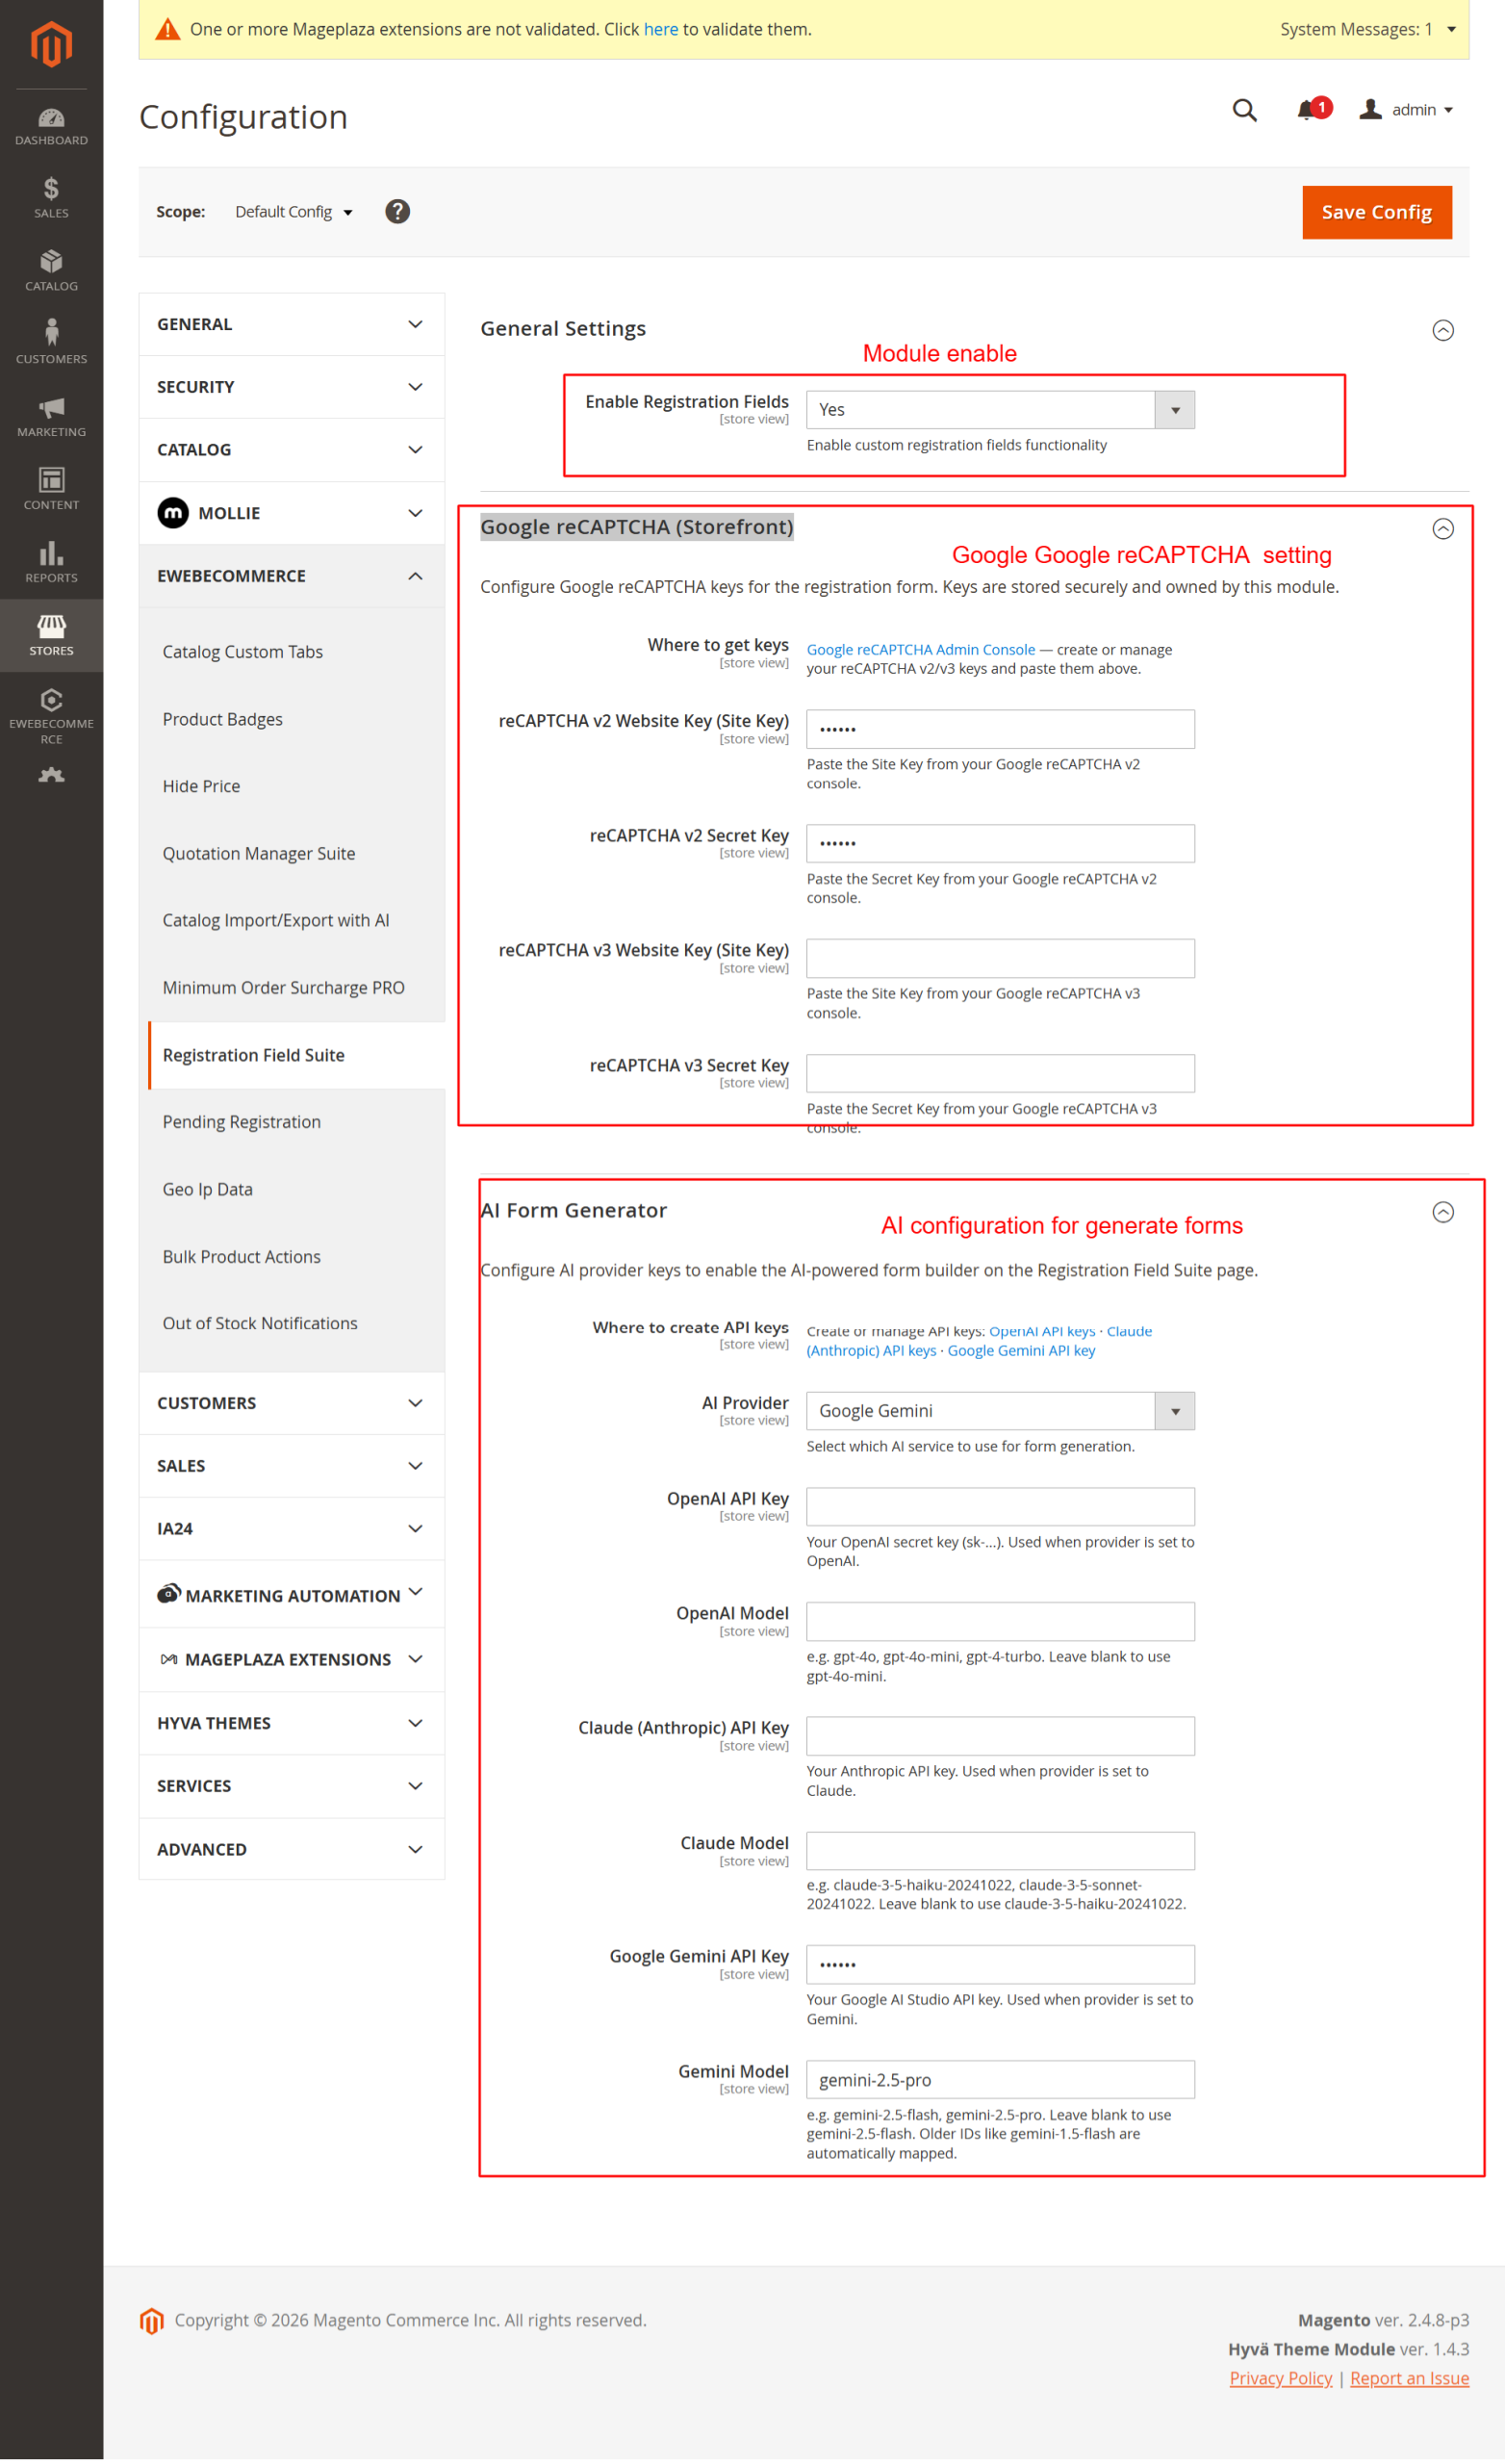
To enable the Ewebecommerce_RegistrationFieldSuite, navigate to Stores > Configuration in the Magento admin panel. Under Customers > Registration Field Suite Settings, locate the 'Enable Registration Fields' setting in the 'General Settings' group. Use the dropdown to activate or deactivate the module functionality.
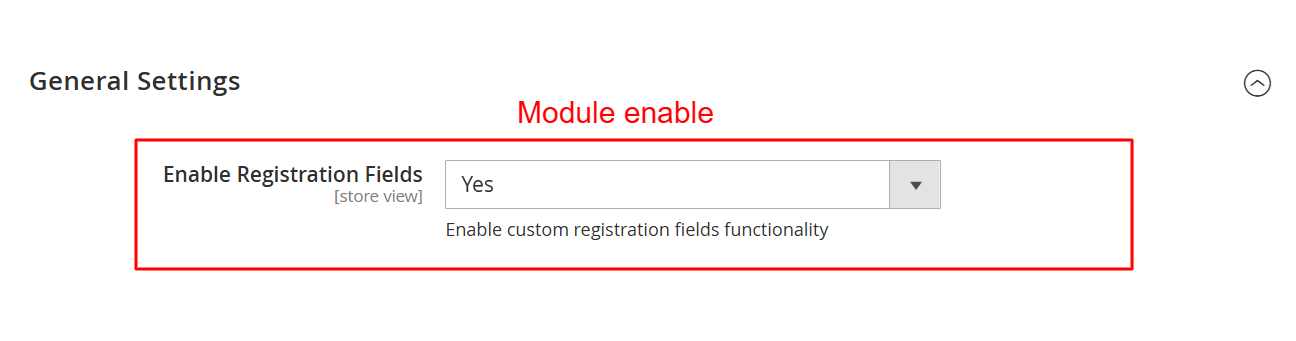
In this section, you enable or disable the custom registration fields provided by the Ewebecommerce_RegistrationFieldSuite module. Activating this feature introduces flexible form fields that can enhance the user registration process, allowing for a more customized user experience.
Configure Captcha Settings
Add an extra layer of security to your registration forms by configuring captcha settings within the Google reCAPTCHA (Storefront) group. Enter your site and secret keys for reCAPTCHA v2 and v3 keys.
This configuration section allows you to enhance security by adding Google reCAPTCHA to the registration forms. By entering the necessary site and secret keys, you can protect your registration page from automated submissions, ensuring only legitimate user registrations.
Set Up AI Form Generator
Leverage AI for form creation under the AI Form Generator section. Here, you can select the AI provider and model, in addition to configuring the necessary API keys for services like OpenAI, Anthropic Claude, and Google Gemini.
Configure API keys for various AI providers here to leverage AI-driven form generation features. Selecting the appropriate provider and model enables the dynamic generation of registration forms, which can adapt based on AI recommendations, facilitating efficient form setup.
Activate Pending Registrations
To control new registrations, activate the Pending Registration extension under its respective configuration section. Determine which customer groups should undergo manual approval processes for additional registration control.
This configuration allows you to activate the Pending Registration feature and select which customer groups require manual validation. By controlling registration status through this setting, you ensure that certain user groups meet predefined criteria before gaining access, enhancing customer management.
Configure Email Notifications
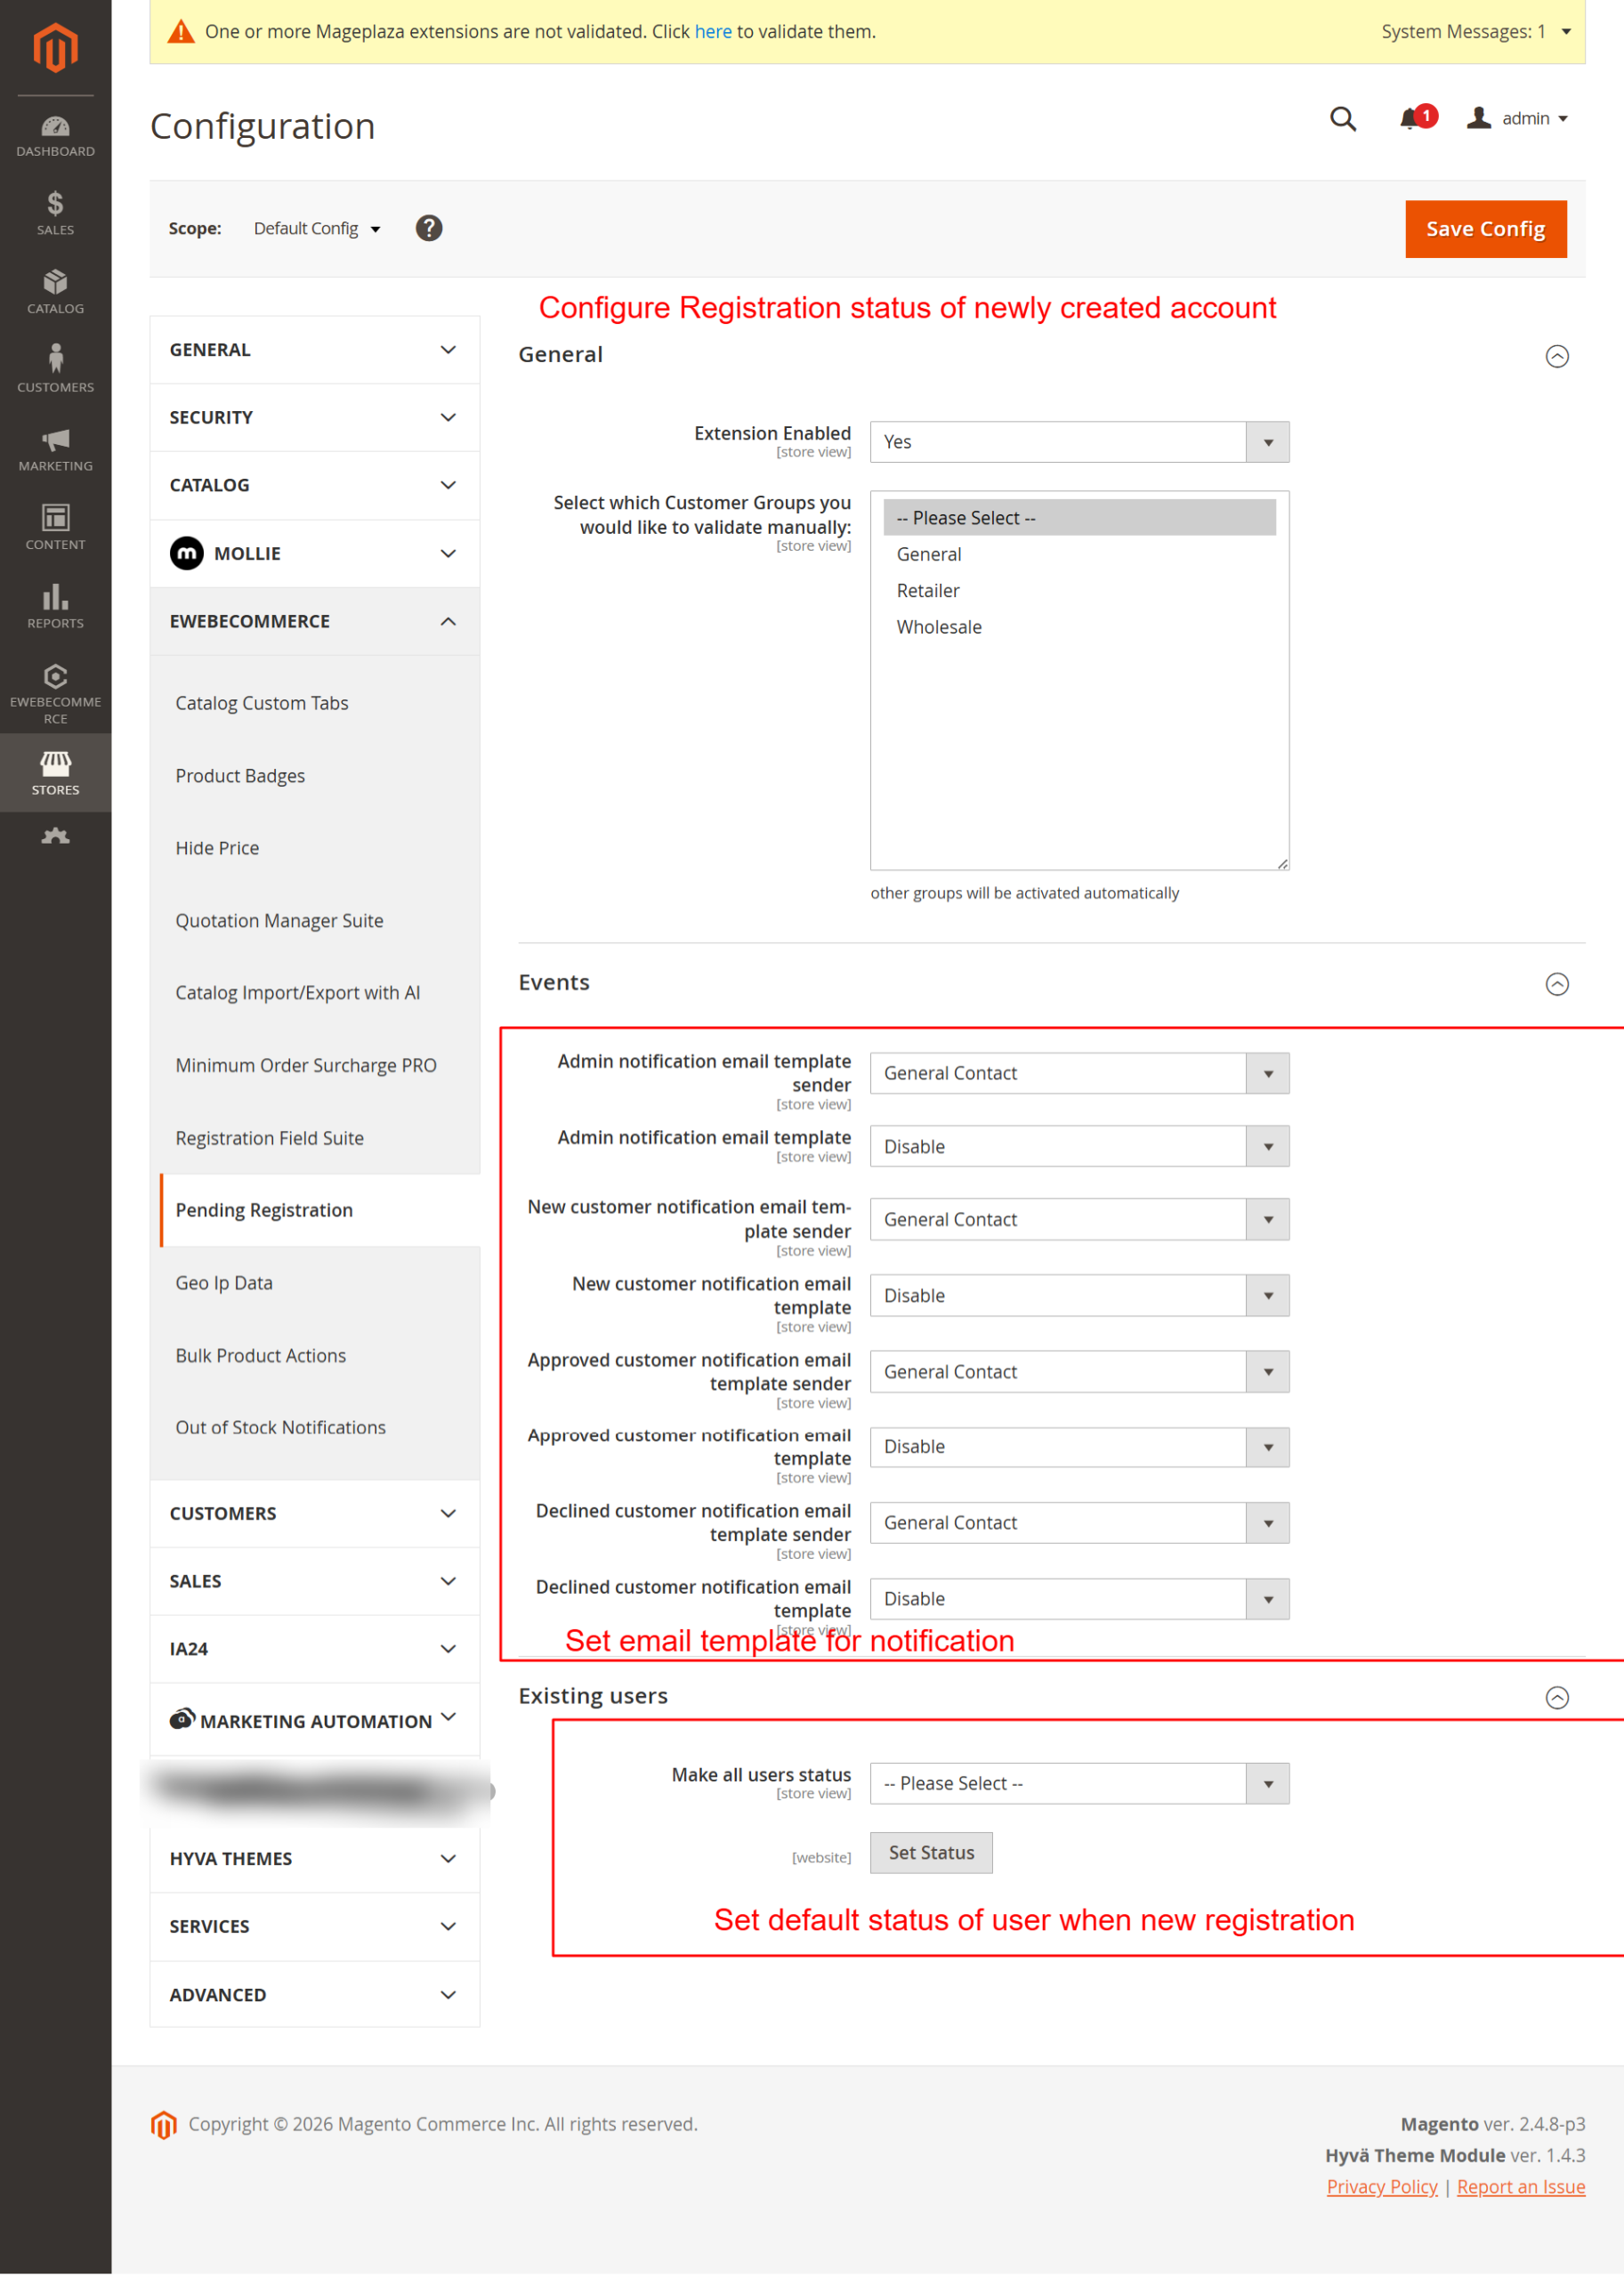
Streamline communication by setting up email templates and senders under the Events group. Assign templates for admin alerts and customer notifications to keep stakeholders informed during registration events.
Setup automated email notifications for registration events by configuring templates and senders here. This ensures timely communication with both admins and customers regarding registration status updates, helping maintain clear and efficient communication channels.
Set Default Registration Status
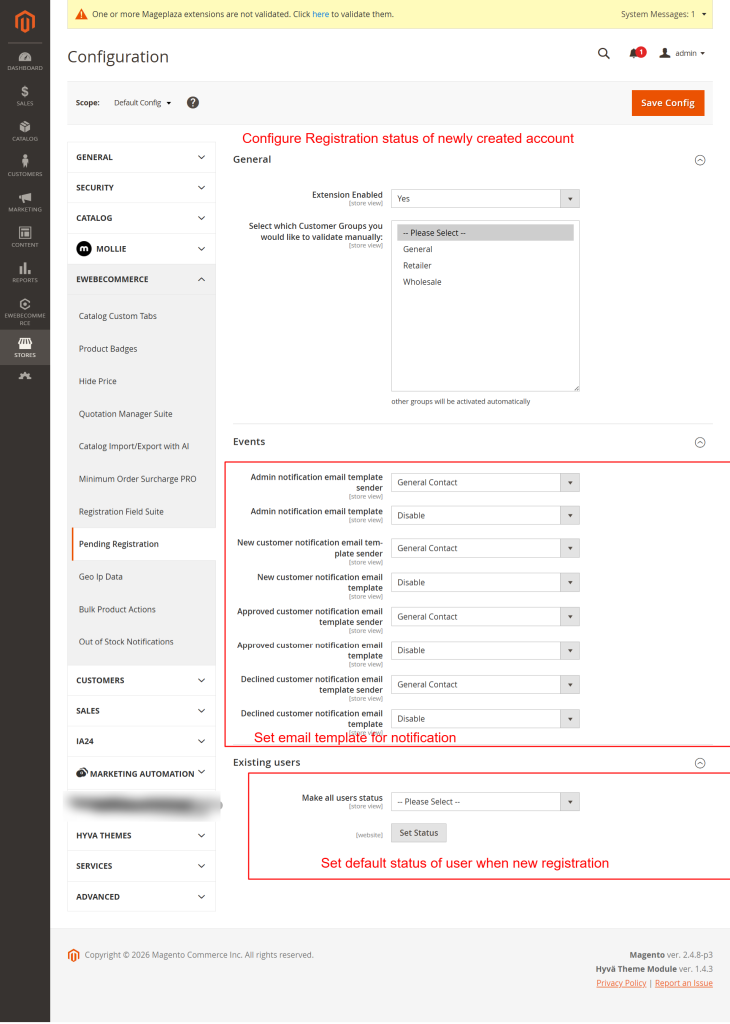
Define how new registrations are handled by default using the Set Default Status of New Registrations feature. Use the dropdown to assign a default status such as Approved, Pending, or Declined for incoming user registrations.
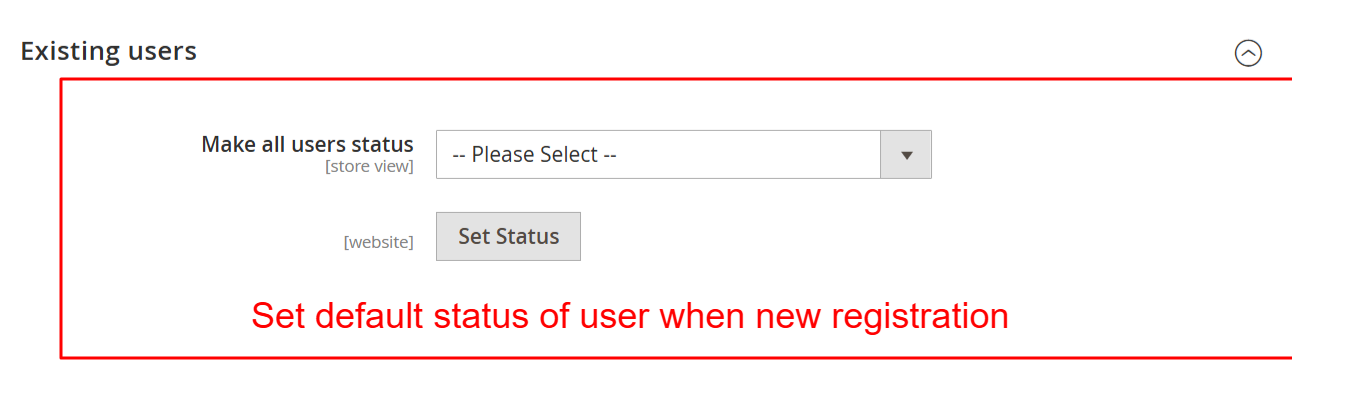
This setting defines the default status assigned to users after registration, allowing admins to control the access level or activation process. By determining this default, you ensure new users start with the appropriate status, facilitating smoother onboarding processes.
4 User Journey
Create a New Customer Account
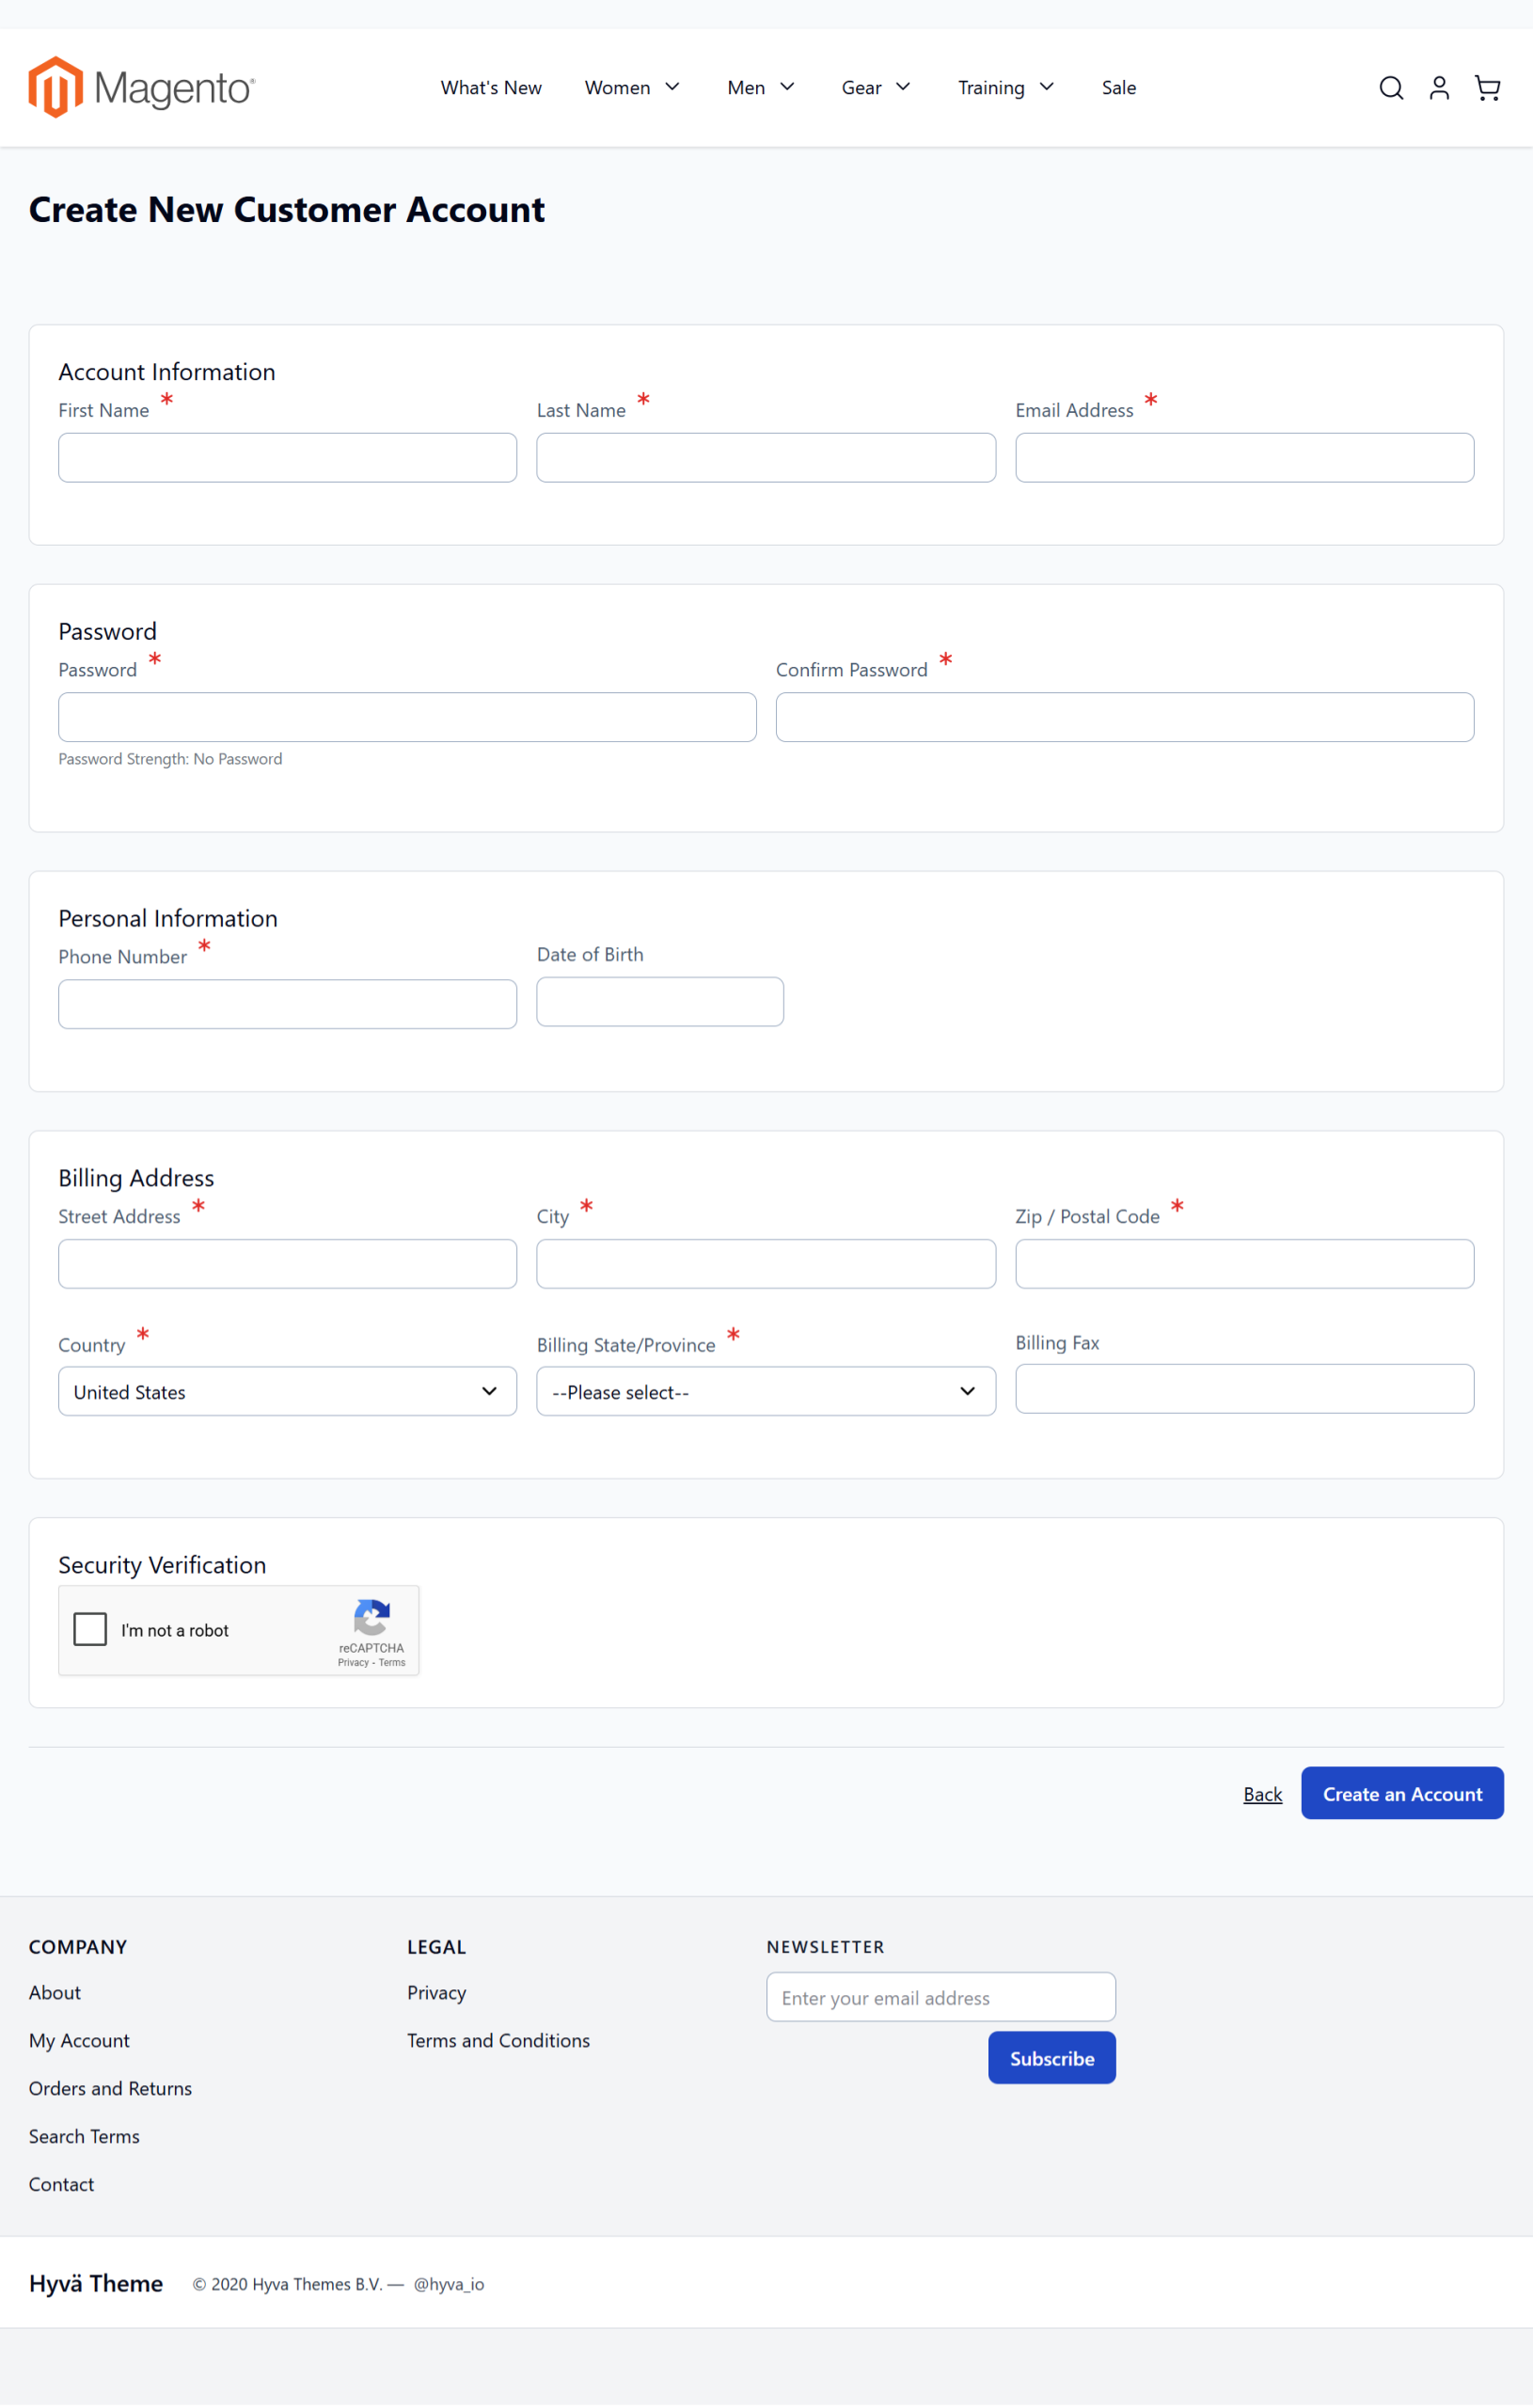
Users initiate account creation on the frontend by providing necessary personal information like name, email, and password. This process includes completing custom registration fields supported by captcha verification for enhanced security.
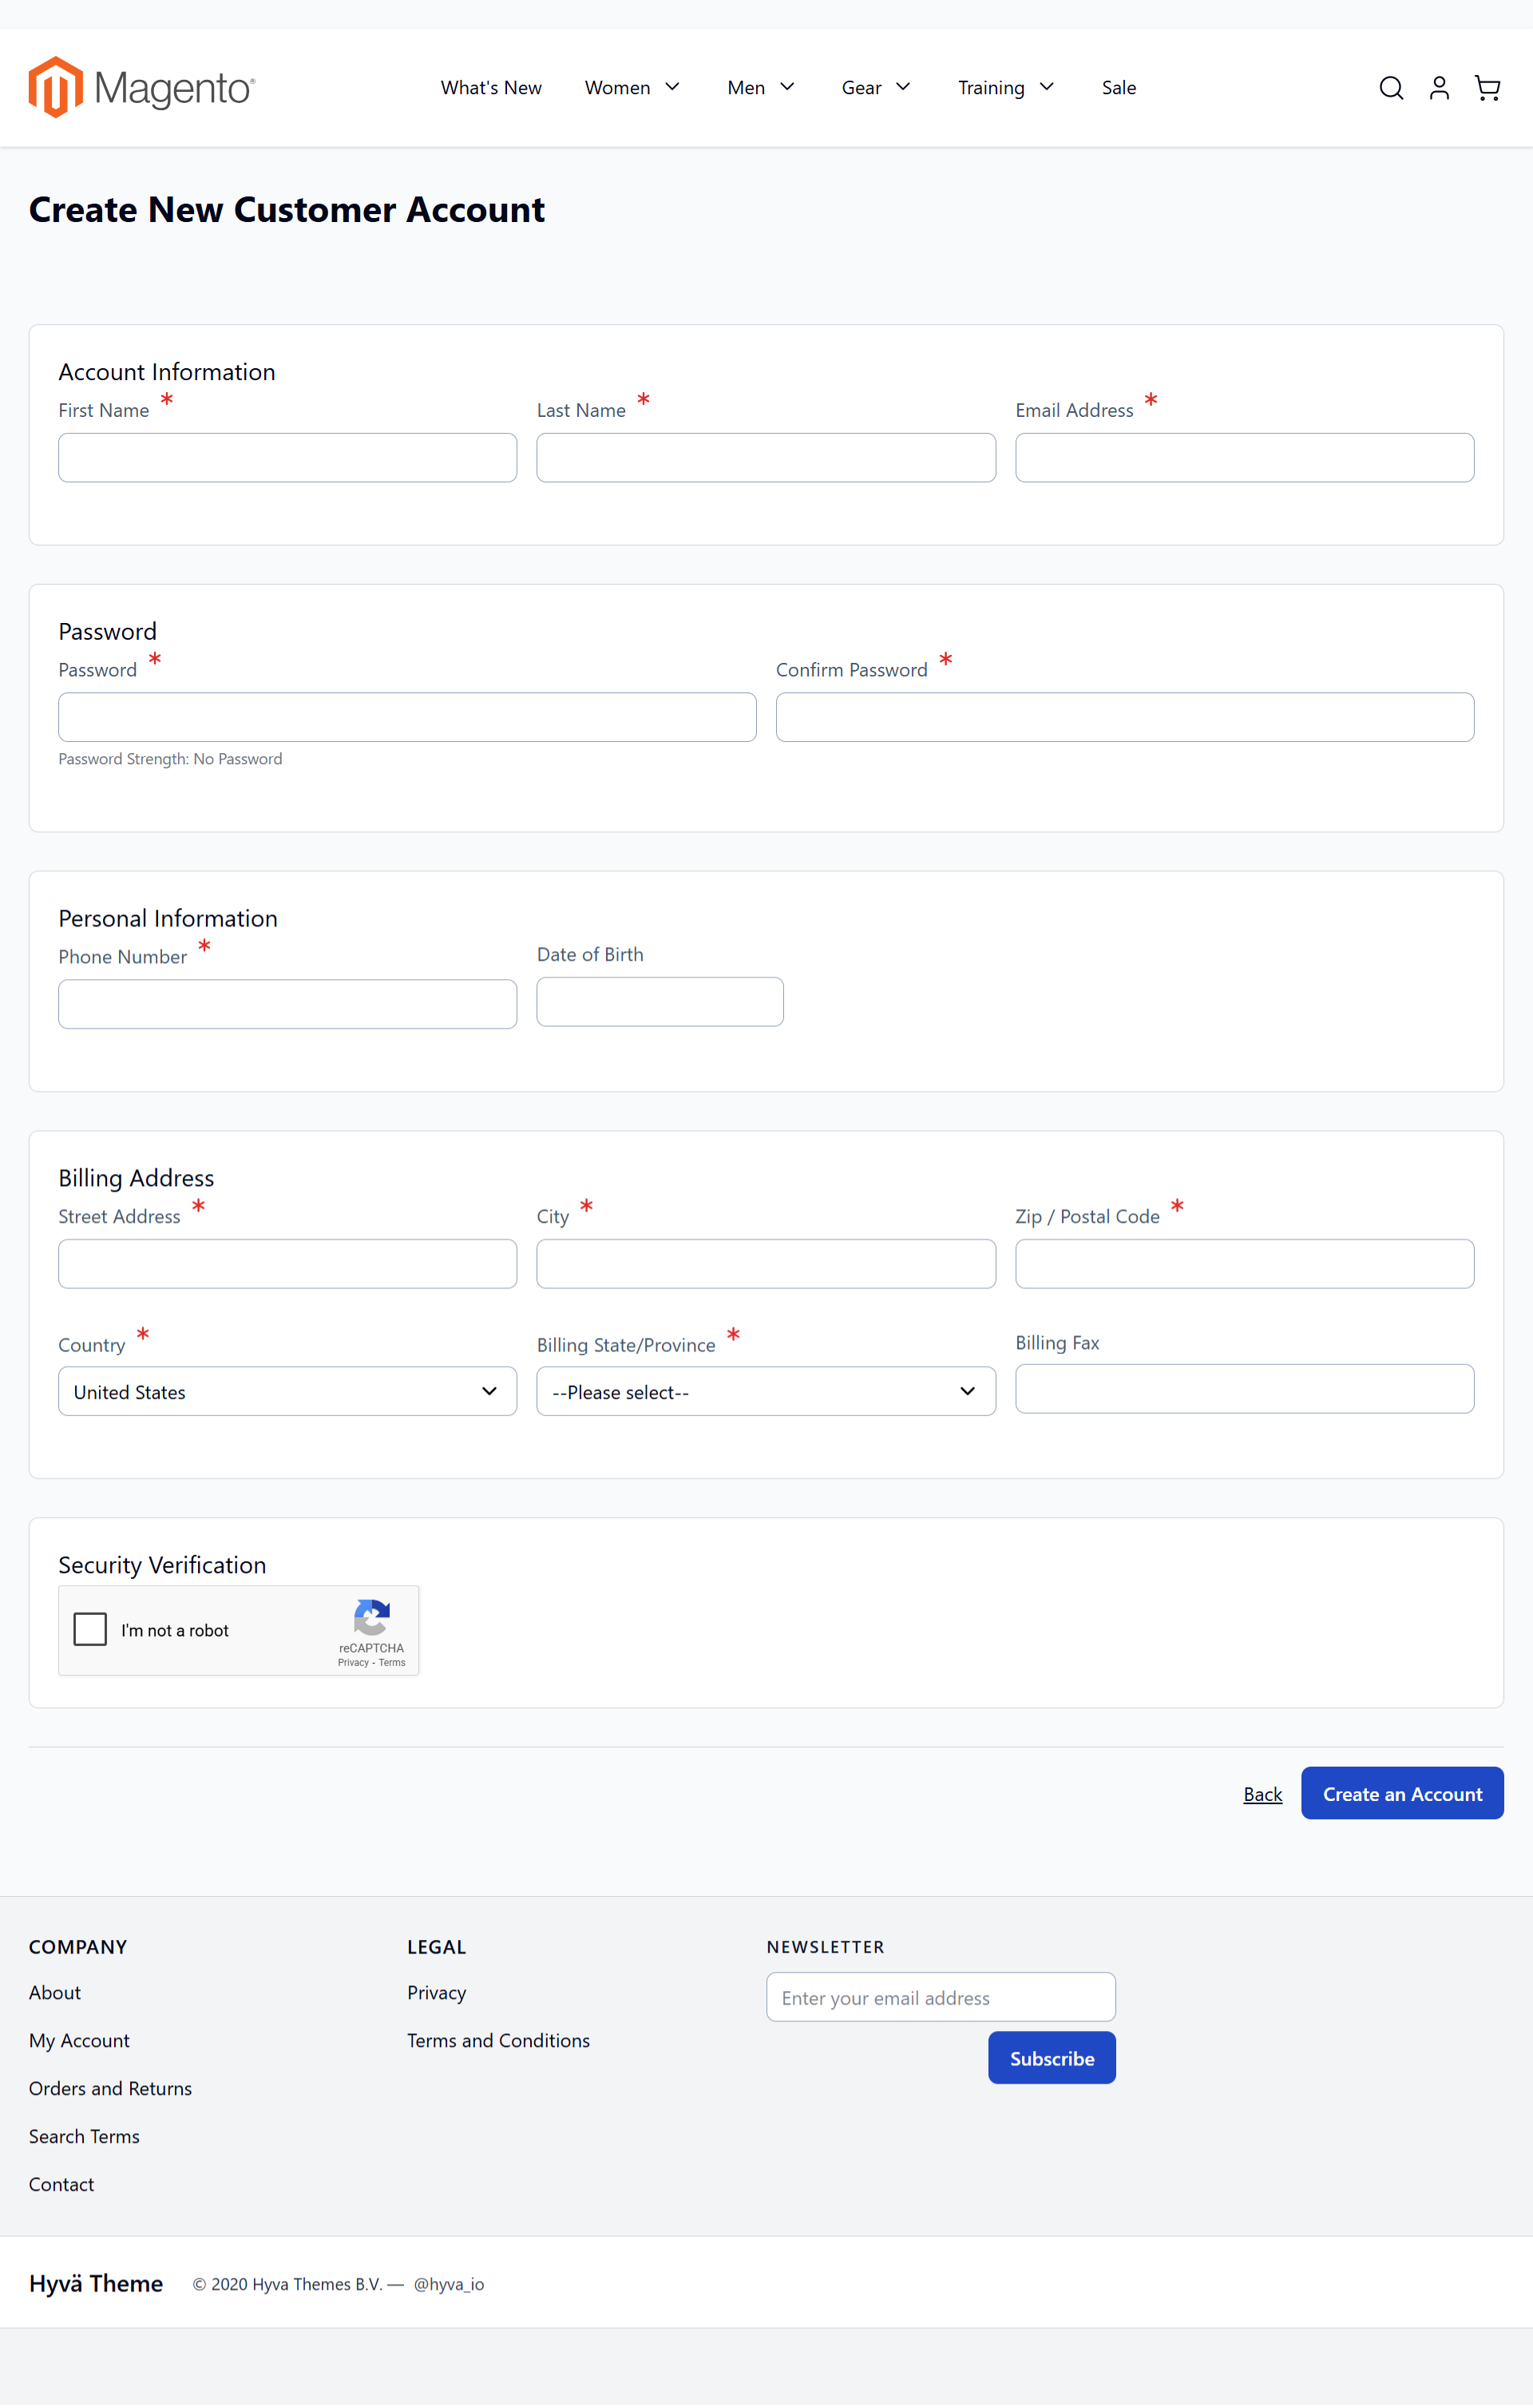
On this screen, users can create a new customer account by filling in personal information such as name, email, and password, along with billing details. The extension allows for custom registration fields, enhancing account security with a captcha. This feature supports complex registration scenarios by using custom fields to gather specific customer data.
Register B2B Account
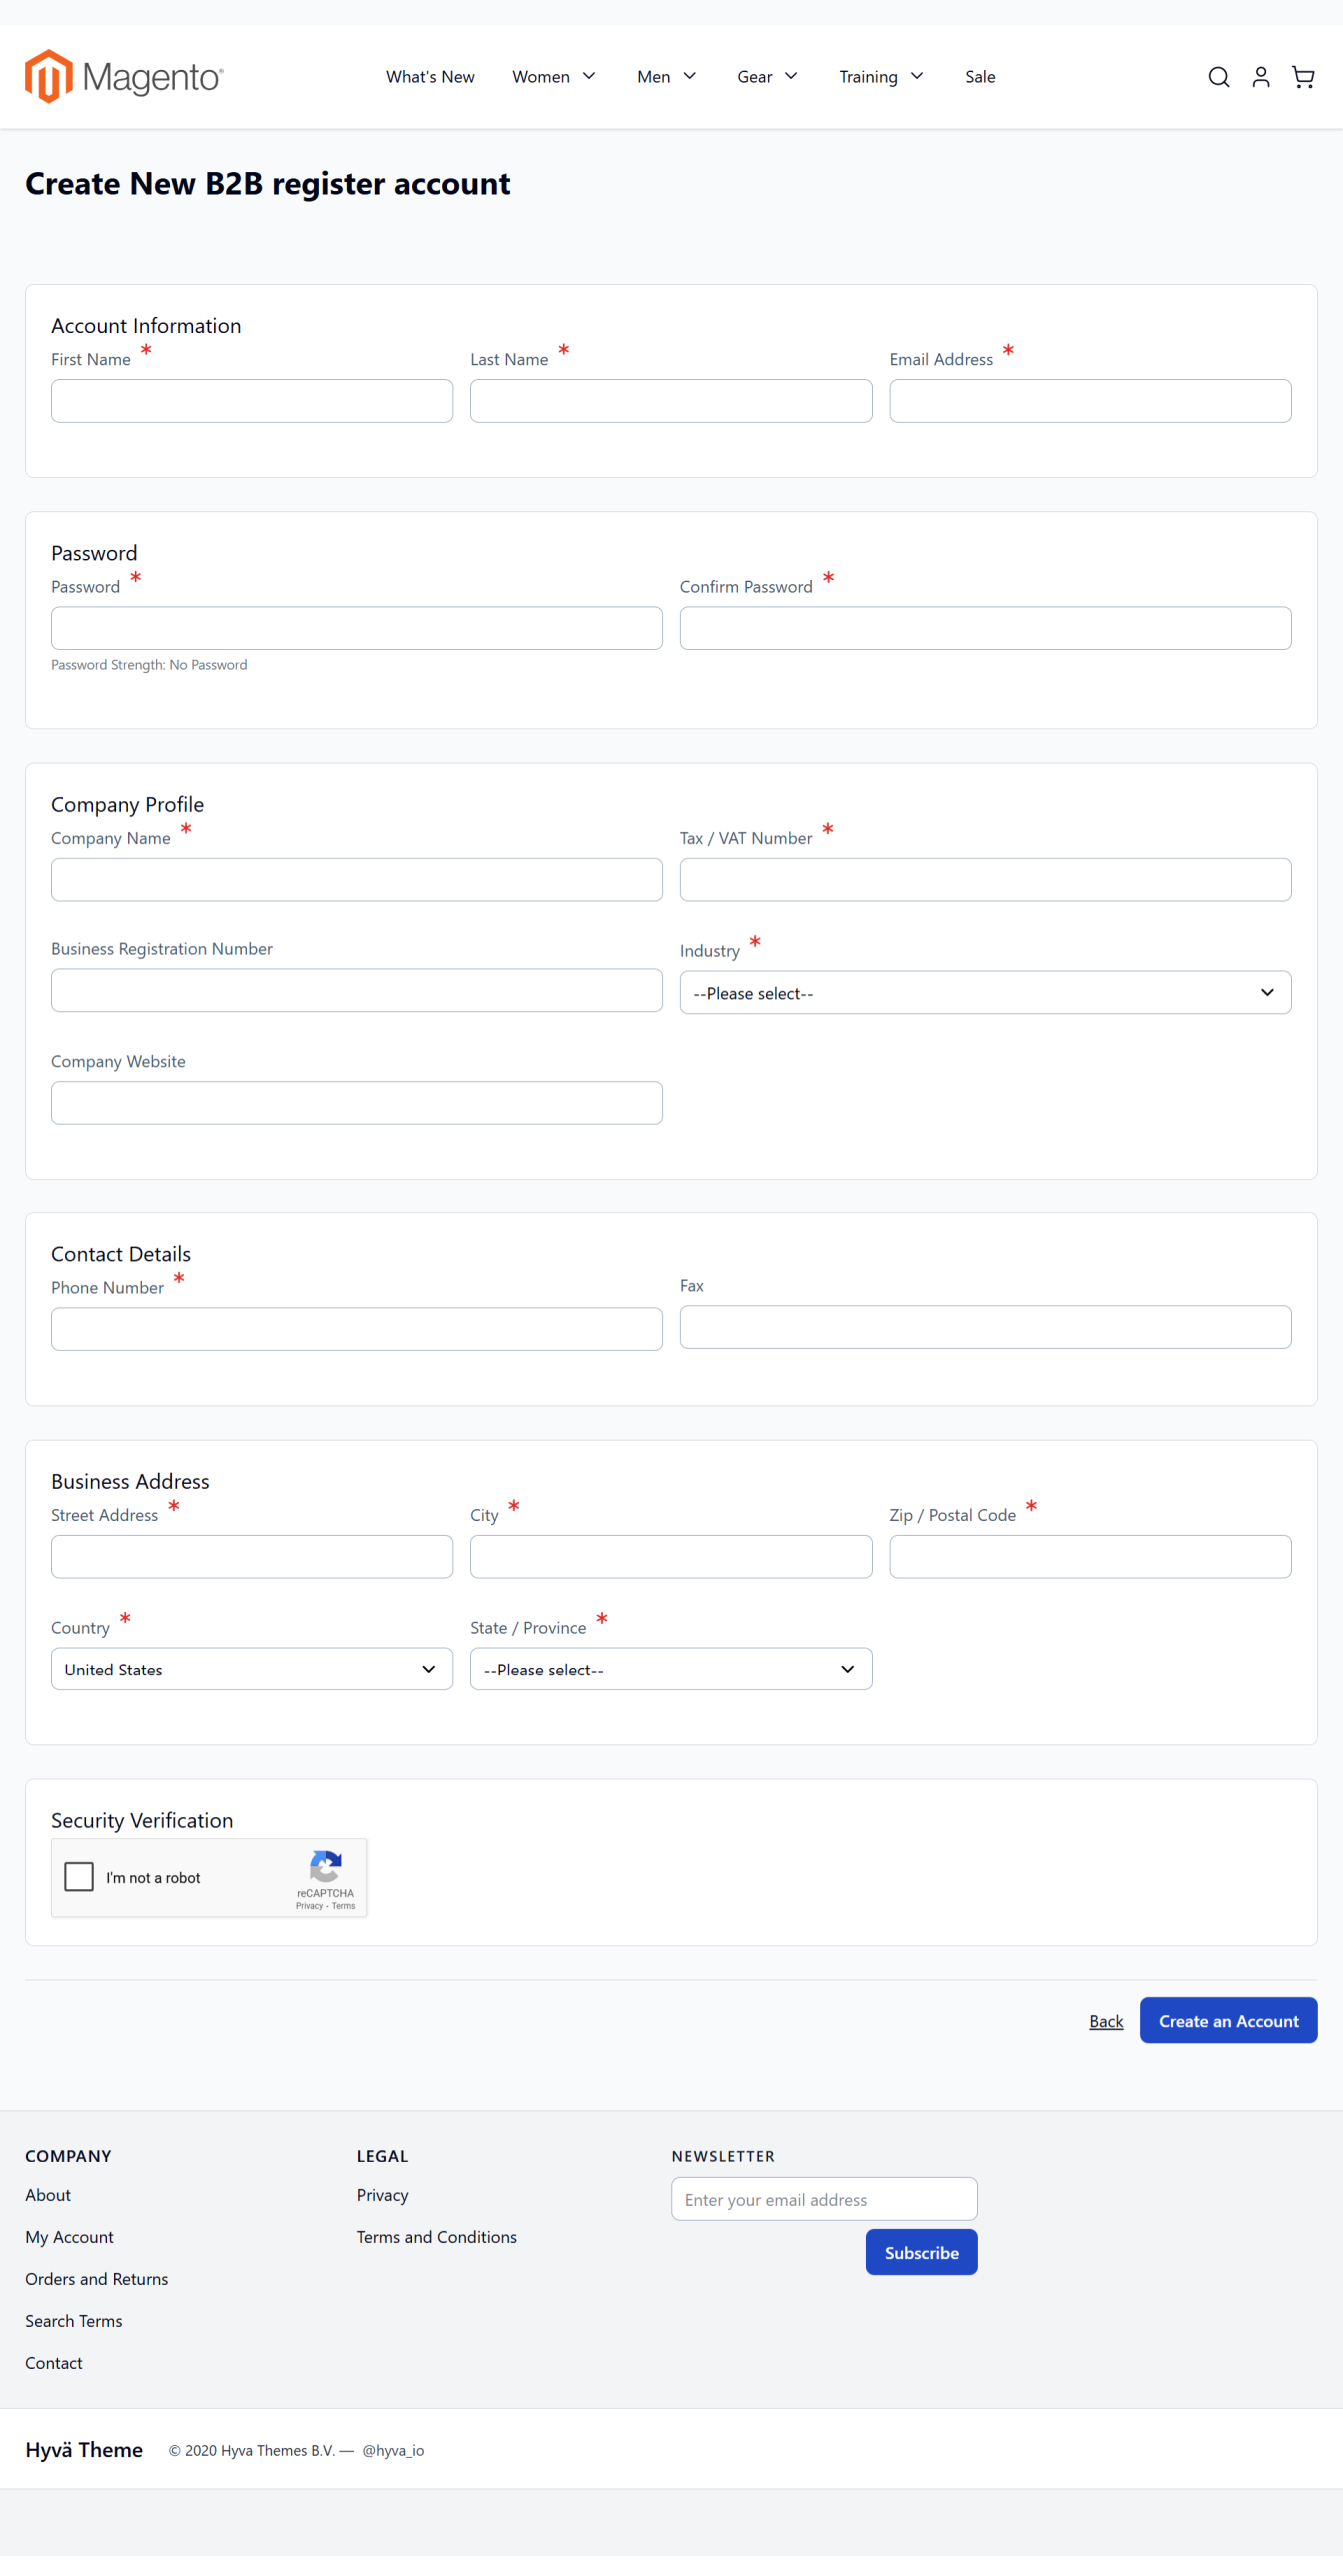
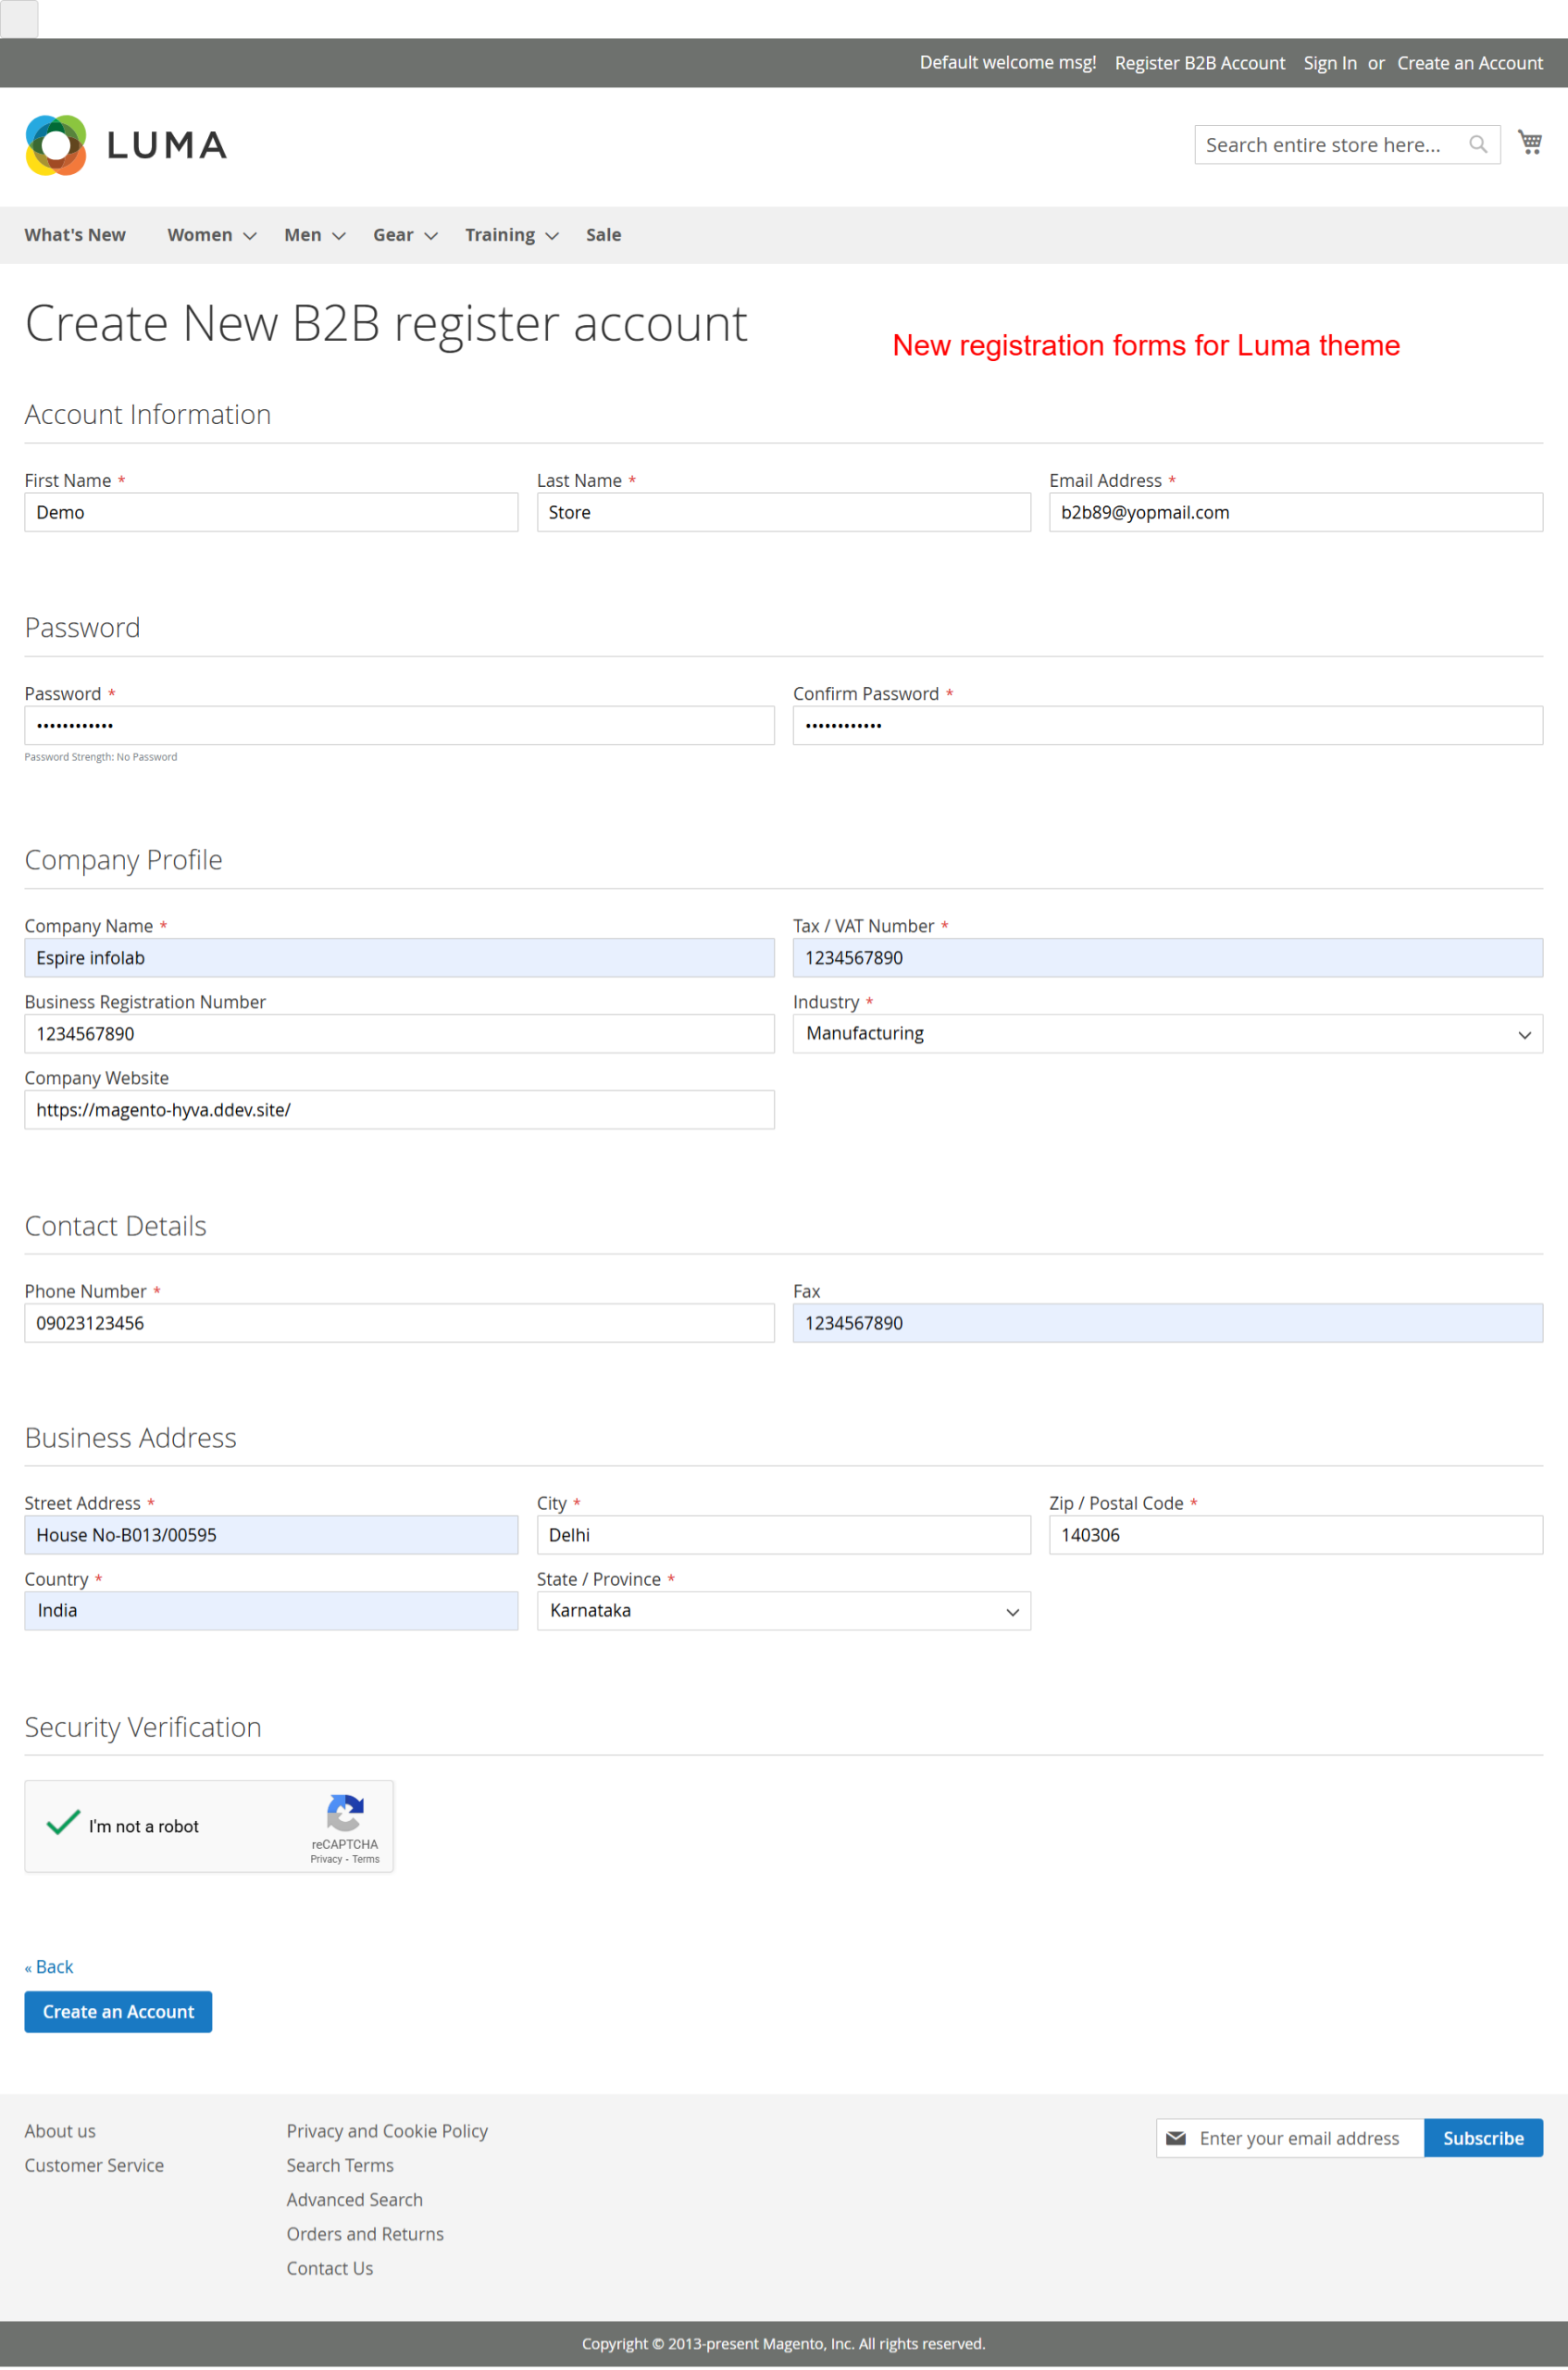
For B2B customer registration, submit detailed company information through the dedicated registration form. Capture critical business data such as Company Name, Business Registration Number, and Industry to validate B2B roles accurately.
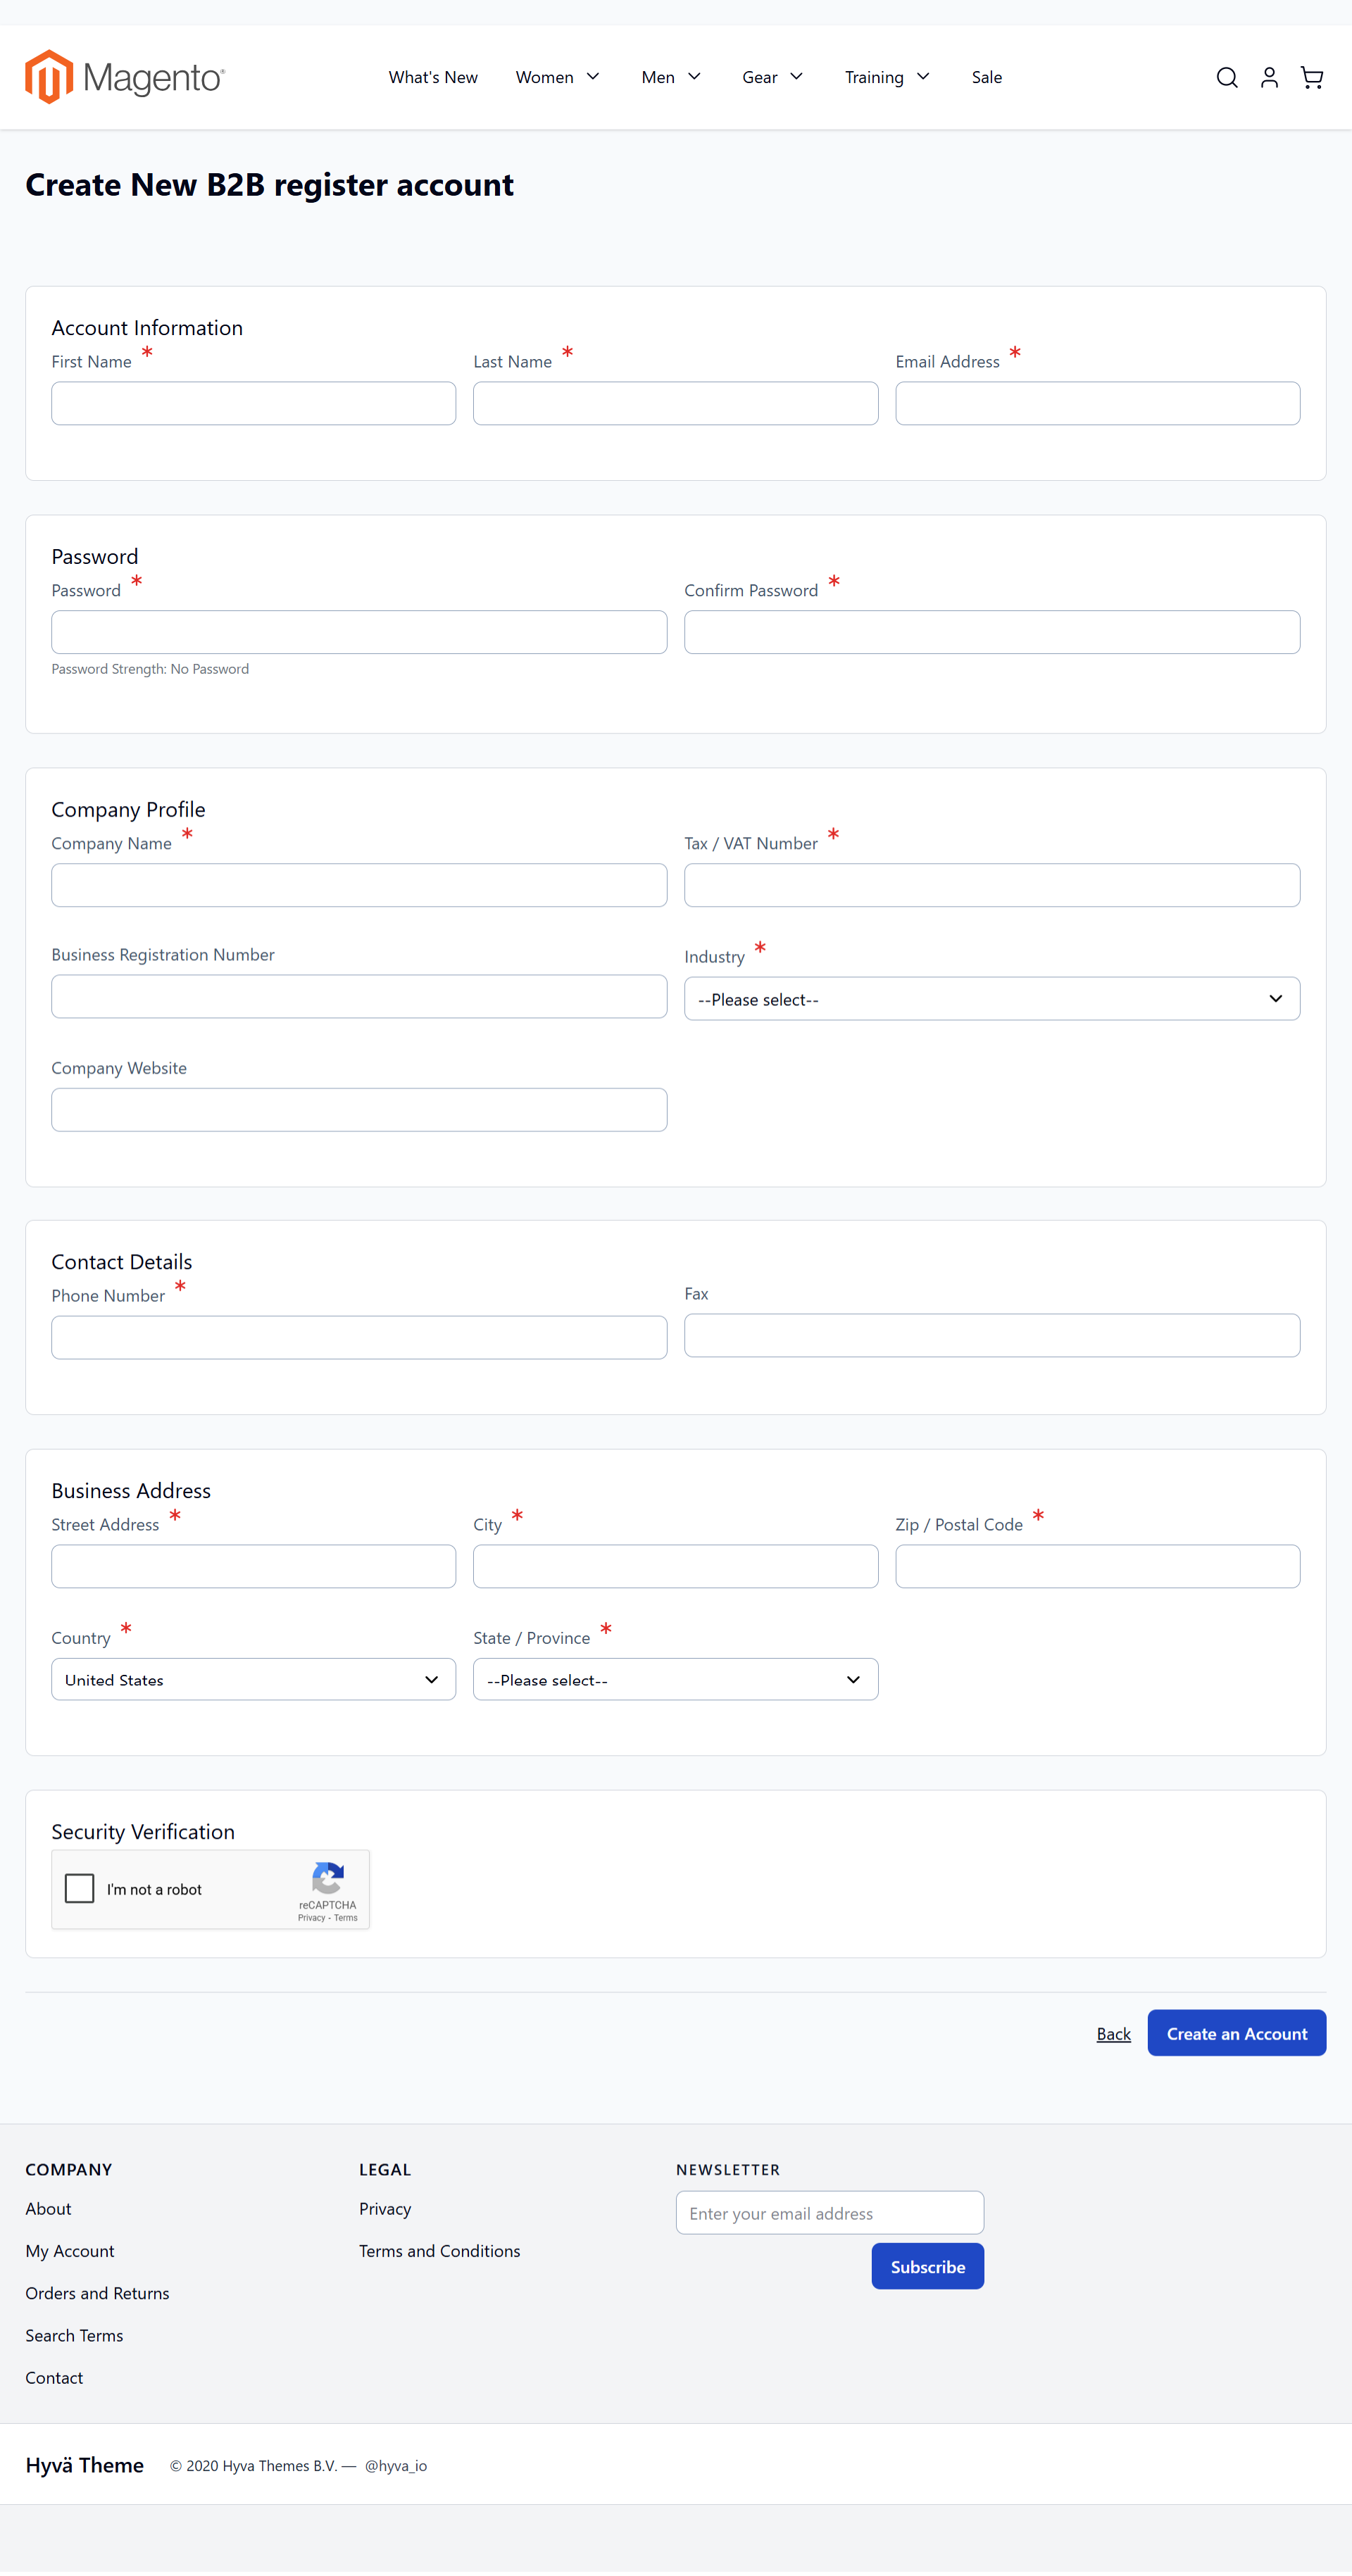
This comprehensive registration form gathers essential business information from new customers. Completing these forms allows businesses to authenticate B2B accounts accurately, ensuring robust customer data collection for strategic engagements.
Navigate Customer Login
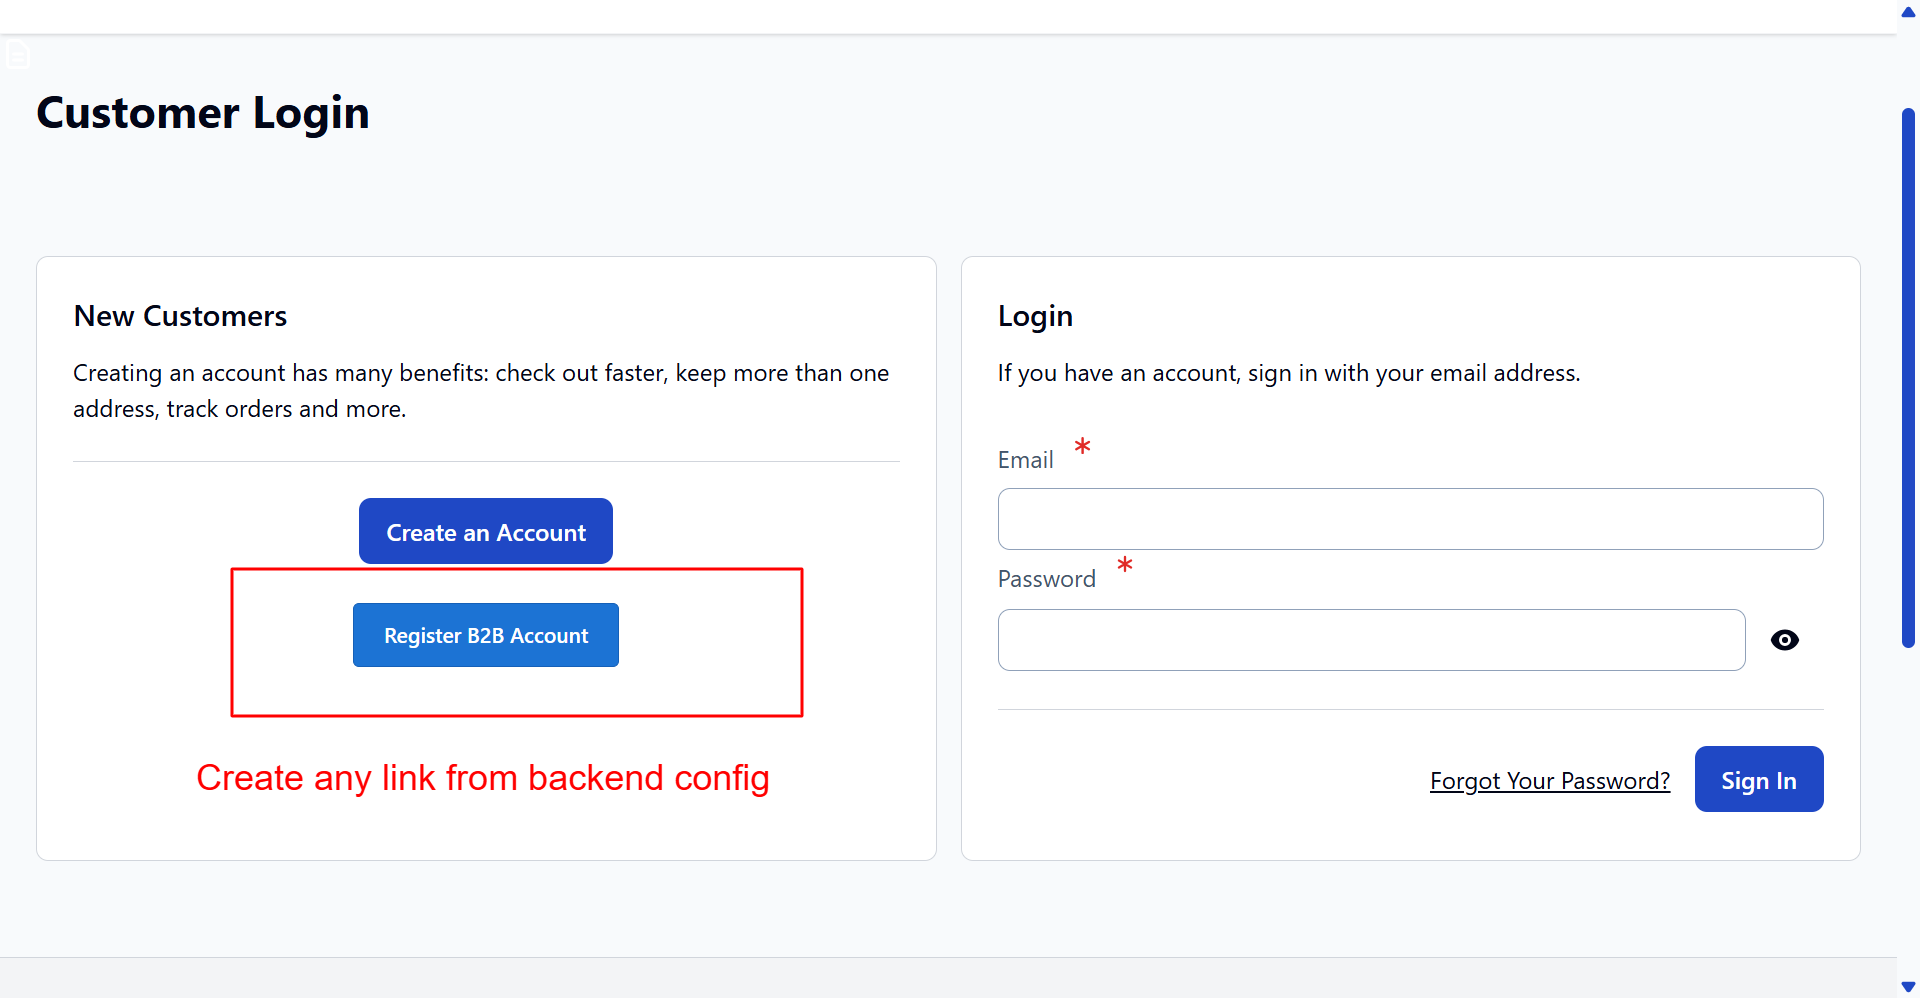
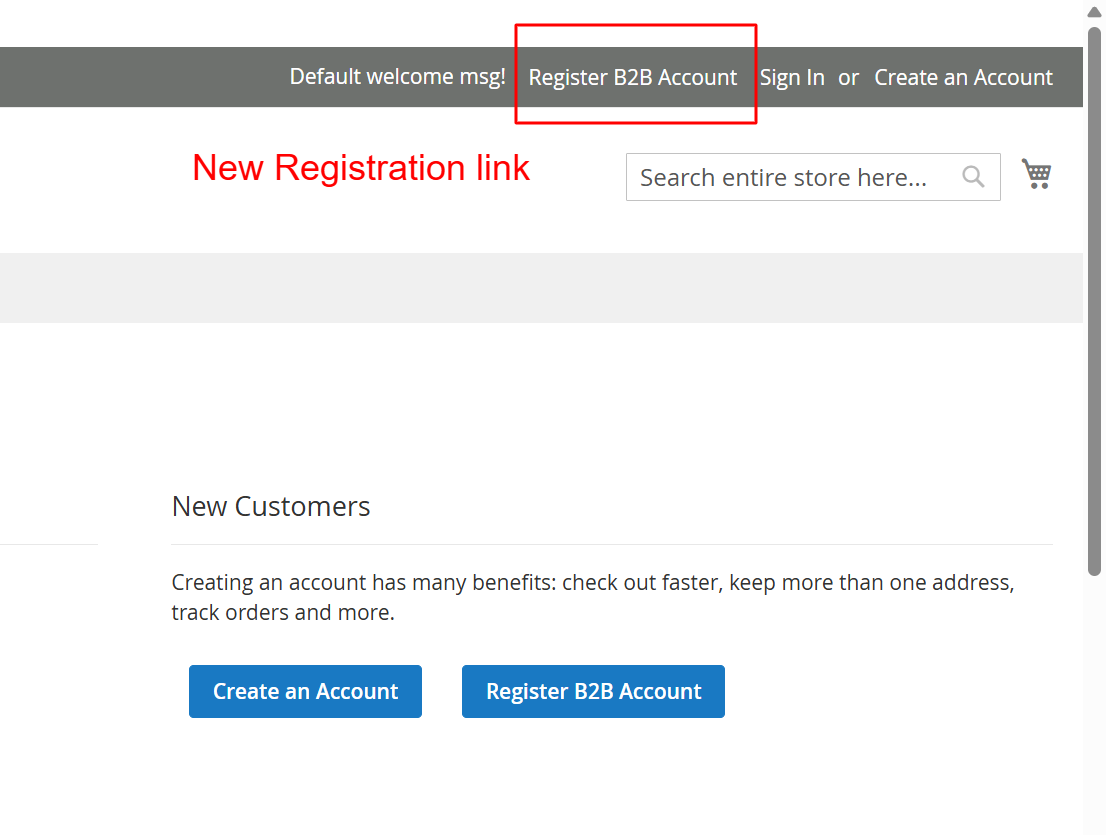
Access the login page to sign into existing accounts or begin new registration processes. Options to create B2B accounts are highlighted, ensuring business clients enjoy a streamlined experience.
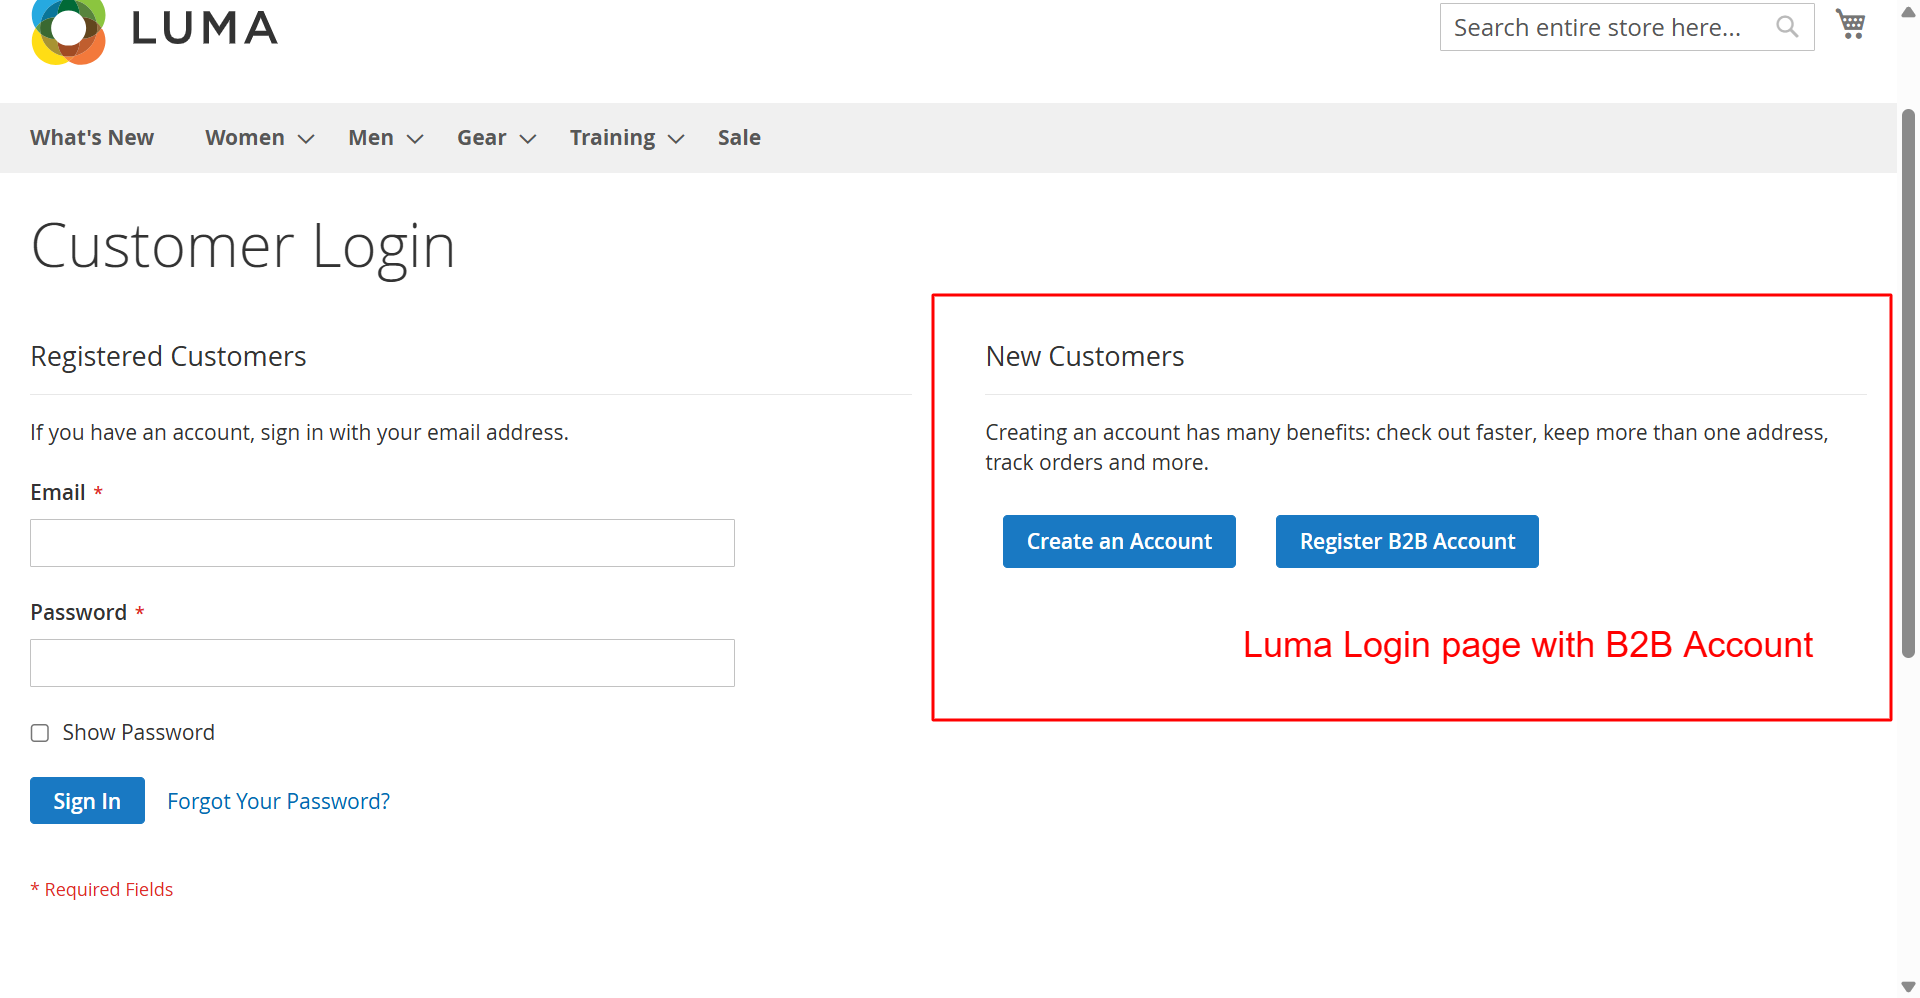
This page offers customers a straightforward login process or the opportunity to register a B2B account. Highlighting B2B registration helps capture business customers, expanding potential user base and enhancing service offerings.
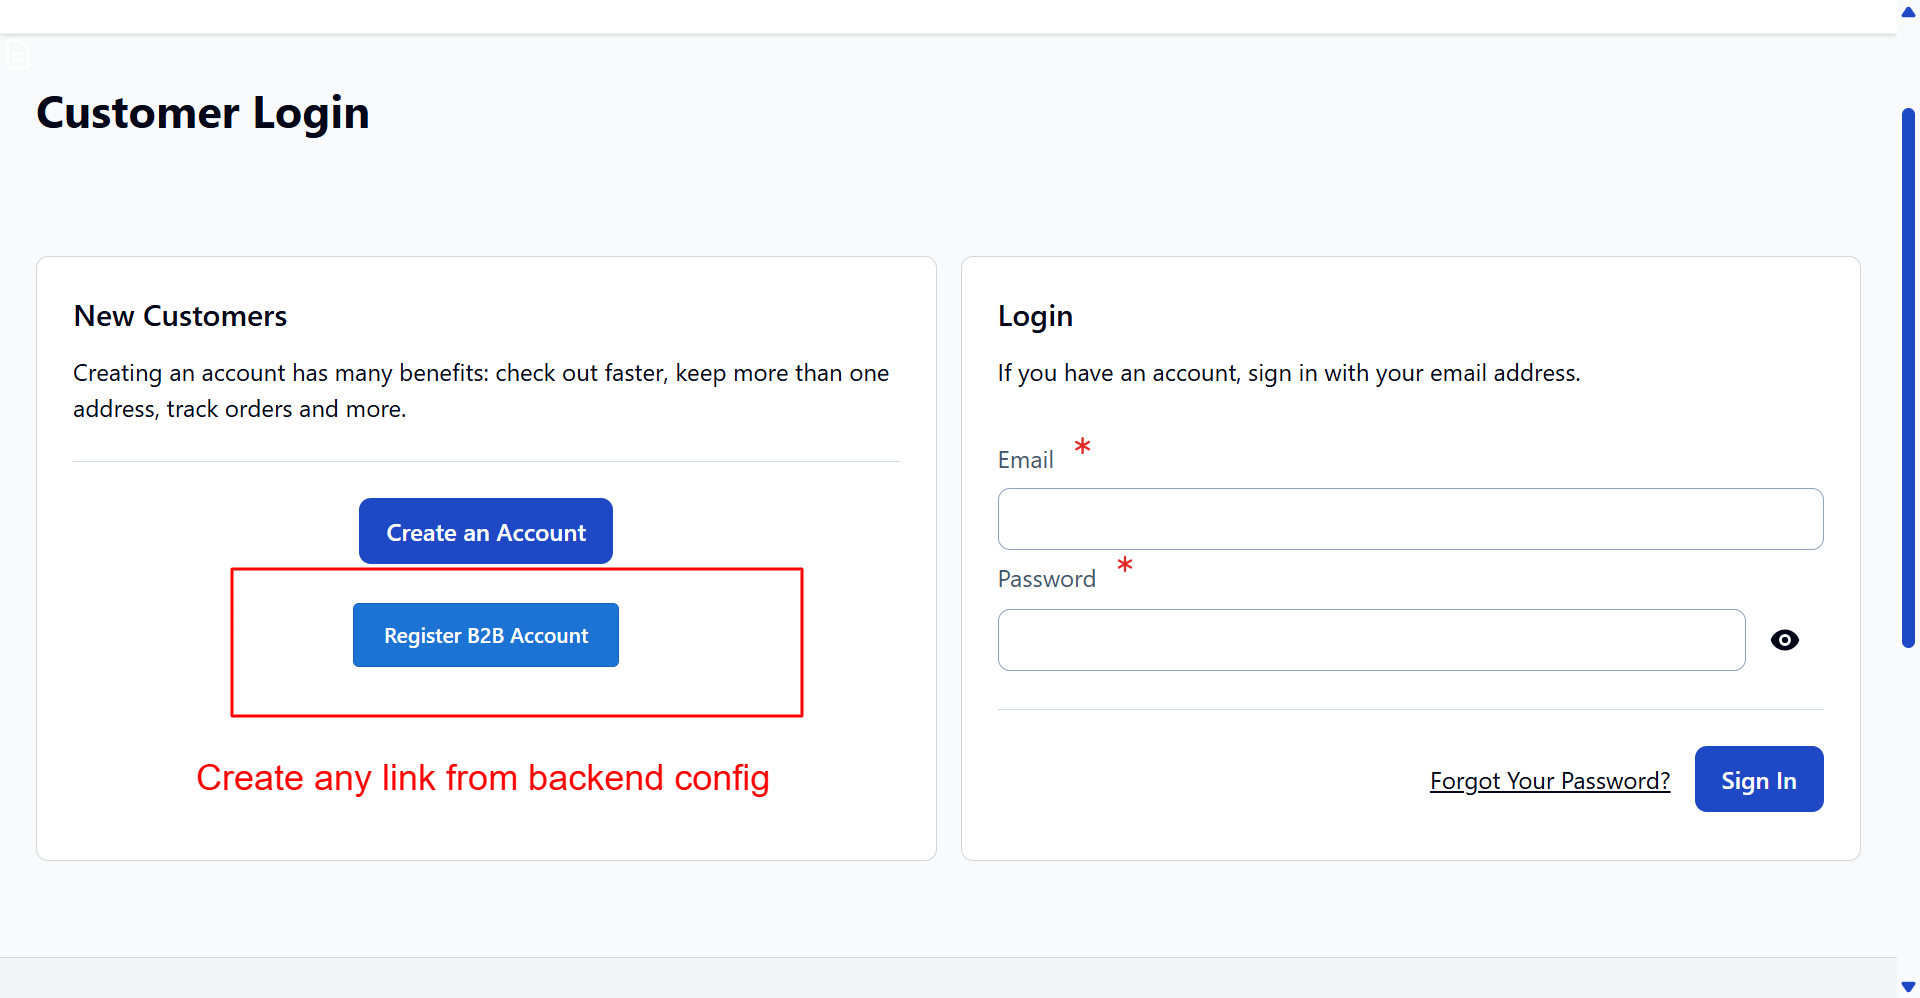
The Hyva theme login page provides a modern user experience with clear account options. Including B2B registration links directly aligns with business growth strategies by targeting organizational clients effectively.
Respond to Registration Errors
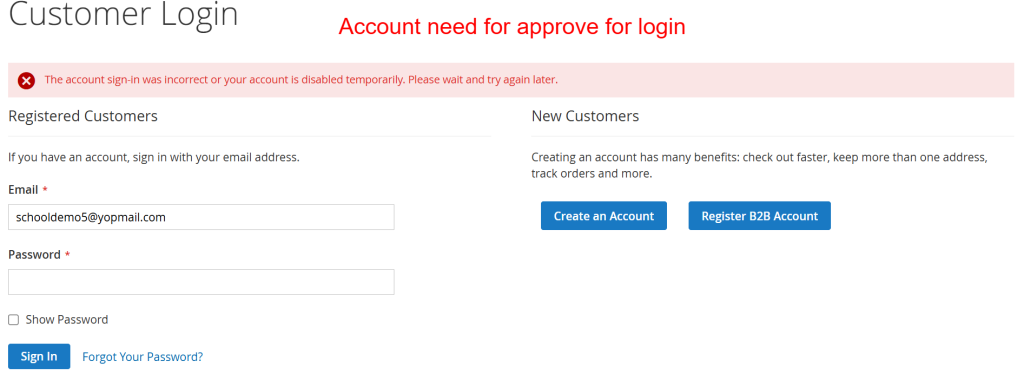
Upon an unsuccessful login attempt, users receive immediate feedback. This feedback system forms part of a proactive approach to user registration and access management, ensuring they are accurately informed on account status.
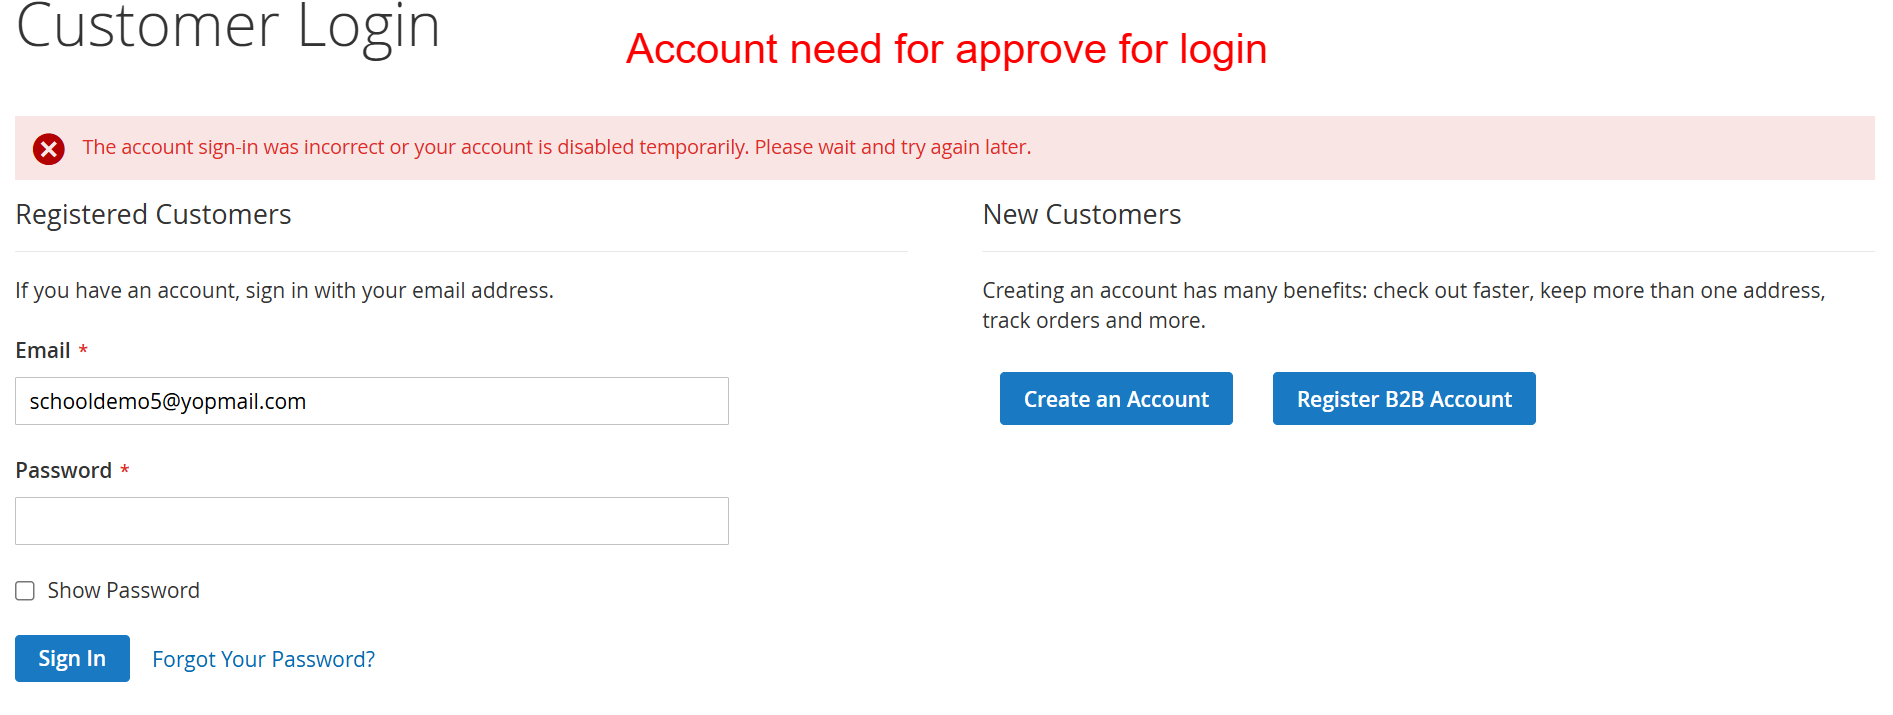
This screen informs users that their login attempt was unsuccessful, possibly due to a temporary account disablement. It is crucial for users whose accounts require admin approval before activation, a feature facilitated by the extension to manage user access proactively.
Access and Manage Account Information
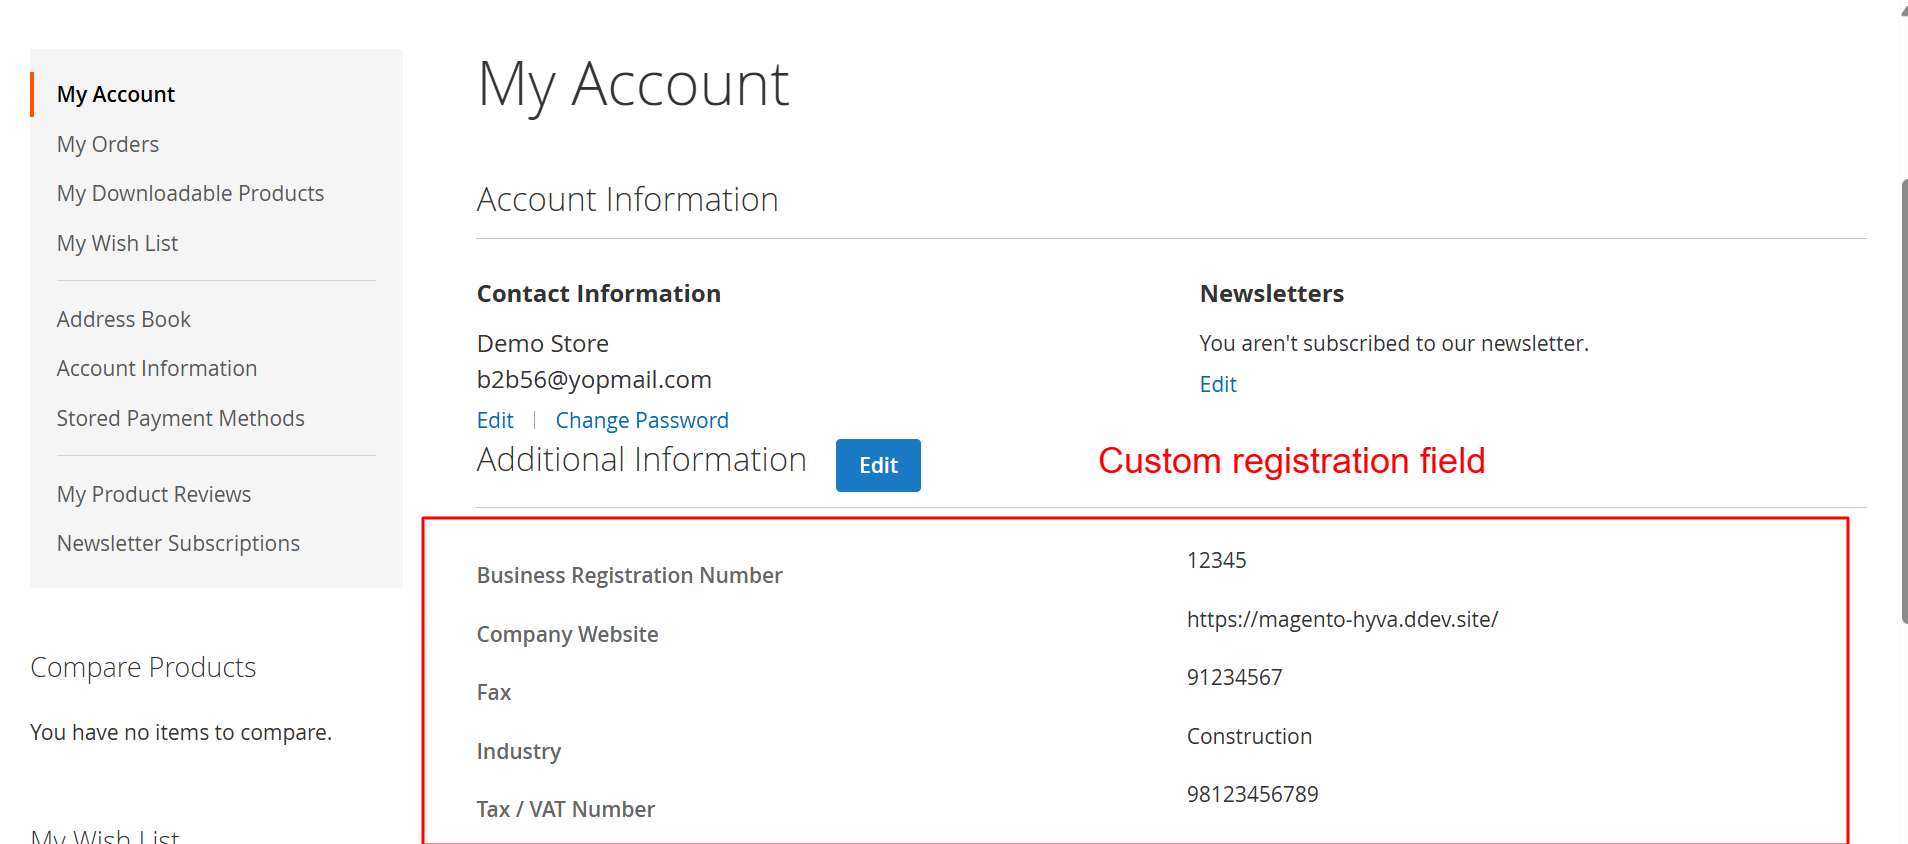
Users can navigate to their account dashboard to review and update personal and business-related data. Enhanced with custom fields, the dashboard supports efficient management of user profiles and account details.
In the My Account Dashboard, users can access and manage their full profile, including custom fields enabled by the extension. The Hyva theme compatibility ensures a seamless user experience, facilitating easy navigation through personal and business data.
5 Use Cases
Streamlined B2B Registration
Handle B2B client registrations with comprehensive forms that gather necessary organizational details like business name, VAT number, and industry type.
Educational Institution Sign-Ups
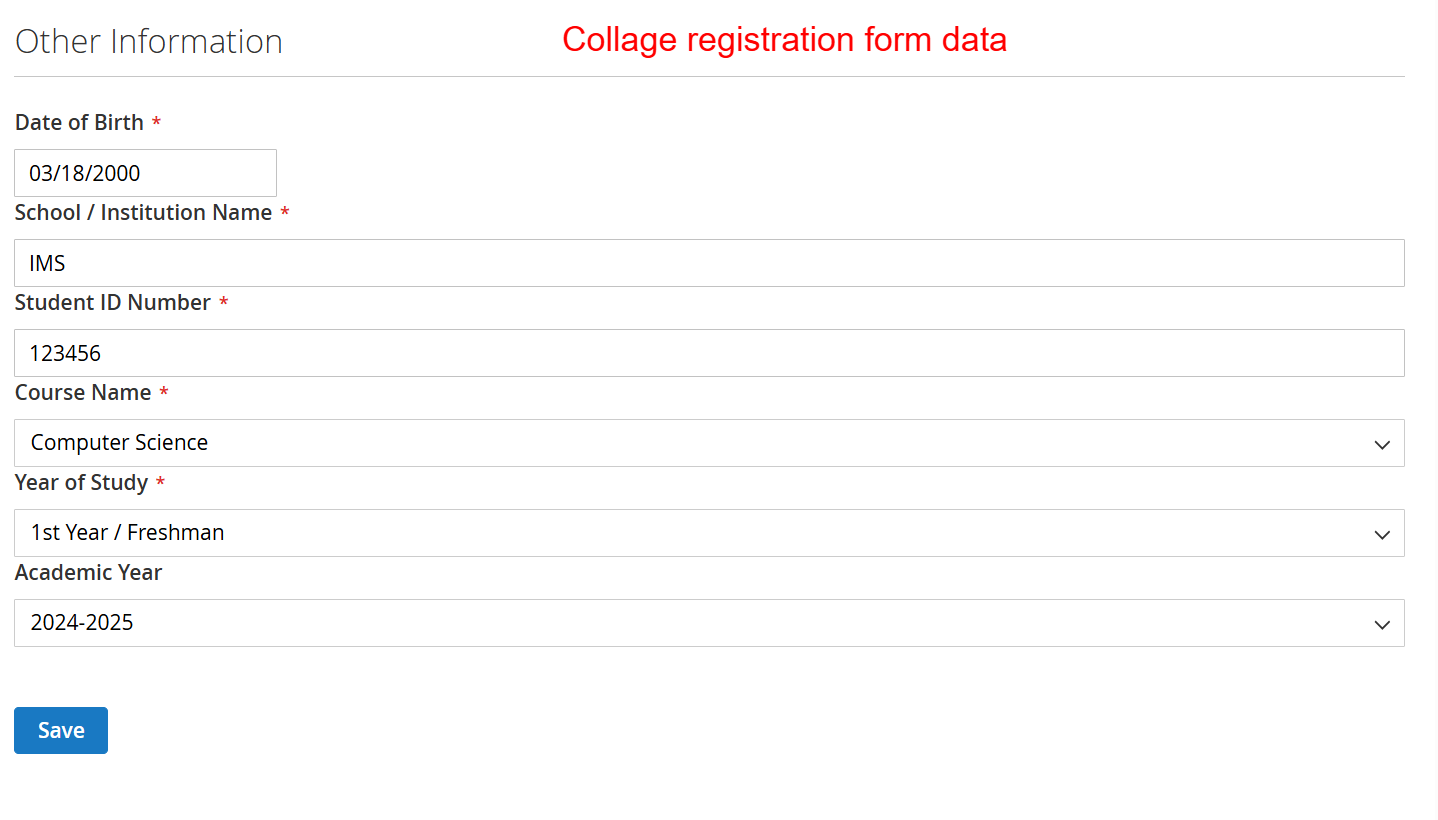
Educational organizations can quickly set up student or teacher registration forms with custom fields capturing school-specific details like student IDs or course enrollments.
Event-Specific Registration Forms
For online or physical events, customize registration with fields specific to event interests, ticket preferences, and demographic data using AI-driven form creation.
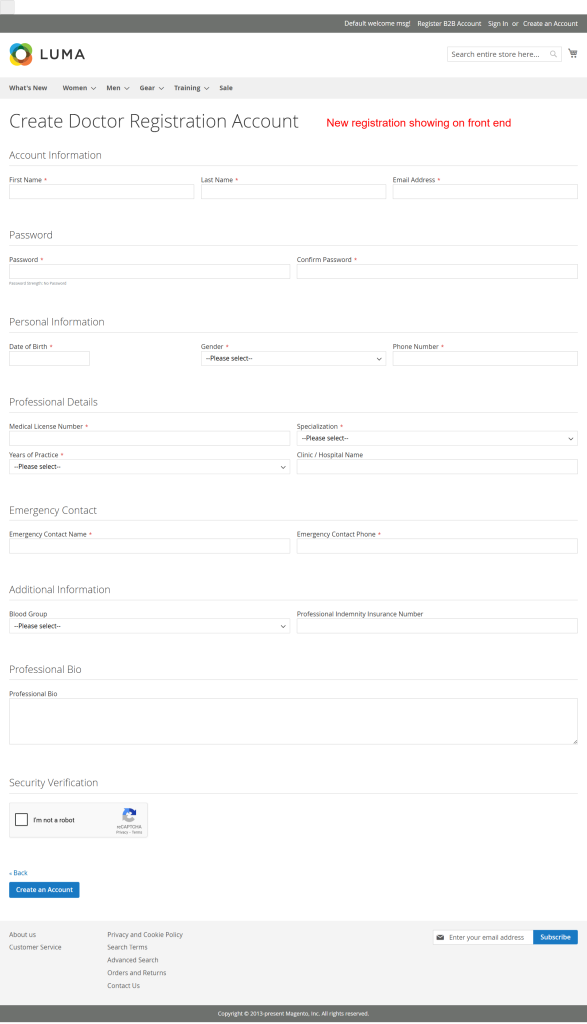
Healthcare Professional Onboarding
Collect detailed professional information from healthcare practitioners by designing forms with fields for medical licenses, qualifications, and specialty areas.
6 Installation Guide
-
Open your CLI terminal and navigate to your Magento 2 root directory.
-
Run
composer require ewebecommerce/module-registration-field-suiteto fetch the module via Composer's package management. -
After requiring the package, run the command
bin/magento setup:upgradeto update the module list. -
Run
bin/magento setup:di:compileto compile the dependency injections necessary for module functionality. -
Lastly, clear the cache using
bin/magento cache:cleanto ensure the new setup refreshes in your Magento environment.
7 Database Schema (7 Tables)
eweb_regfields_form
| Column | Type | Nullable |
|---|---|---|
form_id |
false | |
view_id |
false | |
form_key |
false | |
config |
false | |
use_default |
true |
eweb_regfields_form_settings
| Column | Type | Nullable |
|---|---|---|
setting_id |
false | |
view_id |
false | |
form_key |
false | |
url_key |
true | |
form_title |
true | |
show_login_button |
false | |
login_button_text |
true | |
show_header_link |
false | |
header_link_text |
true |
eweb_regfields_customer_options
| Column | Type | Nullable |
|---|---|---|
option_id |
false | |
customer_id |
false | |
key |
false | |
value |
false |
eweb_pendingregistration_users
| Column | Type | Nullable |
|---|---|---|
customer_id |
false | |
status |
false | |
ip |
false | |
date |
false |
eweb_pendingregistration_settings
| Column | Type | Nullable |
|---|---|---|
id |
false | |
name |
false | |
value |
false | |
scope |
false | |
scope_area |
false |
eweb_pendingregistration_templates
| Column | Type | Nullable |
|---|---|---|
id |
false | |
type |
false | |
from_name |
false | |
from_email |
false | |
admin_email |
false | |
subject |
false | |
cc |
false | |
bcc |
false | |
email_content |
false | |
email_styles |
false | |
active |
false | |
scope |
false | |
scope_area |
false |
eweb_pendingregistration_customergroups
| Column | Type | Nullable |
|---|---|---|
entry_id |
false | |
group_id |
false | |
store_id |
false | |
website_id |
false | |
all_groups |
true |
8 Architecture
Event Observers
| Event | Observer | Area | |||||||
|---|---|---|---|---|---|---|---|---|---|
customer_customer_authenticated |
AddCustomOptionToAuthenticated |
global | |||||||
customer_load_after |
AddCustomOptionsToCustomer |
global | |||||||
adminhtml_customer_save_after |
SaveCustomOptions |
global | |||||||
controller_front_init_before |
FixOverride |
global | |||||||
customer_save_after |
SaveCustomer |
global | |||||||
adminhtml_customer_prepare_save |
SetFlag |
global | |||||||
customer_login |
CheckLoginAbility |
global | |||||||
controller_action_predispatch_customer_account_createpost</ td >< td >< code > SendEmails < / code > < / td >< td > global < / td > < / tr > < tr > < td >< code > customer_register_success < / code > < / td >< td >< code > RegisterSuccess < / code > < / td >< td > global < / td > < / tr > < tr > < td >< code > admin_system_config_changed_section_eweb_pendingreg < / code > < / td >< td >< code > CustomerGroupsPost < / code > < / td >< td > global < / td > < / tr > < tr > < td >< code > eweb_regfields_pending_error < / code > < / td >< td >< code > PendingRegFields < / code > < / td >< td > global < / td > < / tr > </ tbody ></ table >
Plugin Interceptors< td > < code > AddressRepositoryInterface </ code > </ td >
1
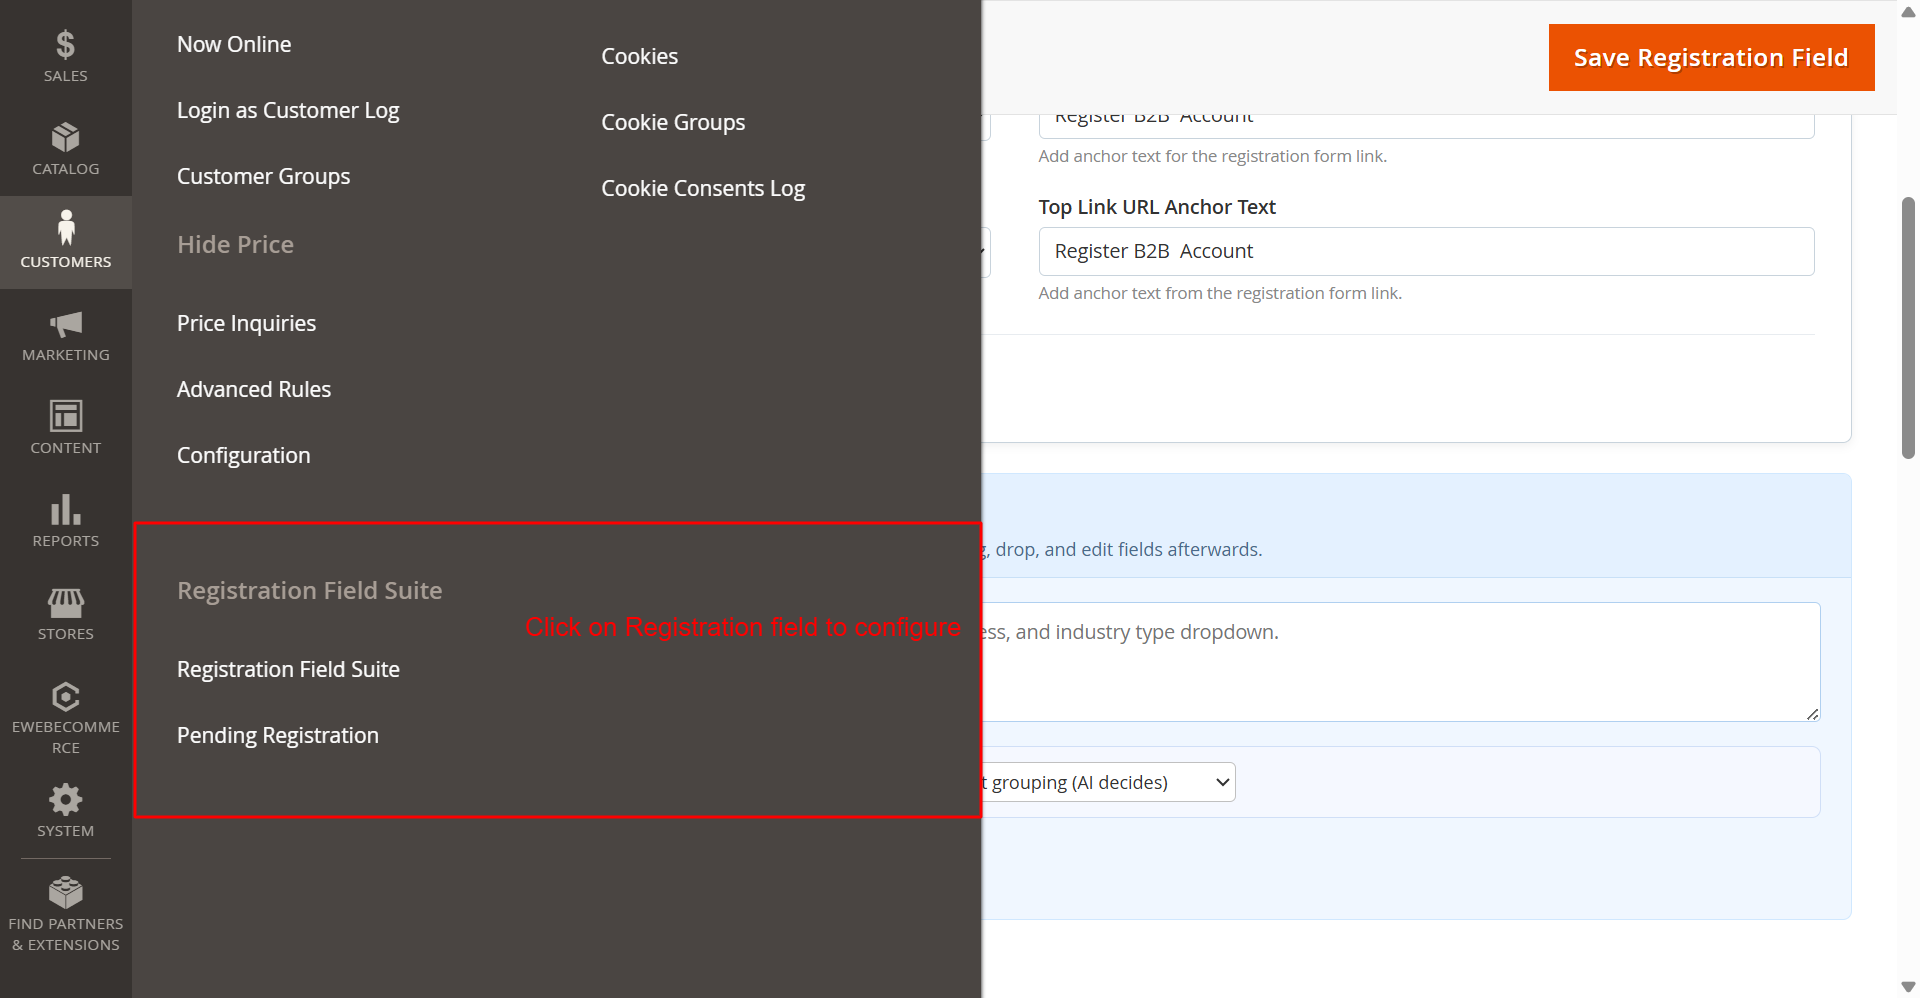
Admin: Customers > Registration Field Suite SettingsWhat this shows: The side navigation menu with 'Registration Field Suite' and 'Pending Registration' options under the 'Customers' section. This screen displays the navigation menu where you access the Registration Field Suite options. By selecting 'Registration Field Suite', you can configure various registration settings, including custom fields, captcha, and approval processes, crucial for tailoring registration to fit your needs. 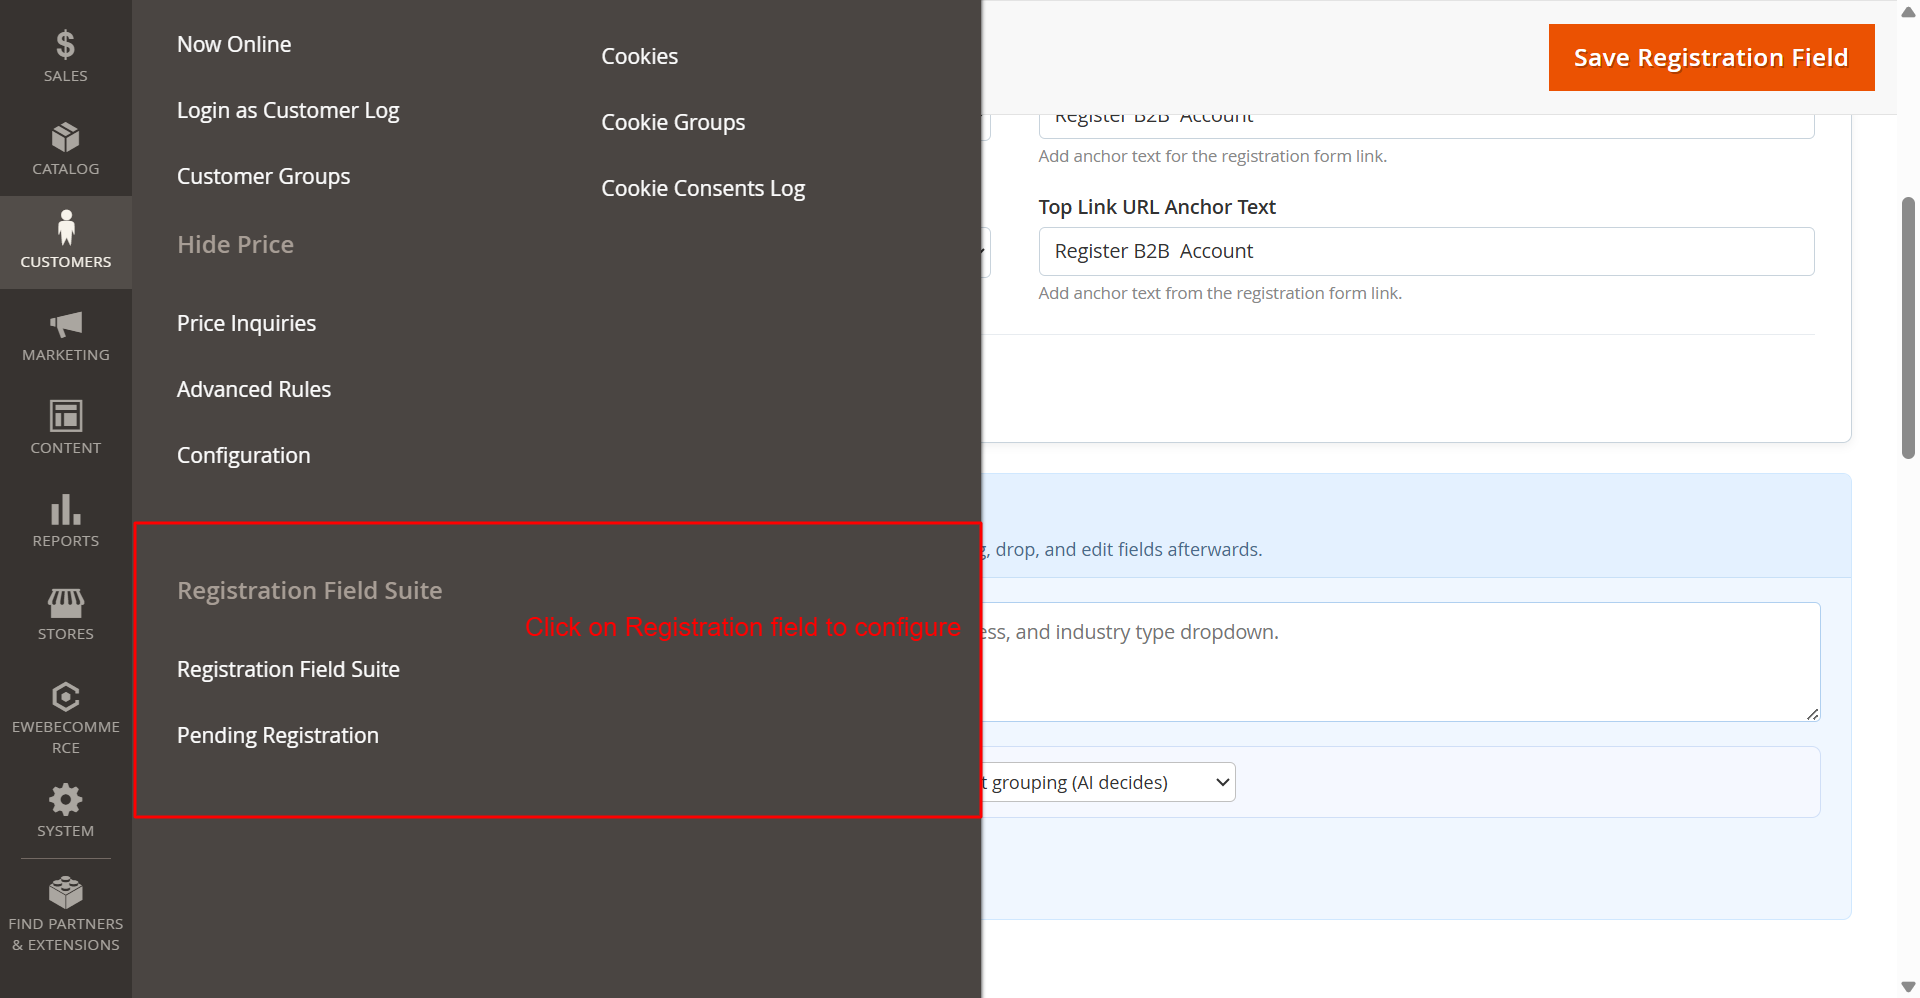 2
General Settings: Enable Registration Fields ModuleWhat this shows: A dropdown labeled 'Enable Registration Fields' with options to enable or disable the registration fields functionality. In this section, you enable or disable the custom registration fields provided by the Ewebecommerce_RegistrationFieldSuite module. Activating this feature introduces flexible form fields that can enhance the user registration process, allowing for a more customized user experience. 3
Google reCAPTCHA Configuration for RegistrationWhat this shows: Fields to configure Google reCAPTCHA v2 and v3 keys for the registration form including site and secret keys. This configuration section allows you to enhance security by adding Google reCAPTCHA to the registration forms. By entering the necessary site and secret keys, you can protect your registration page from automated submissions, ensuring only legitimate user registrations. 4
AI Form Generator: API Key ConfigurationWhat this shows: Options for setting API keys for AI services like OpenAI, Claude, and Google Gemini, including selecting the specific AI provider and model. Configure API keys for various AI providers here to leverage AI-driven form generation features. Selecting the appropriate provider and model enables the dynamic generation of registration forms, which can adapt based on AI recommendations, facilitating efficient form setup. 5
Pending Registration: Enable Extension and Manual ValidationWhat this shows: A setting to enable the extension and a dropdown to select customer groups for manual validation. This configuration allows you to activate the Pending Registration feature and select which customer groups require manual validation. By controlling registration status through this setting, you ensure that certain user groups meet predefined criteria before gaining access, enhancing customer management. 6
Email Notification Settings for Registration EventsWhat this shows: Dropdown menus to select email templates and senders for various registration notifications, including admin and customer emails. Setup automated email notifications for registration events by configuring templates and senders here. This ensures timely communication with both admins and customers regarding registration status updates, helping maintain clear and efficient communication channels. 7
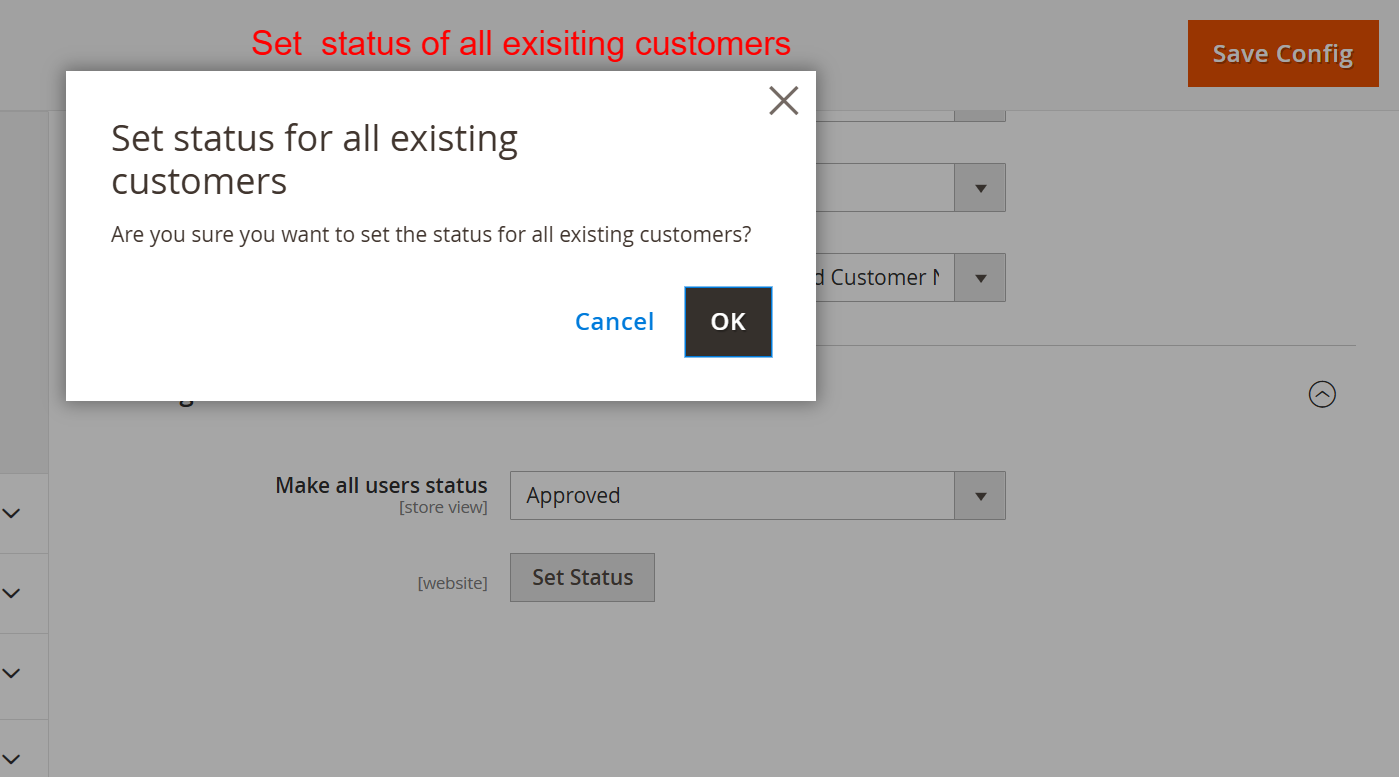
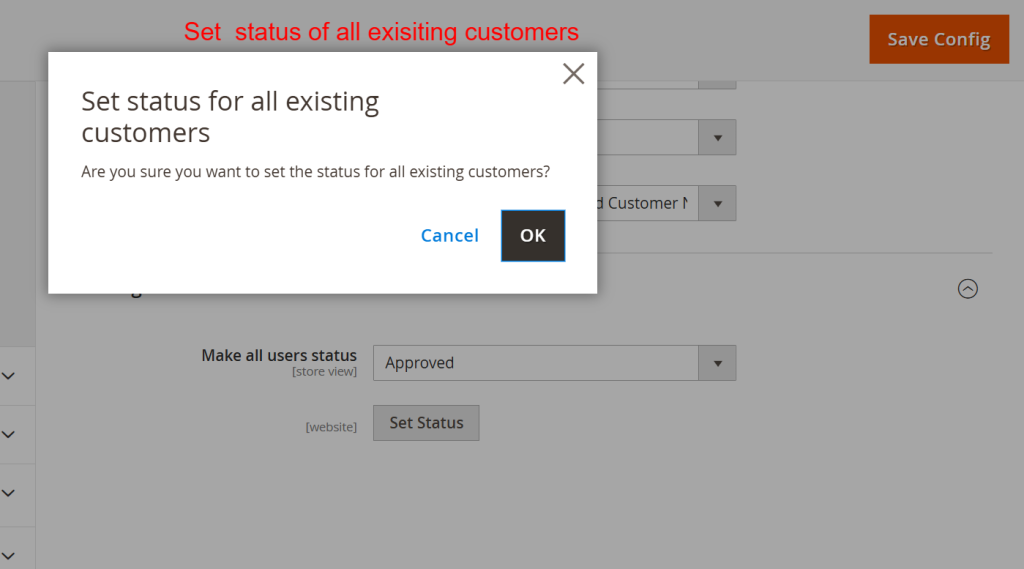
Set Status for All Existing CustomersWhat this shows: A dialog box confirming the action to set the status for all existing customers, accompanied by buttons for confirmation. Use this feature to uniformly set the status of all existing customers, which helps maintain consistent registration statuses across your customer base. This is particularly useful during initial setup or when changing default approval flows. 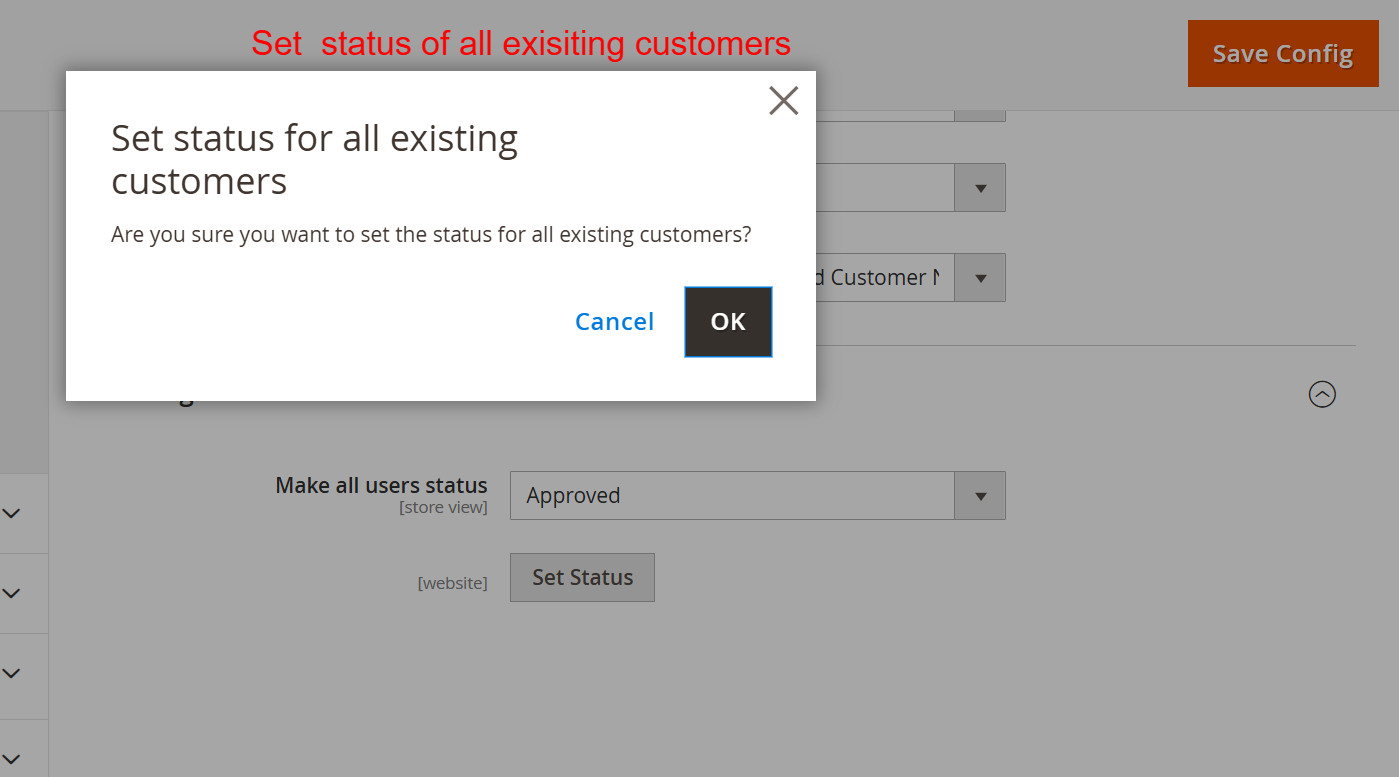 8
Set Default Status of New RegistrationsWhat this shows: Options to set the default status for all users upon new registration, with a dropdown for selecting the status and a 'Set Status' button. This setting defines the default status assigned to users after registration, allowing admins to control the access level or activation process. By determining this default, you ensure new users start with the appropriate status, facilitating smoother onboarding processes. 9
Dashboard: Registration Forms OverviewWhat this shows: The dashboard displays a table listing registration forms, including columns for Form Name, Identifier, Store View, URL, Page Title, Login Button, Header Link, and Actions like Edit and Delete. This screen provides an overview of all existing registration forms. Administrators can view key details for each form and quickly access actions to edit or delete forms. The ability to manage forms from a single interface streamlines the process of maintaining and customizing registration flows for different store views. 10
Edit: B2B Registration Form SettingsWhat this shows: The screen shows fields for editing registration settings, including URL Key, Form Title, Button Text, and options for Captcha Type and Section Style. It also highlights AI form generation prompts and a save button. On this screen, administrators customize specific aspects of the B2B registration form, such as URL and title. AI tools can be leveraged to generate forms based on prompts, allowing for efficient creation and customization. This flexibility is crucial for optimizing user registration experiences tailored to business needs. 11
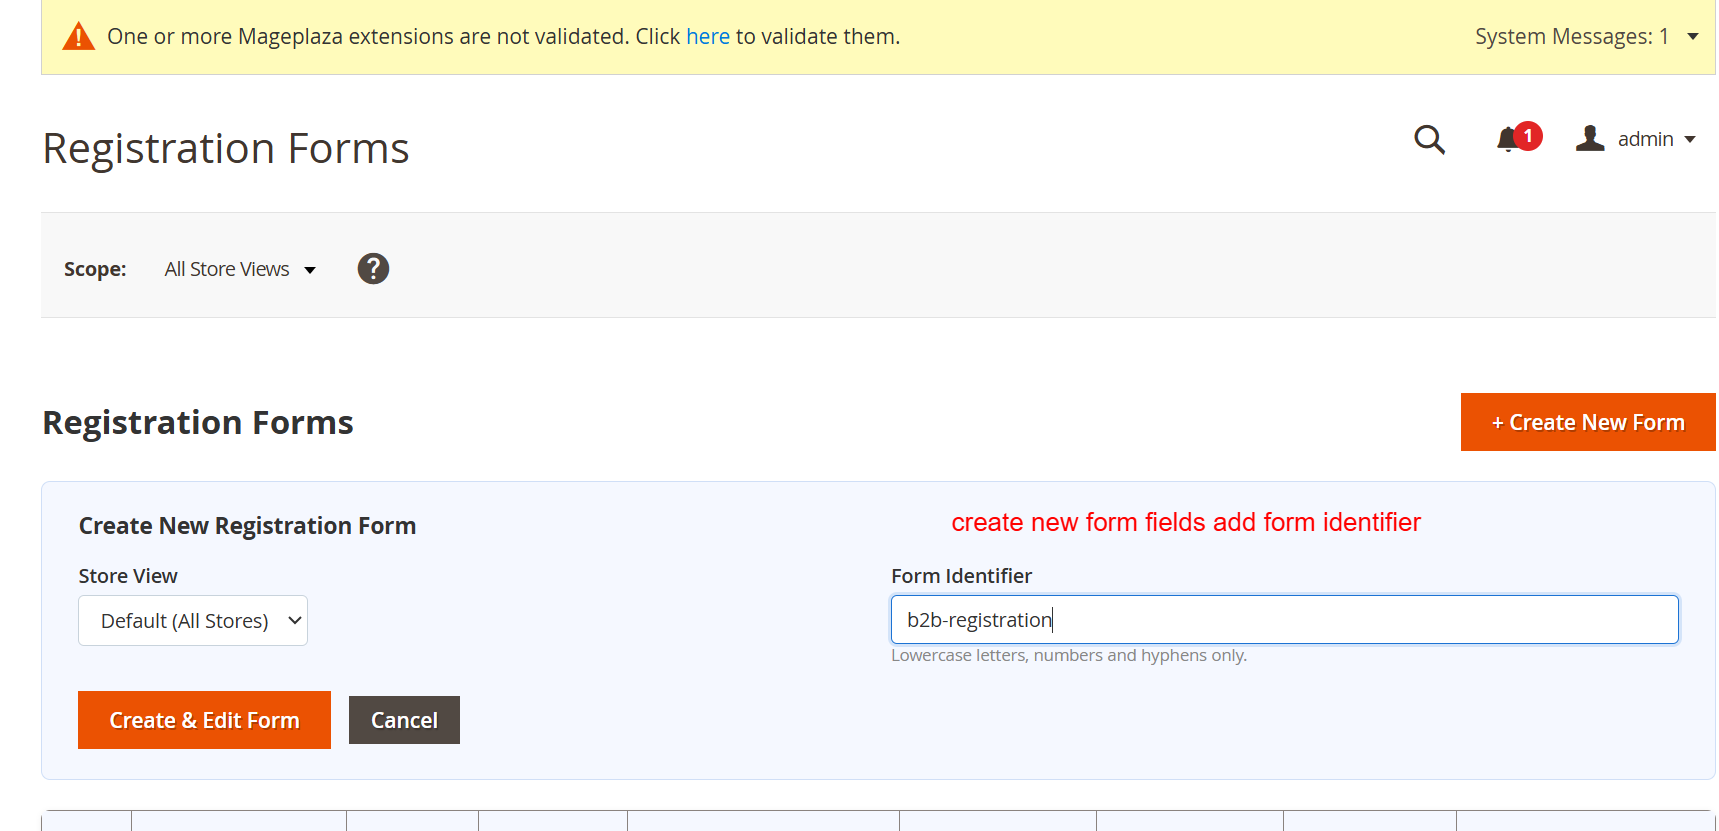
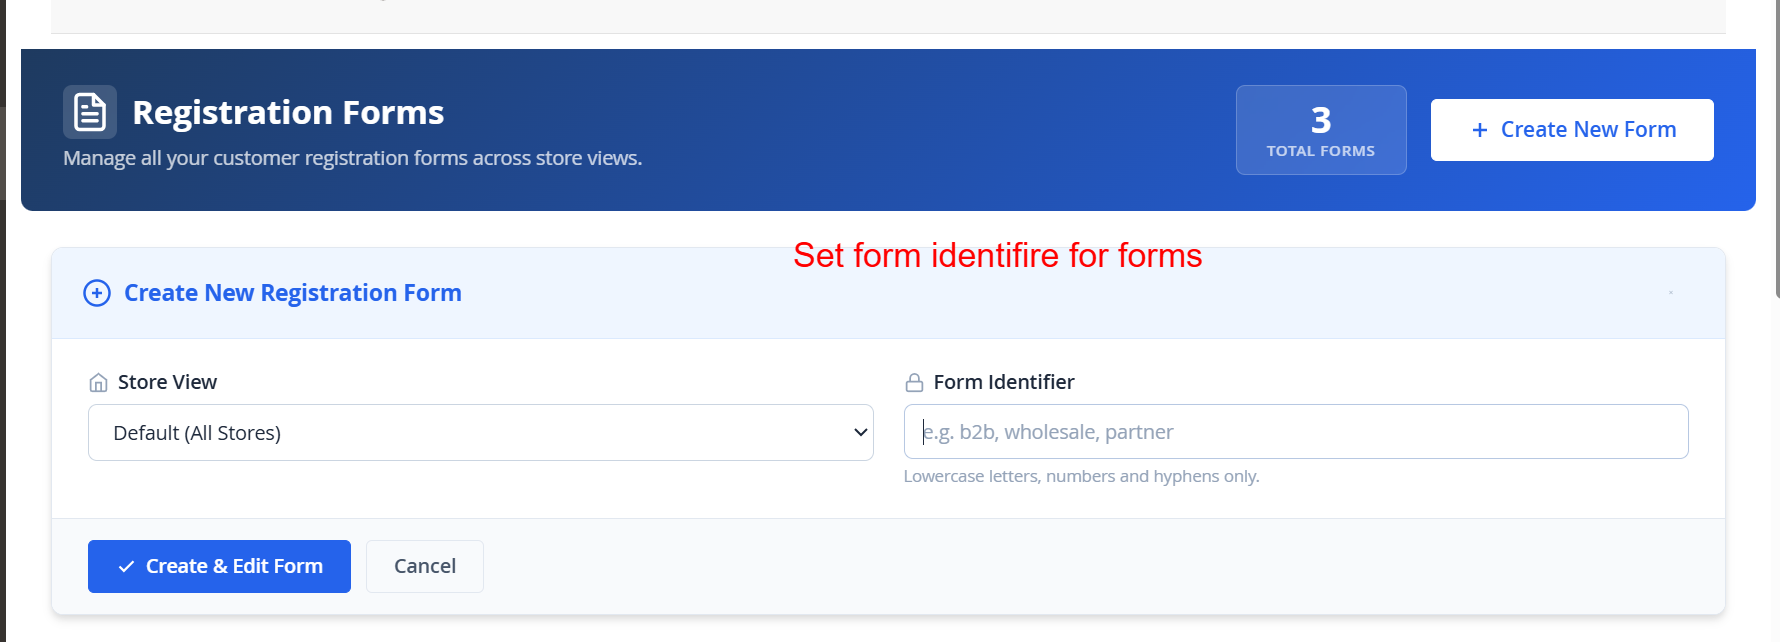
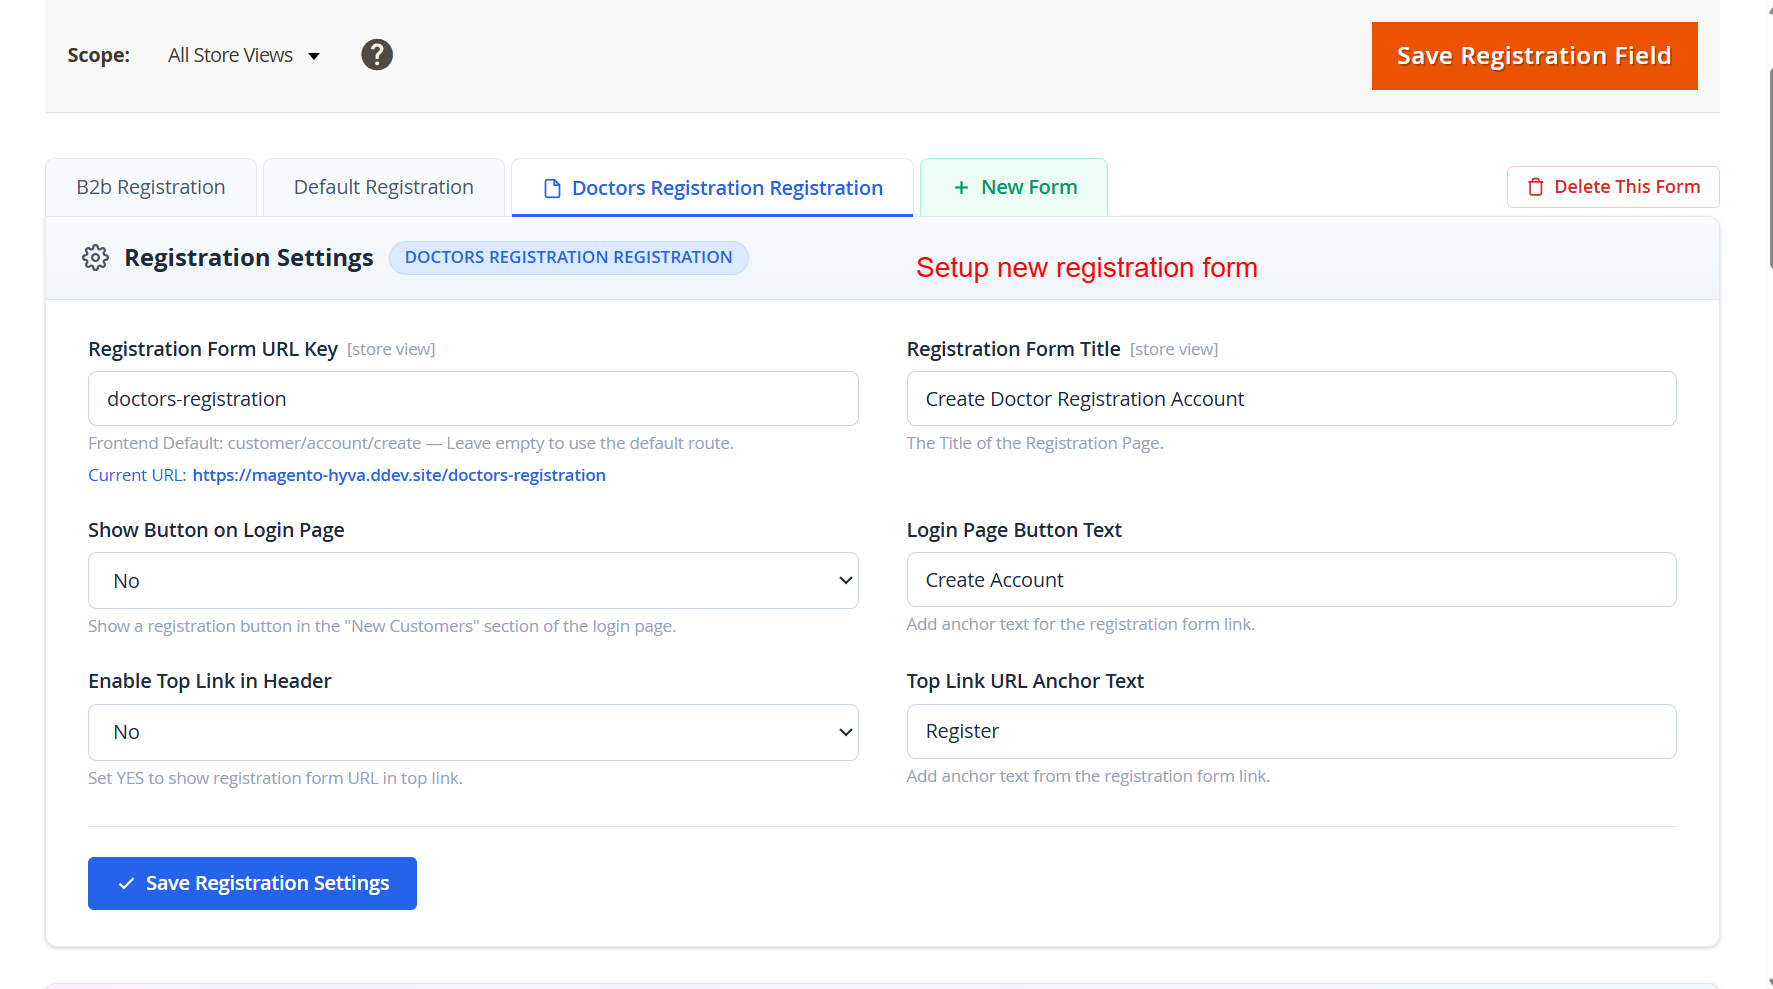
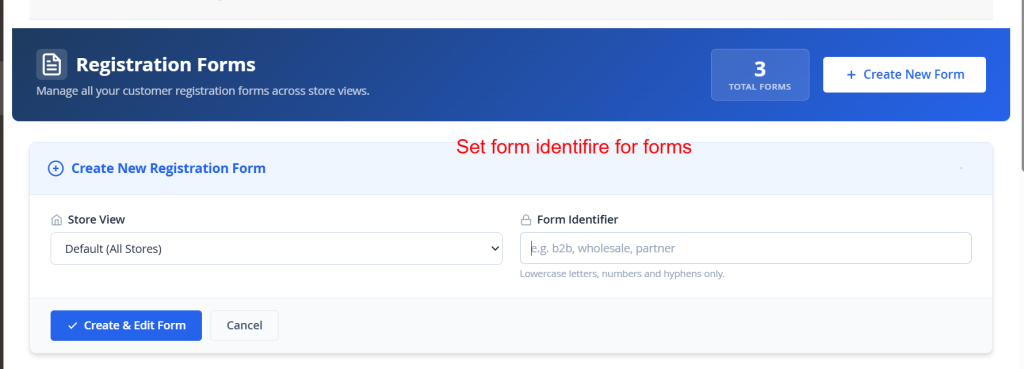
Create: New Registration Form IdentifierWhat this shows: This screen allows for the creation of a new registration form, with fields for selecting Store View and setting a Form Identifier. Here, new registration forms can be initiated by determining their store view and unique identifier. This setup is essential to ensure that forms are correctly grouped and easily retrievable during further configuration or on the frontend, simplifying form management. 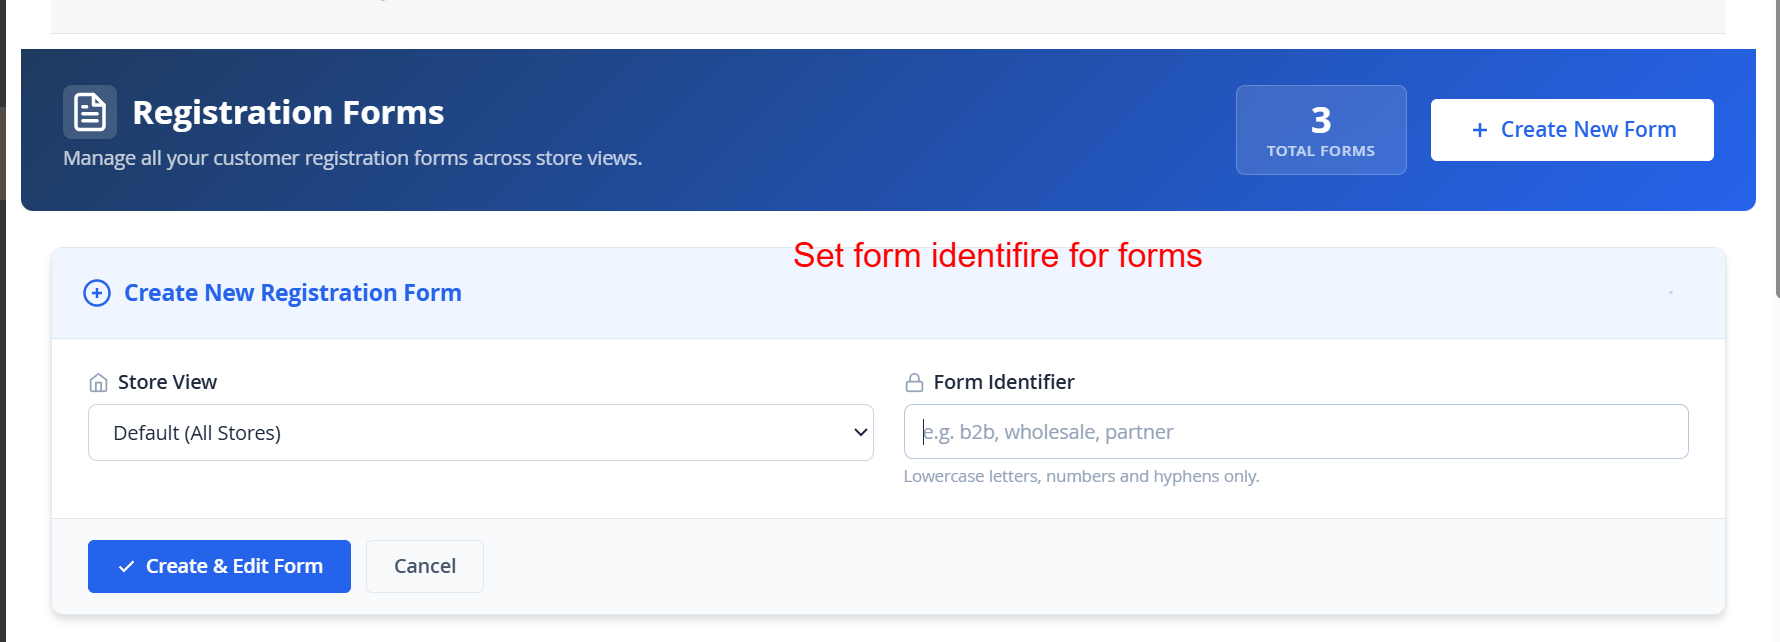 12
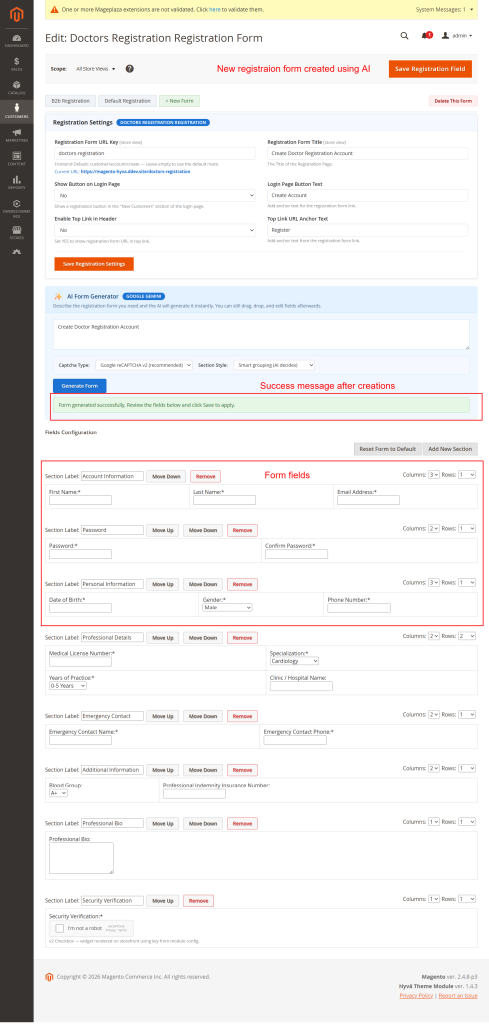
AI-Driven Form CreationWhat this shows: It displays an AI form generator section with input for form descriptions, captcha type selection, and the 'Generate Form' button. This interface empowers administrators to use AI to rapidly create registration forms by entering descriptive prompts. The AI generates forms matching the specified characteristics, which can be fine-tuned post-generation. This offers a significant efficiency boost, enabling quick rollout of diverse forms for varied registration needs. 13
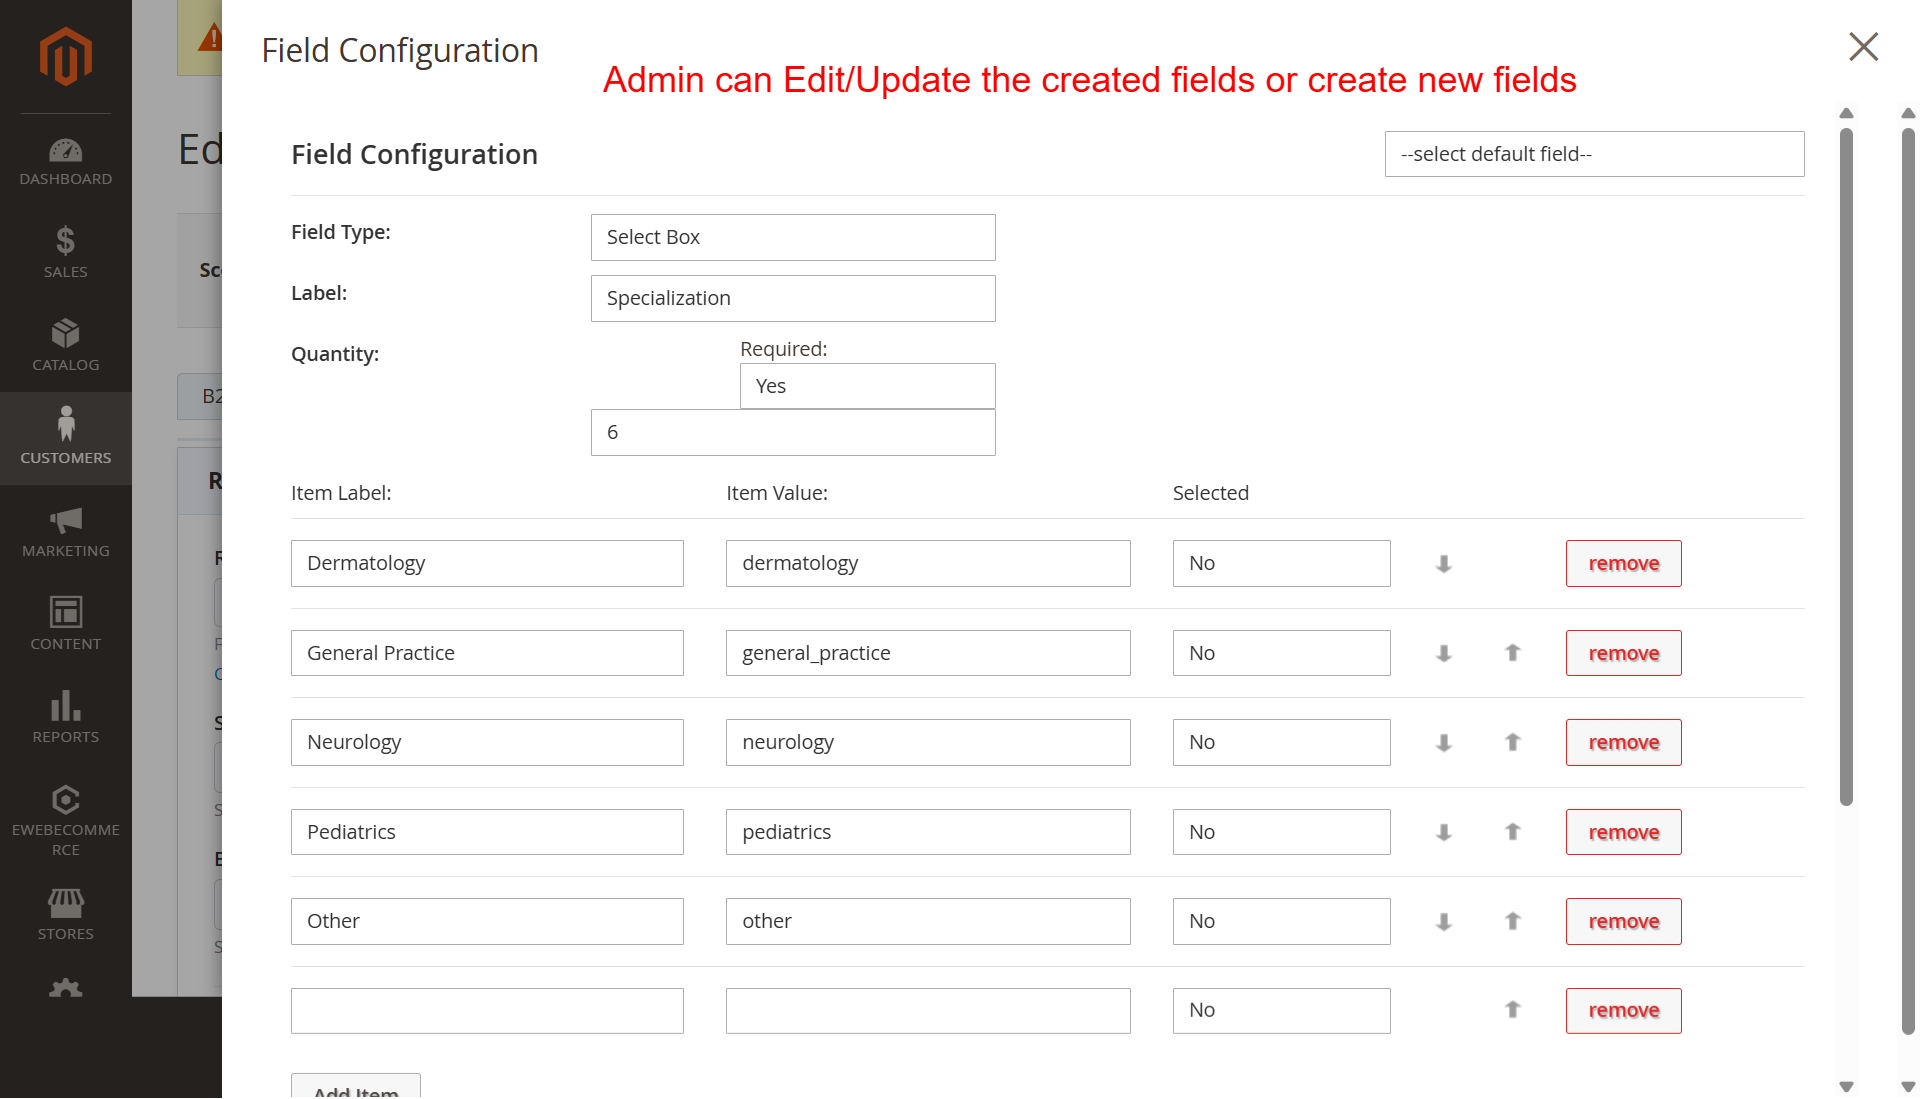
Field Configuration: Edit or Add FieldsWhat this shows: A modal shows form field settings, including options for field type, label, quantity, and item customization, with actions to add or remove items. Administrators use this screen to customize form fields, either by editing existing options or adding new ones. This granular control is critical for tailoring registration fields to meet unique business requirements, ensuring that all necessary information is collected during user signup. 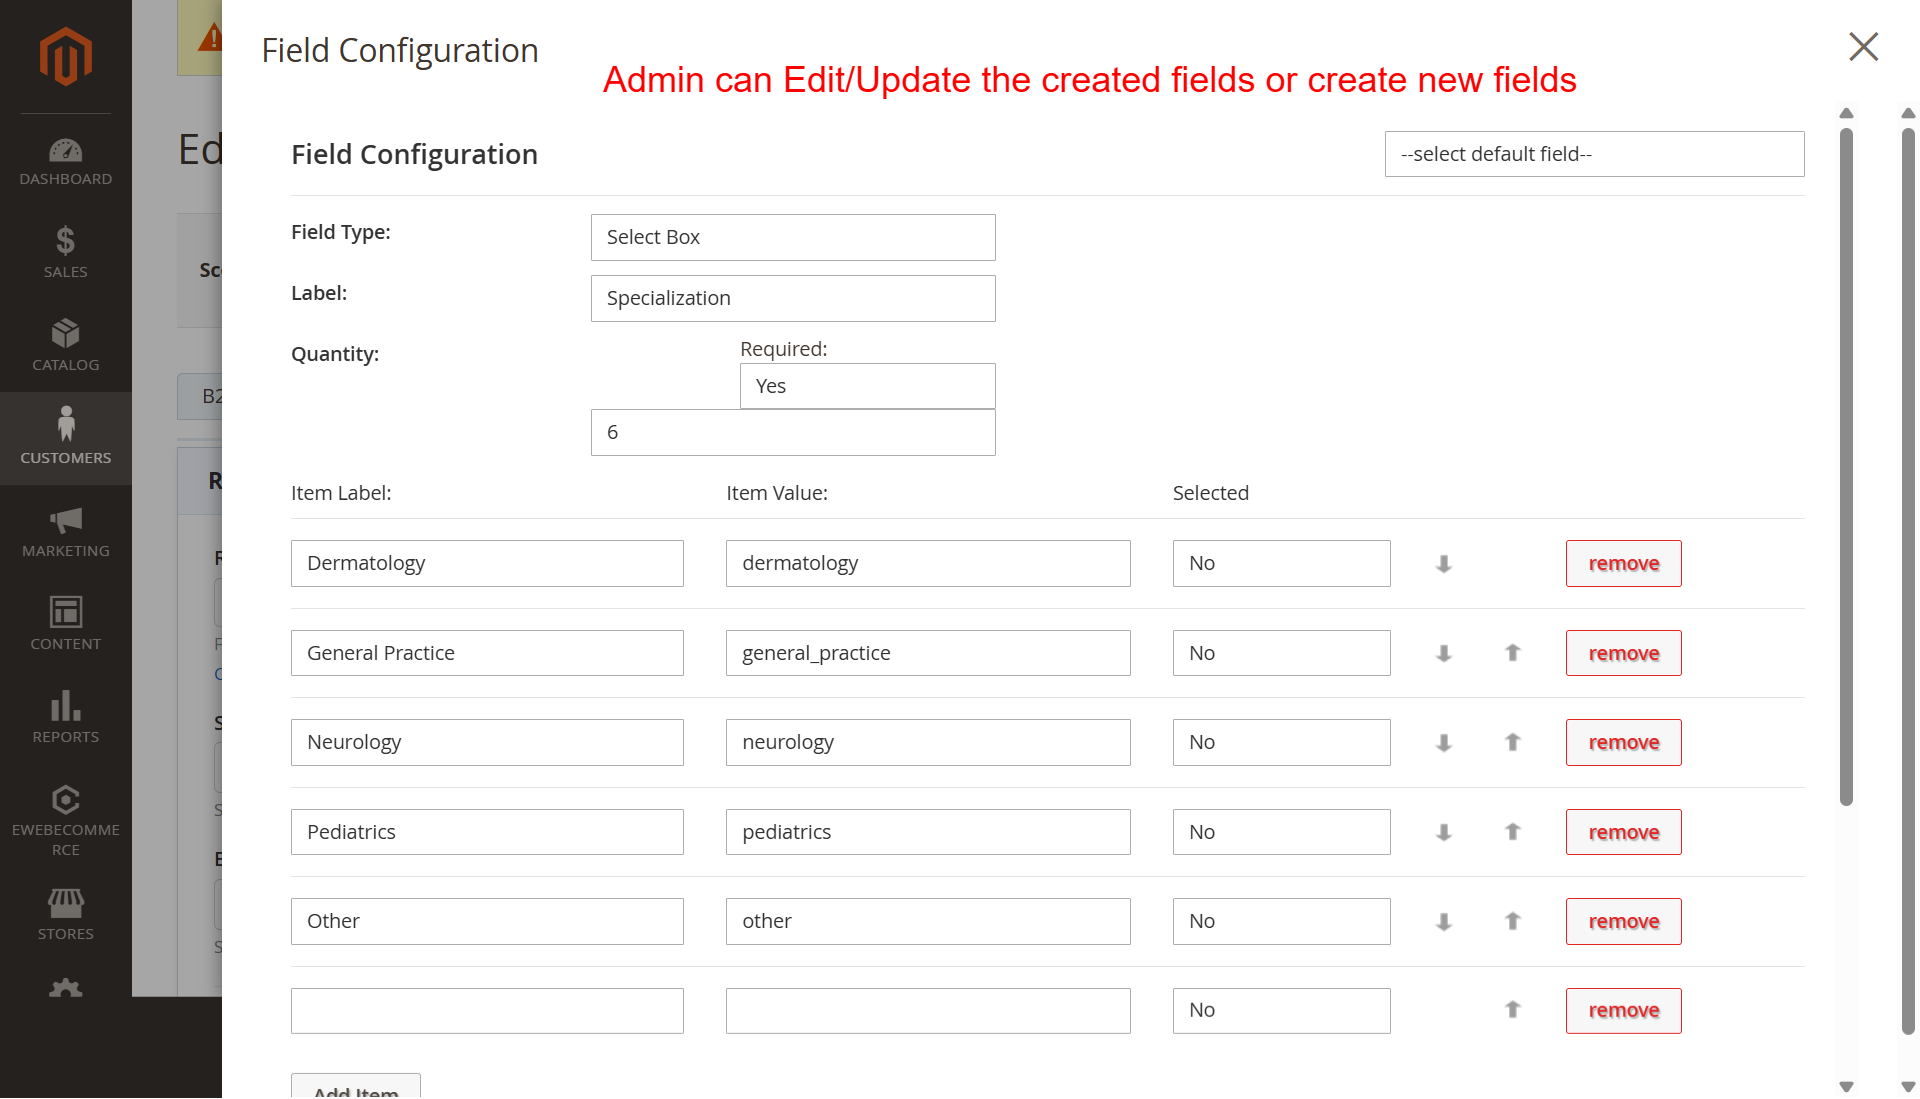 14
Drag-and-Drop Form Field ArrangementWhat this shows: This view features a drag-and-drop interface for organizing fields, with options to move sections up or down, and add new sections. Here, administrators can rearrange registration form fields via a simple drag-and-drop mechanism. This feature allows for on-the-fly customization, ensuring that form layouts can be optimized quickly for usability, thereby enhancing the user experience during registration. 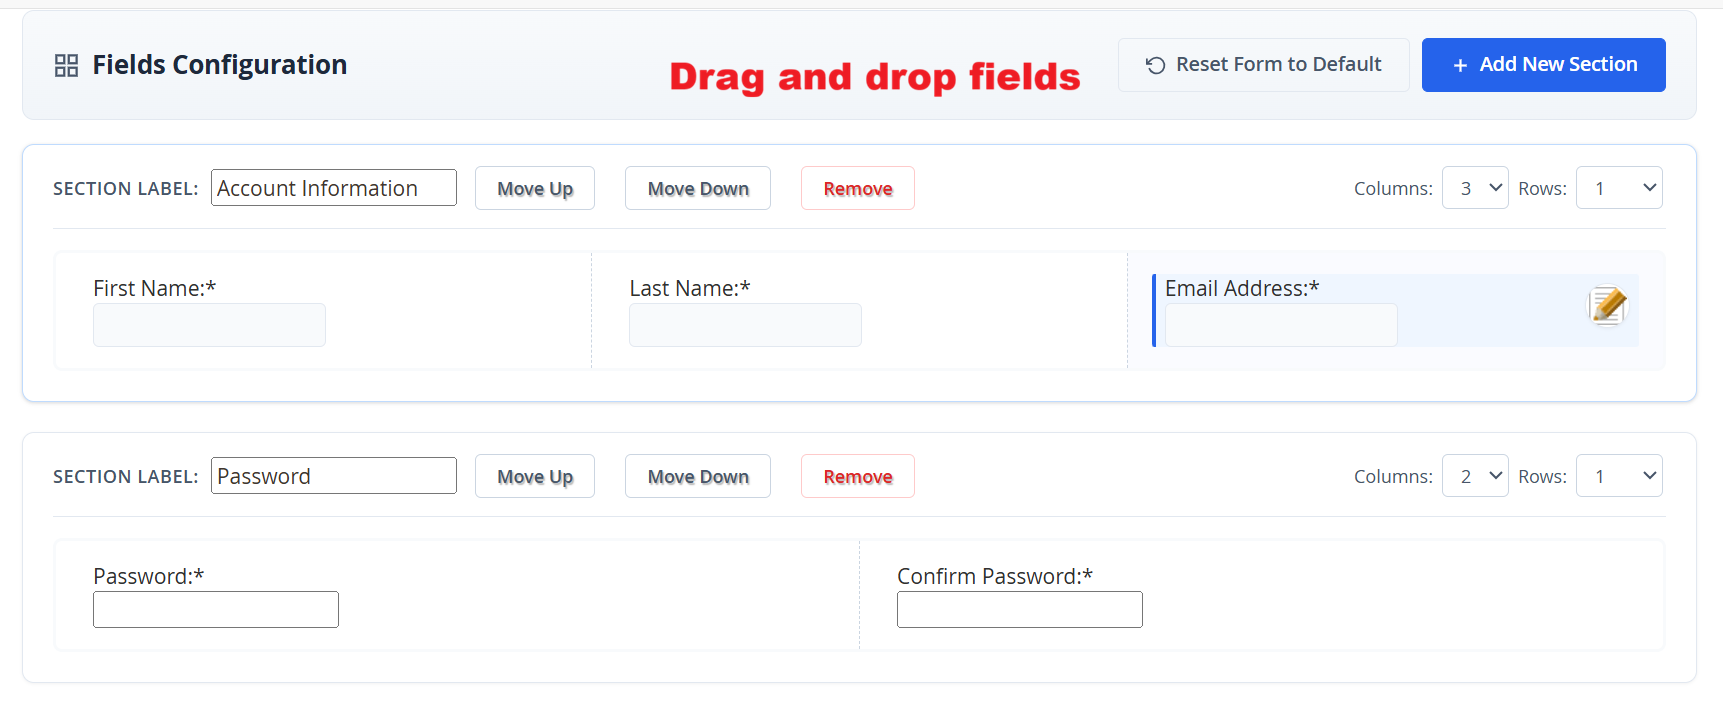 15
Captcha Configuration for Registration FormWhat this shows: A configuration panel displaying options to set field type and label, with a dropdown for selecting captcha types such as Google reCAPTCHA. This screen offers configuration for captcha settings on registration forms, enabling the selection of different captcha technologies to enhance security. Proper captcha implementation helps prevent spam and automated registrations, maintaining the quality and integrity of user data. 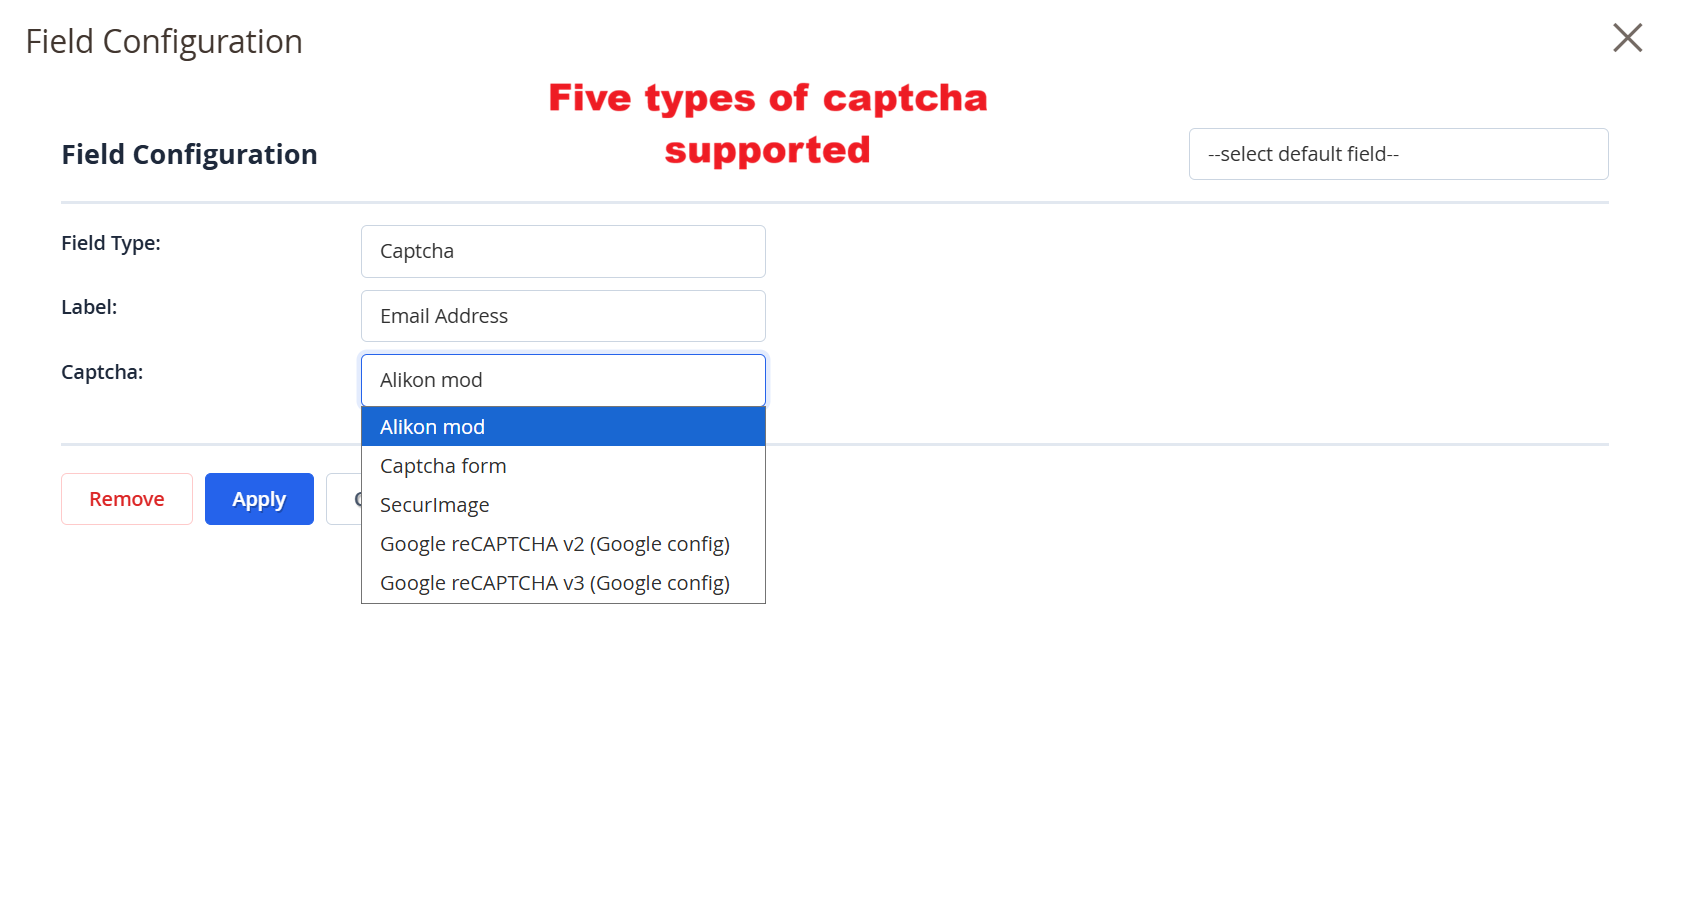 16
Field Type and Validation SettingsWhat this shows: A form configuration view that includes settings for field type, label, required status, and validation type, with dropdown options for various validations. Administrators define field attributes and validations on this screen to ensure data integrity and accuracy. By selecting appropriate validation rules, they can enforce data formats and constraints, such as email or number requirements, improving data quality collected via registration forms. 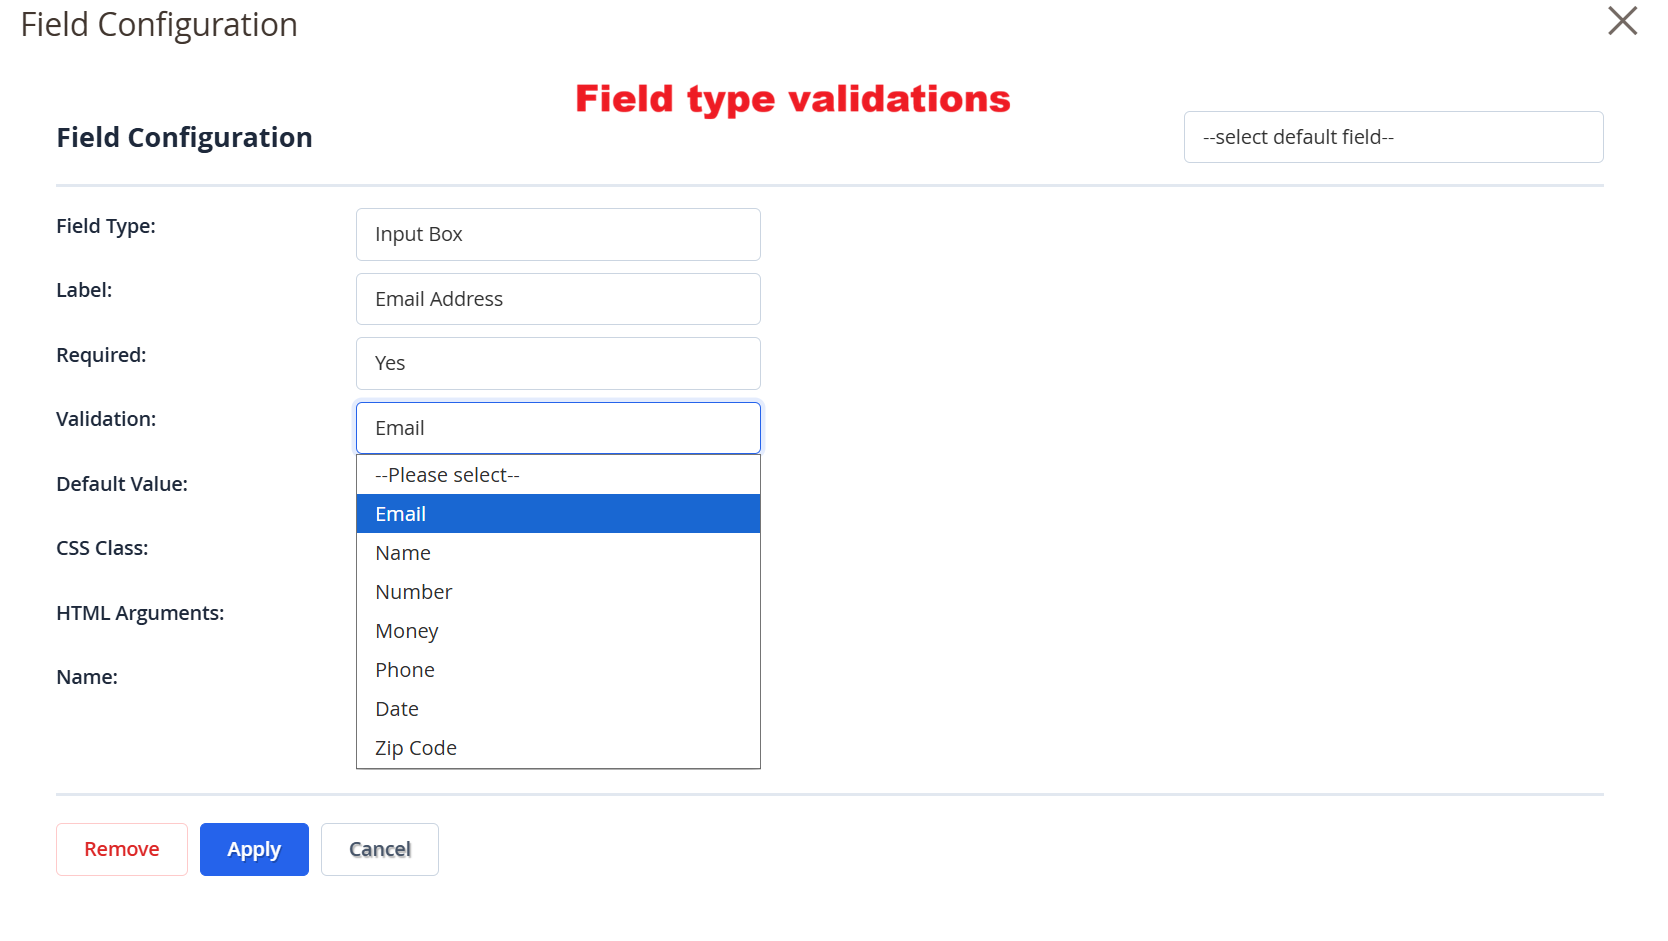 17
Admin: Edit B2B Registration FormWhat this shows: Edit screen with registration settings, AI form generator, and field configuration. Includes form options like URL key, form title, and button texts. This screen allows administrators to customize B2B registration forms. Administrators can adjust settings like form titles, URLs, and login button texts. The AI Form Generator simplifies creating complex forms by auto-generating fields based on descriptive input. Users can further customize by adding or removing form sections to tailor the registration process. 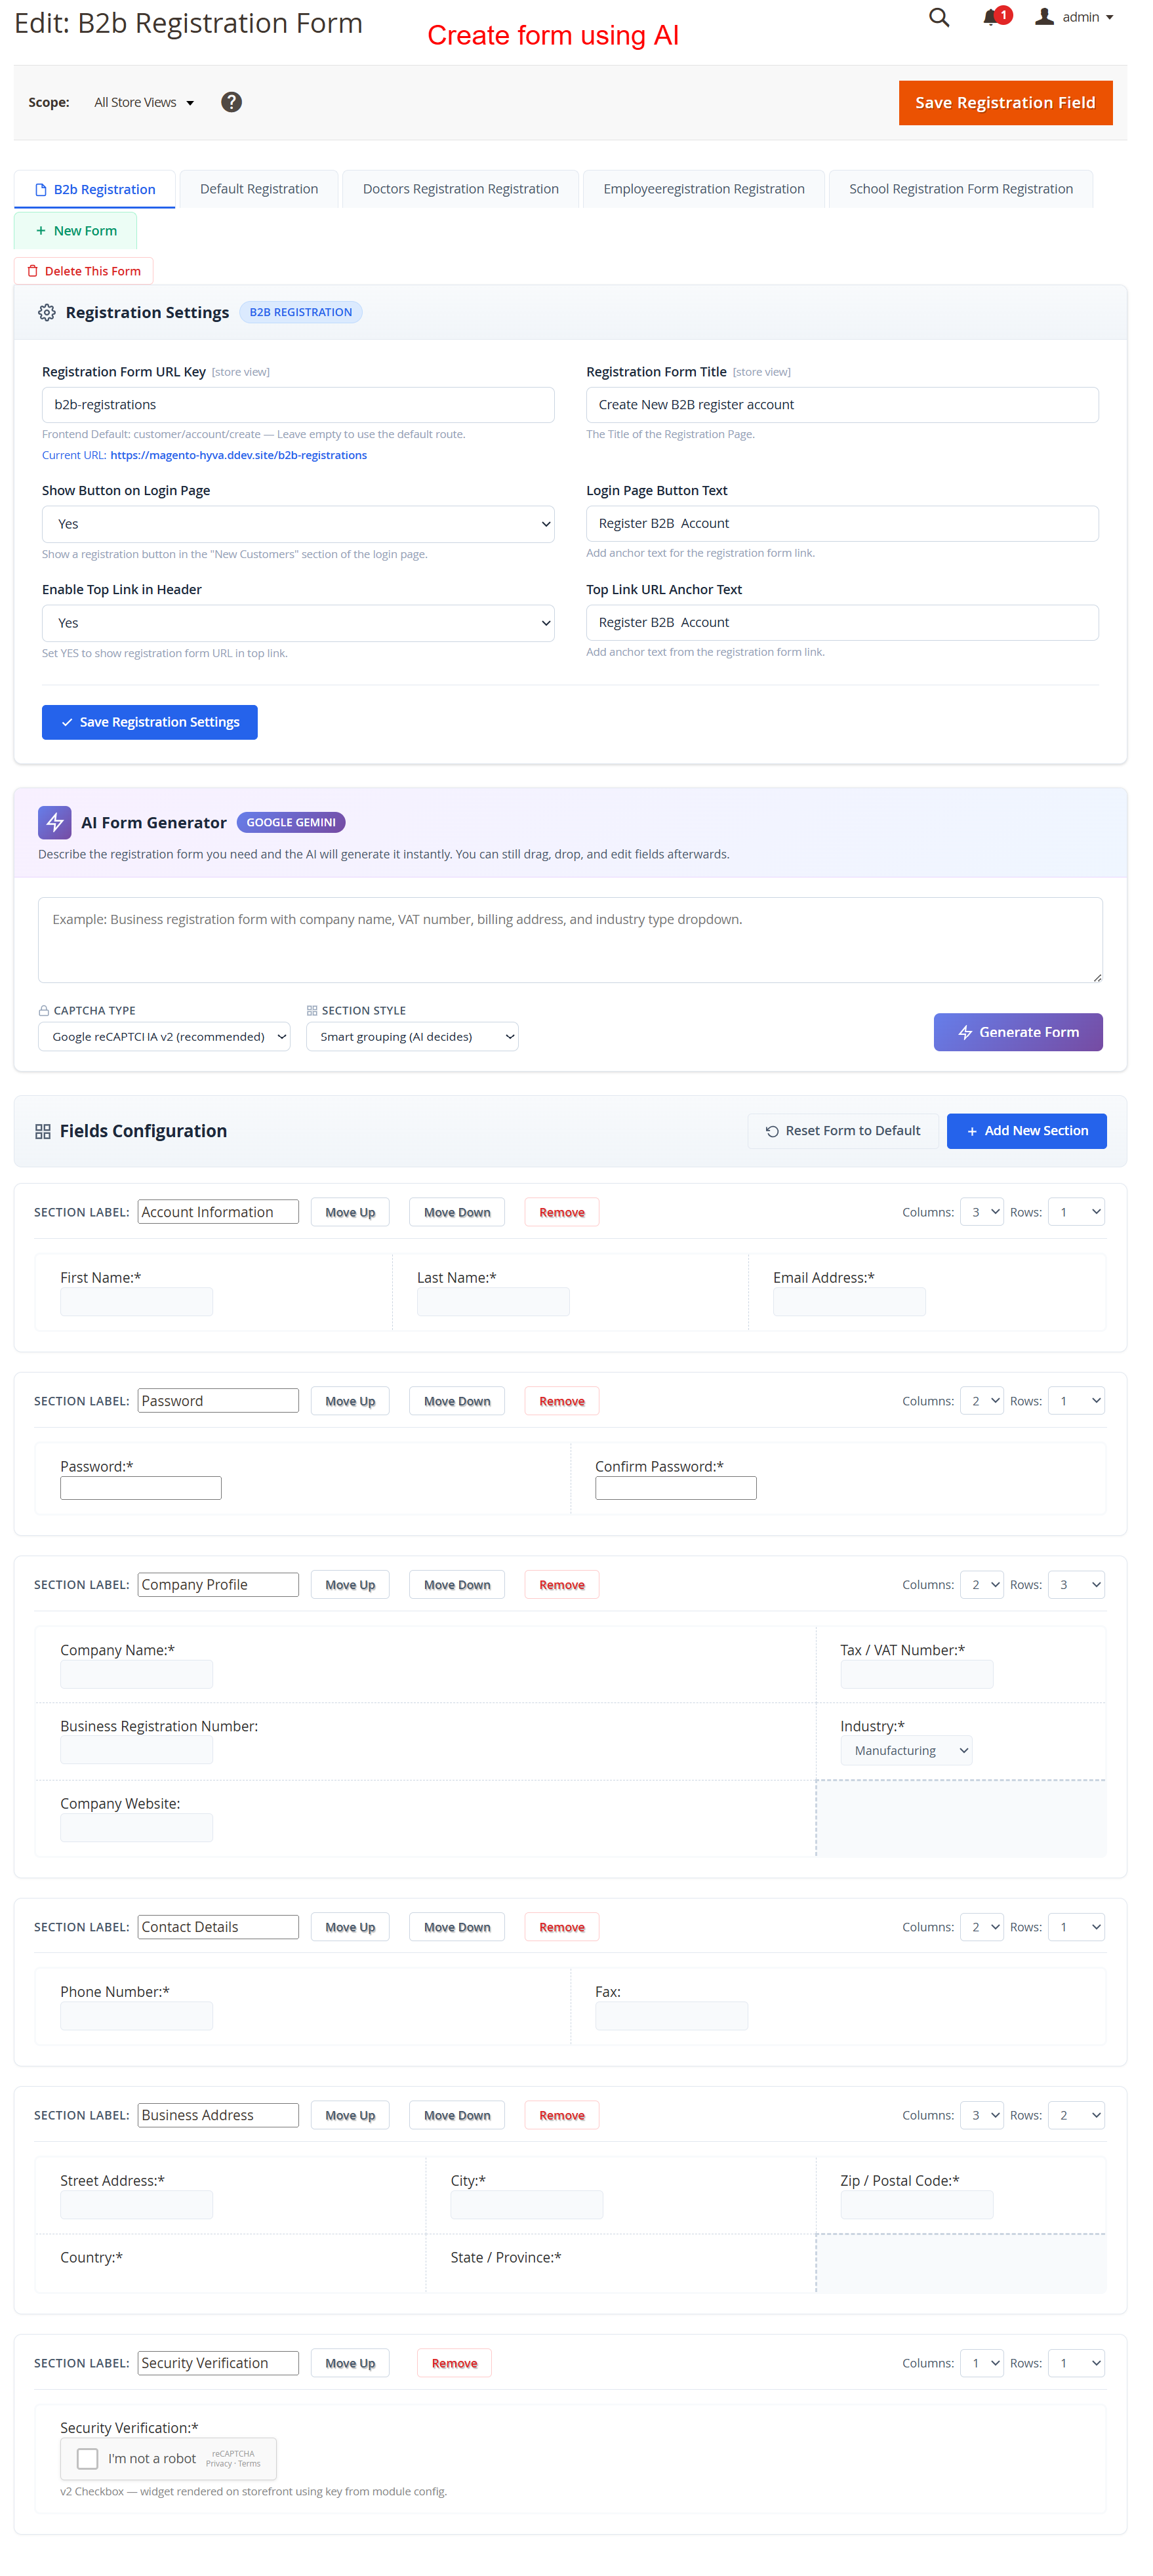 18
Admin: Update Customer Status InlineWhat this shows: Customer list with inline status edit for new users. Features include columns for email, group, and status with save and cancel options. This interface allows admins to quickly modify a new customer's registration status. Inline editing enables efficient status updates, crucial for managing customer onboarding. It streamlines operations by allowing admins to approve or reject applications directly from the grid view. 19
Admin: Account Activation ManagementWhat this shows: Account Activation settings with a dropdown to set customer status to Approved, Pending, or Declined. Here, admins manage user account activations, setting statuses that dictate login permissions. Approving an account allows user login, while pending keeps it in review. Declining an account prevents login, offering admins direct control over user activation. 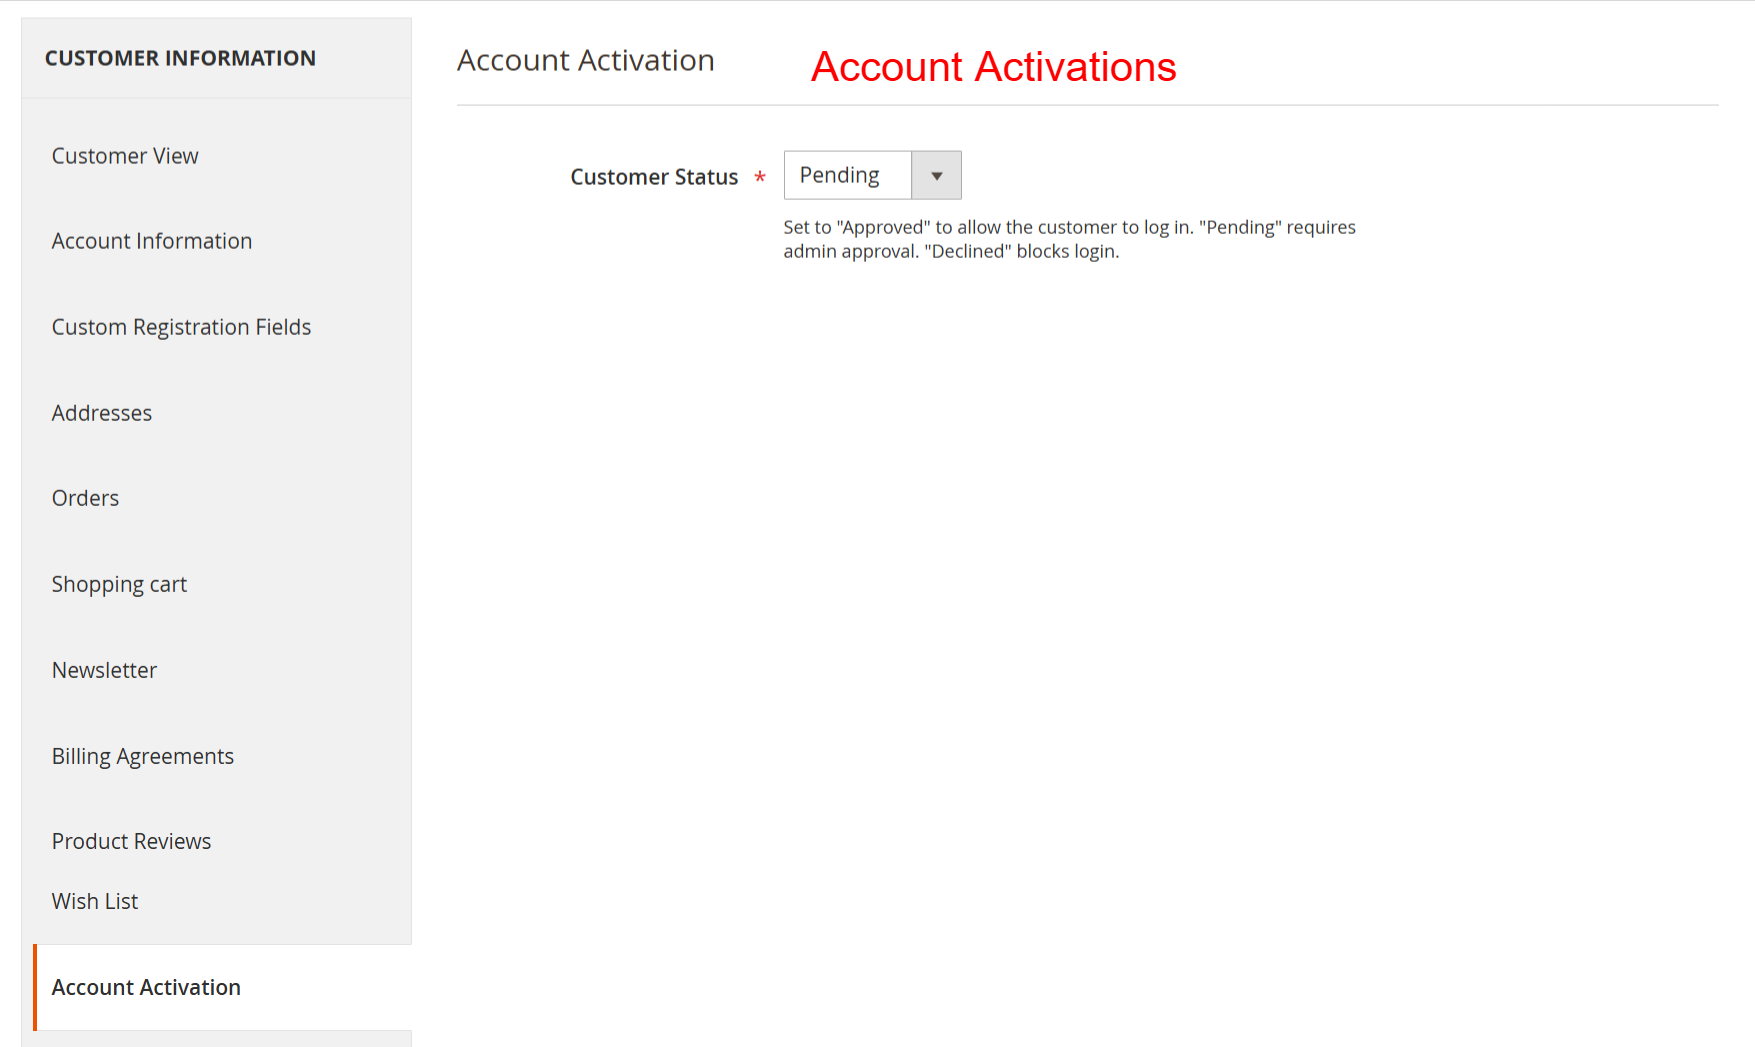 20
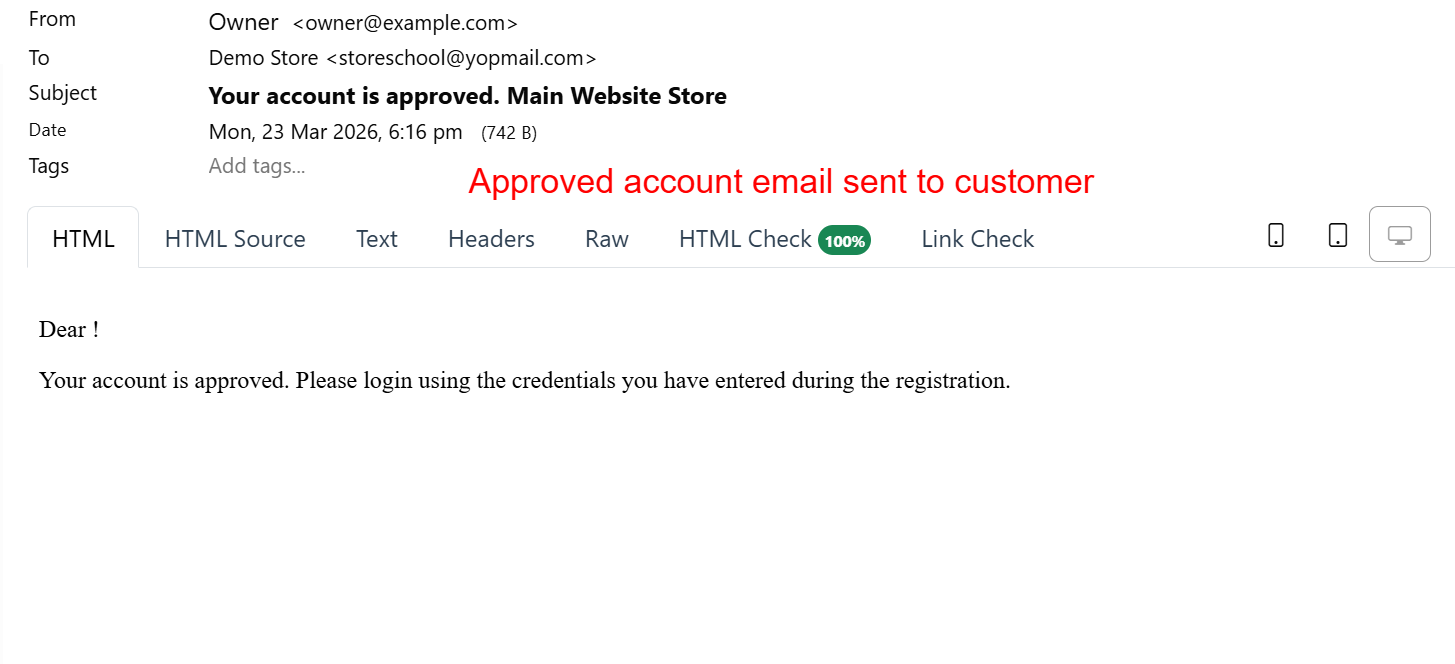
Admin: Email Notification for ApprovalWhat this shows: Email editor showing a notification template for account approval, with subject and HTML content fields. This template is used to send automated emails to customers upon account approval. Admins can customize the content to ensure clarity and professionalism, reinforcing customer engagement by confirming successful registration. 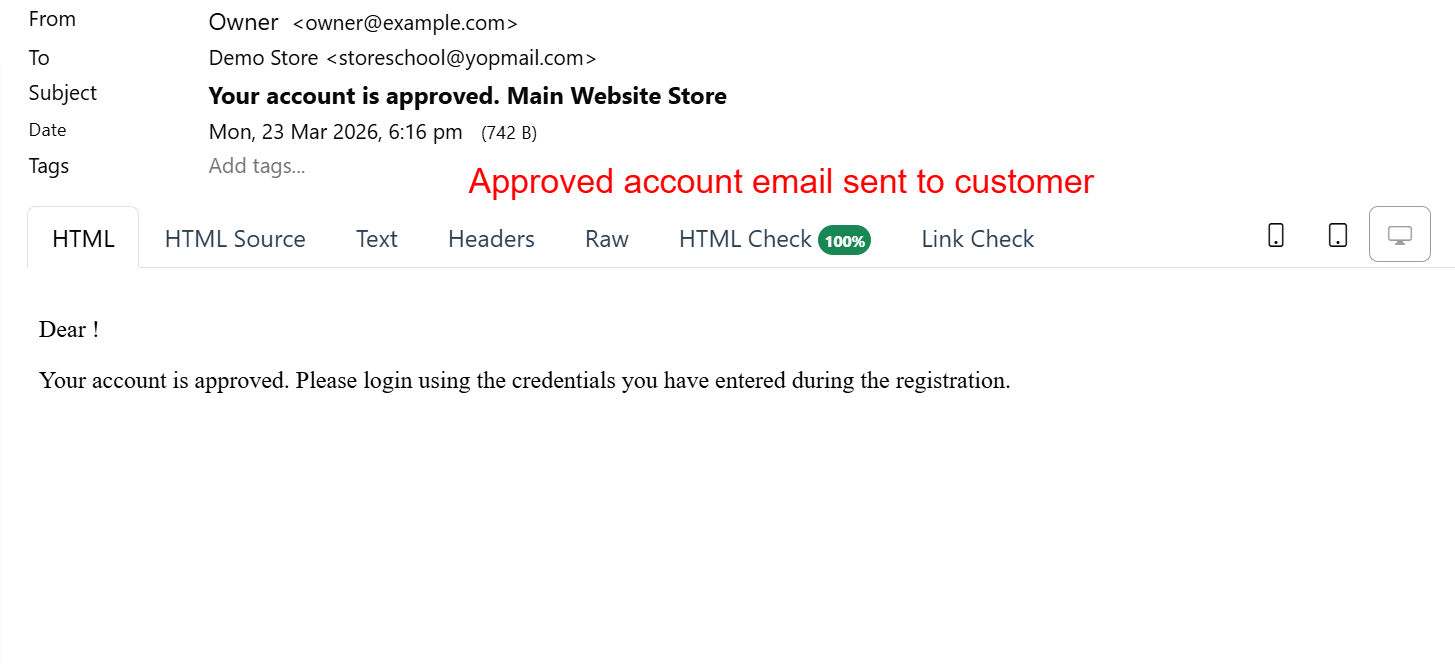 21
Admin: Custom Registration FieldsWhat this shows: Custom fields editor for customer registration, including fields for school name, student ID, and course details. Administrators create tailored registration fields to gather specific customer information. This customization is essential for businesses requiring detailed user data for account creation, allowing flexibility and precise user profiling. 22
Frontend: Luma Theme Customer LoginWhat this shows: Customer login page with options for registered customers and new account registration, including a B2B account option. This page offers customers a straightforward login process or the opportunity to register a B2B account. Highlighting B2B registration helps capture business customers, expanding potential user base and enhancing service offerings. 23
Frontend: Hyva Theme Customer LoginWhat this shows: Customer login interface featuring email and password fields, alongside options to create standard or B2B accounts. The Hyva theme login page provides a modern user experience with clear account options. Including B2B registration links directly aligns with business growth strategies by targeting organizational clients effectively. 24
Frontend: New B2B Account RegistrationWhat this shows: Registration form for B2B accounts, including sections for account information, company profile, and address details. This comprehensive registration form gathers essential business information from new customers. Completing these forms allows businesses to authenticate B2B accounts accurately, ensuring robust customer data collection for strategic engagements. 25
Frontend: Create New Customer Account FormWhat this shows: The form includes fields for First Name, Last Name, Email Address, Password, Phone Number, and more, ending with a reCAPTCHA widget for security verification. On this screen, users can create a new customer account by filling in personal information such as name, email, and password, along with billing details. The extension allows for custom registration fields, enhancing account security with a captcha. This feature supports complex registration scenarios by using custom fields to gather specific customer data. 26
Frontend: Customer Login Error MessageWhat this shows: The page displays a login form with email and password fields, along with an error message indicating a failed login attempt. This screen informs users that their login attempt was unsuccessful, possibly due to a temporary account disablement. It is crucial for users whose accounts require admin approval before activation, a feature facilitated by the extension to manage user access proactively. 27
Frontend: Customer Header LinksWhat this shows: Header menu options include 'Register B2B Account', 'Sign In', and 'Create an Account', positioned prominently for easy access. Here, new menu options are provided to facilitate quick access to account creation or B2B registration. This customization helps businesses encourage both regular customers and B2B clients to register, leveraging the flexibility offered by the extension to tailor registration paths. 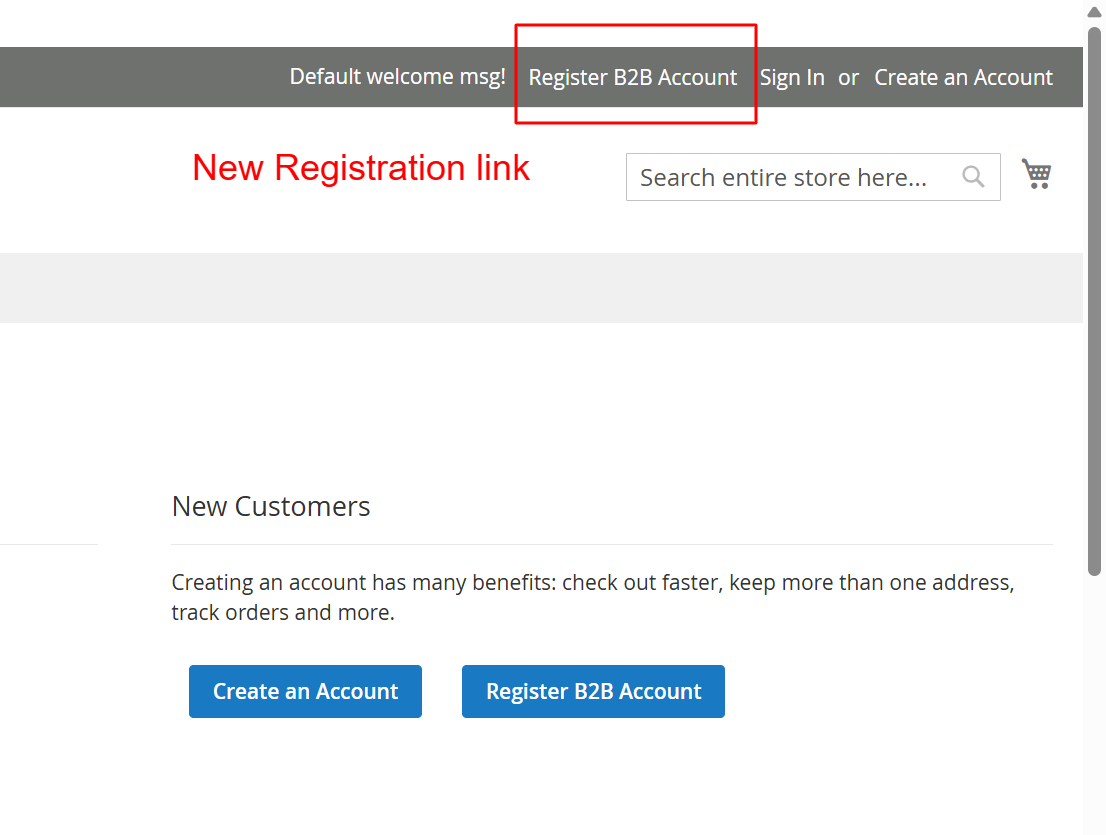 28
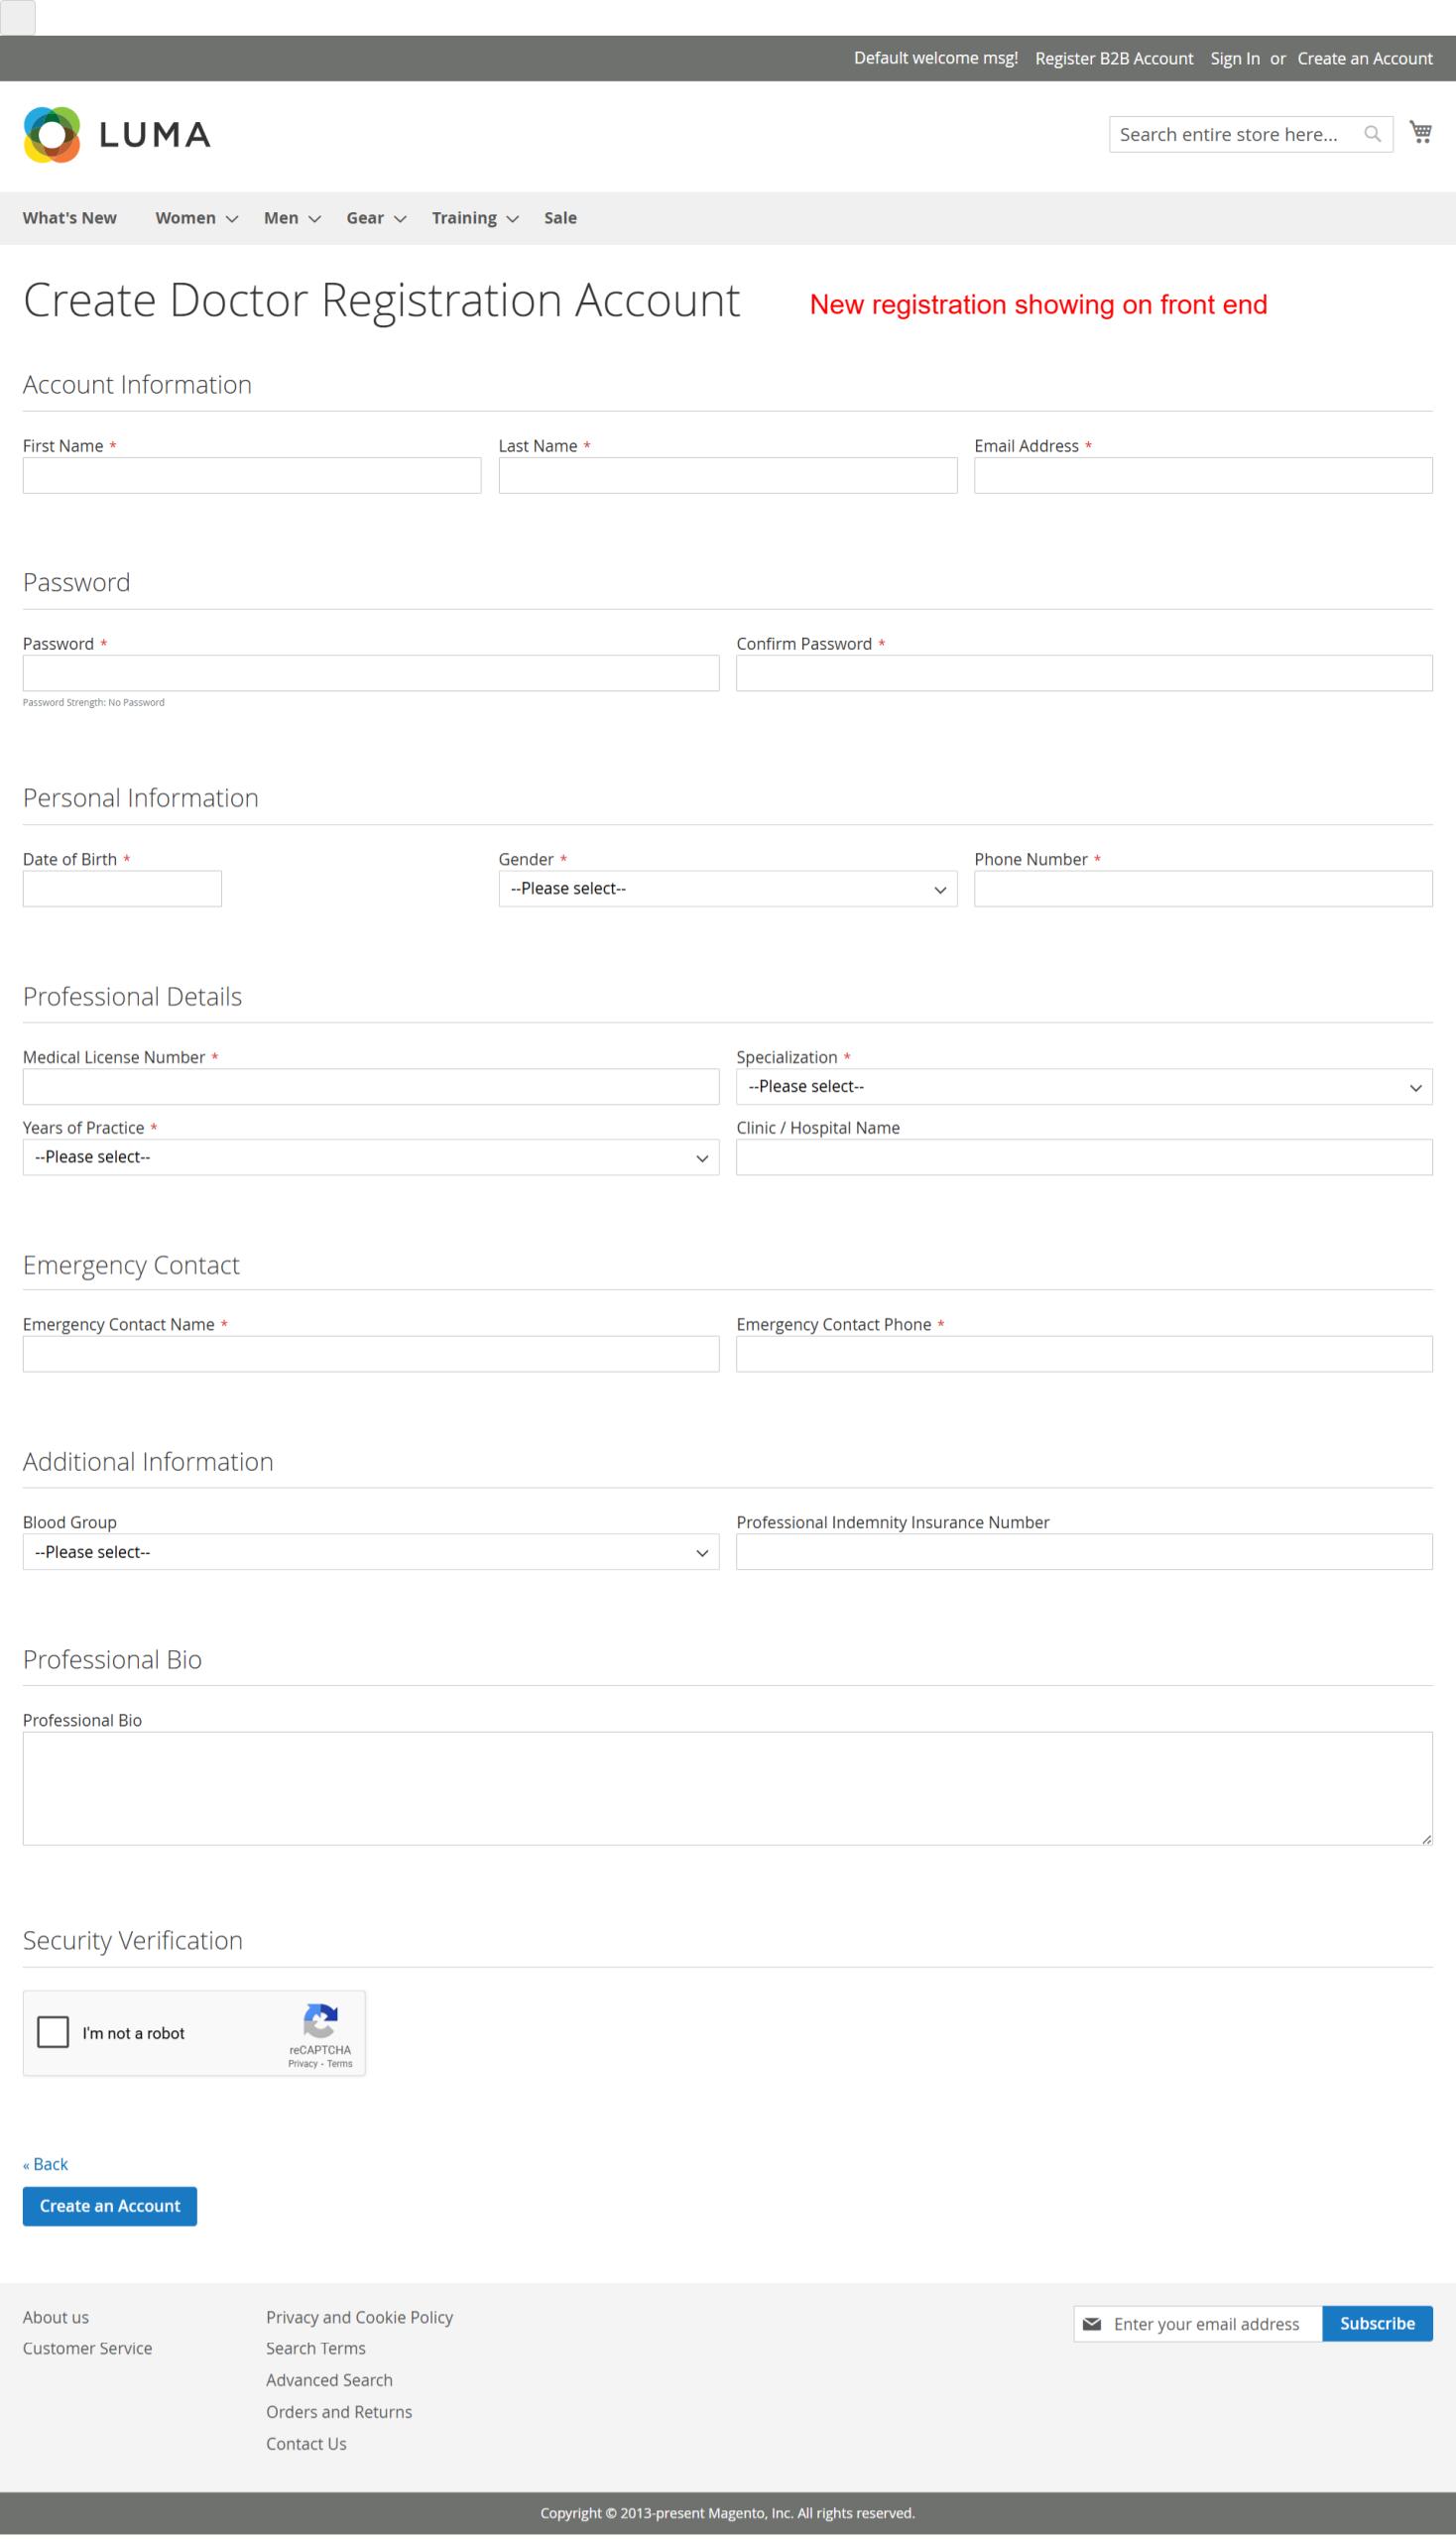
Frontend: Luma Theme B2B Account RegistrationWhat this shows: The form gathers detailed B2B information, including Company Name, Business Registration Number, and Industry, alongside contact details. This extends the registration process to B2B customers, collecting specific business details essential for account setup. The module's form builder capabilities are highlighted here, allowing eCommerce stores to seamlessly capture and manage extensive business-related data. 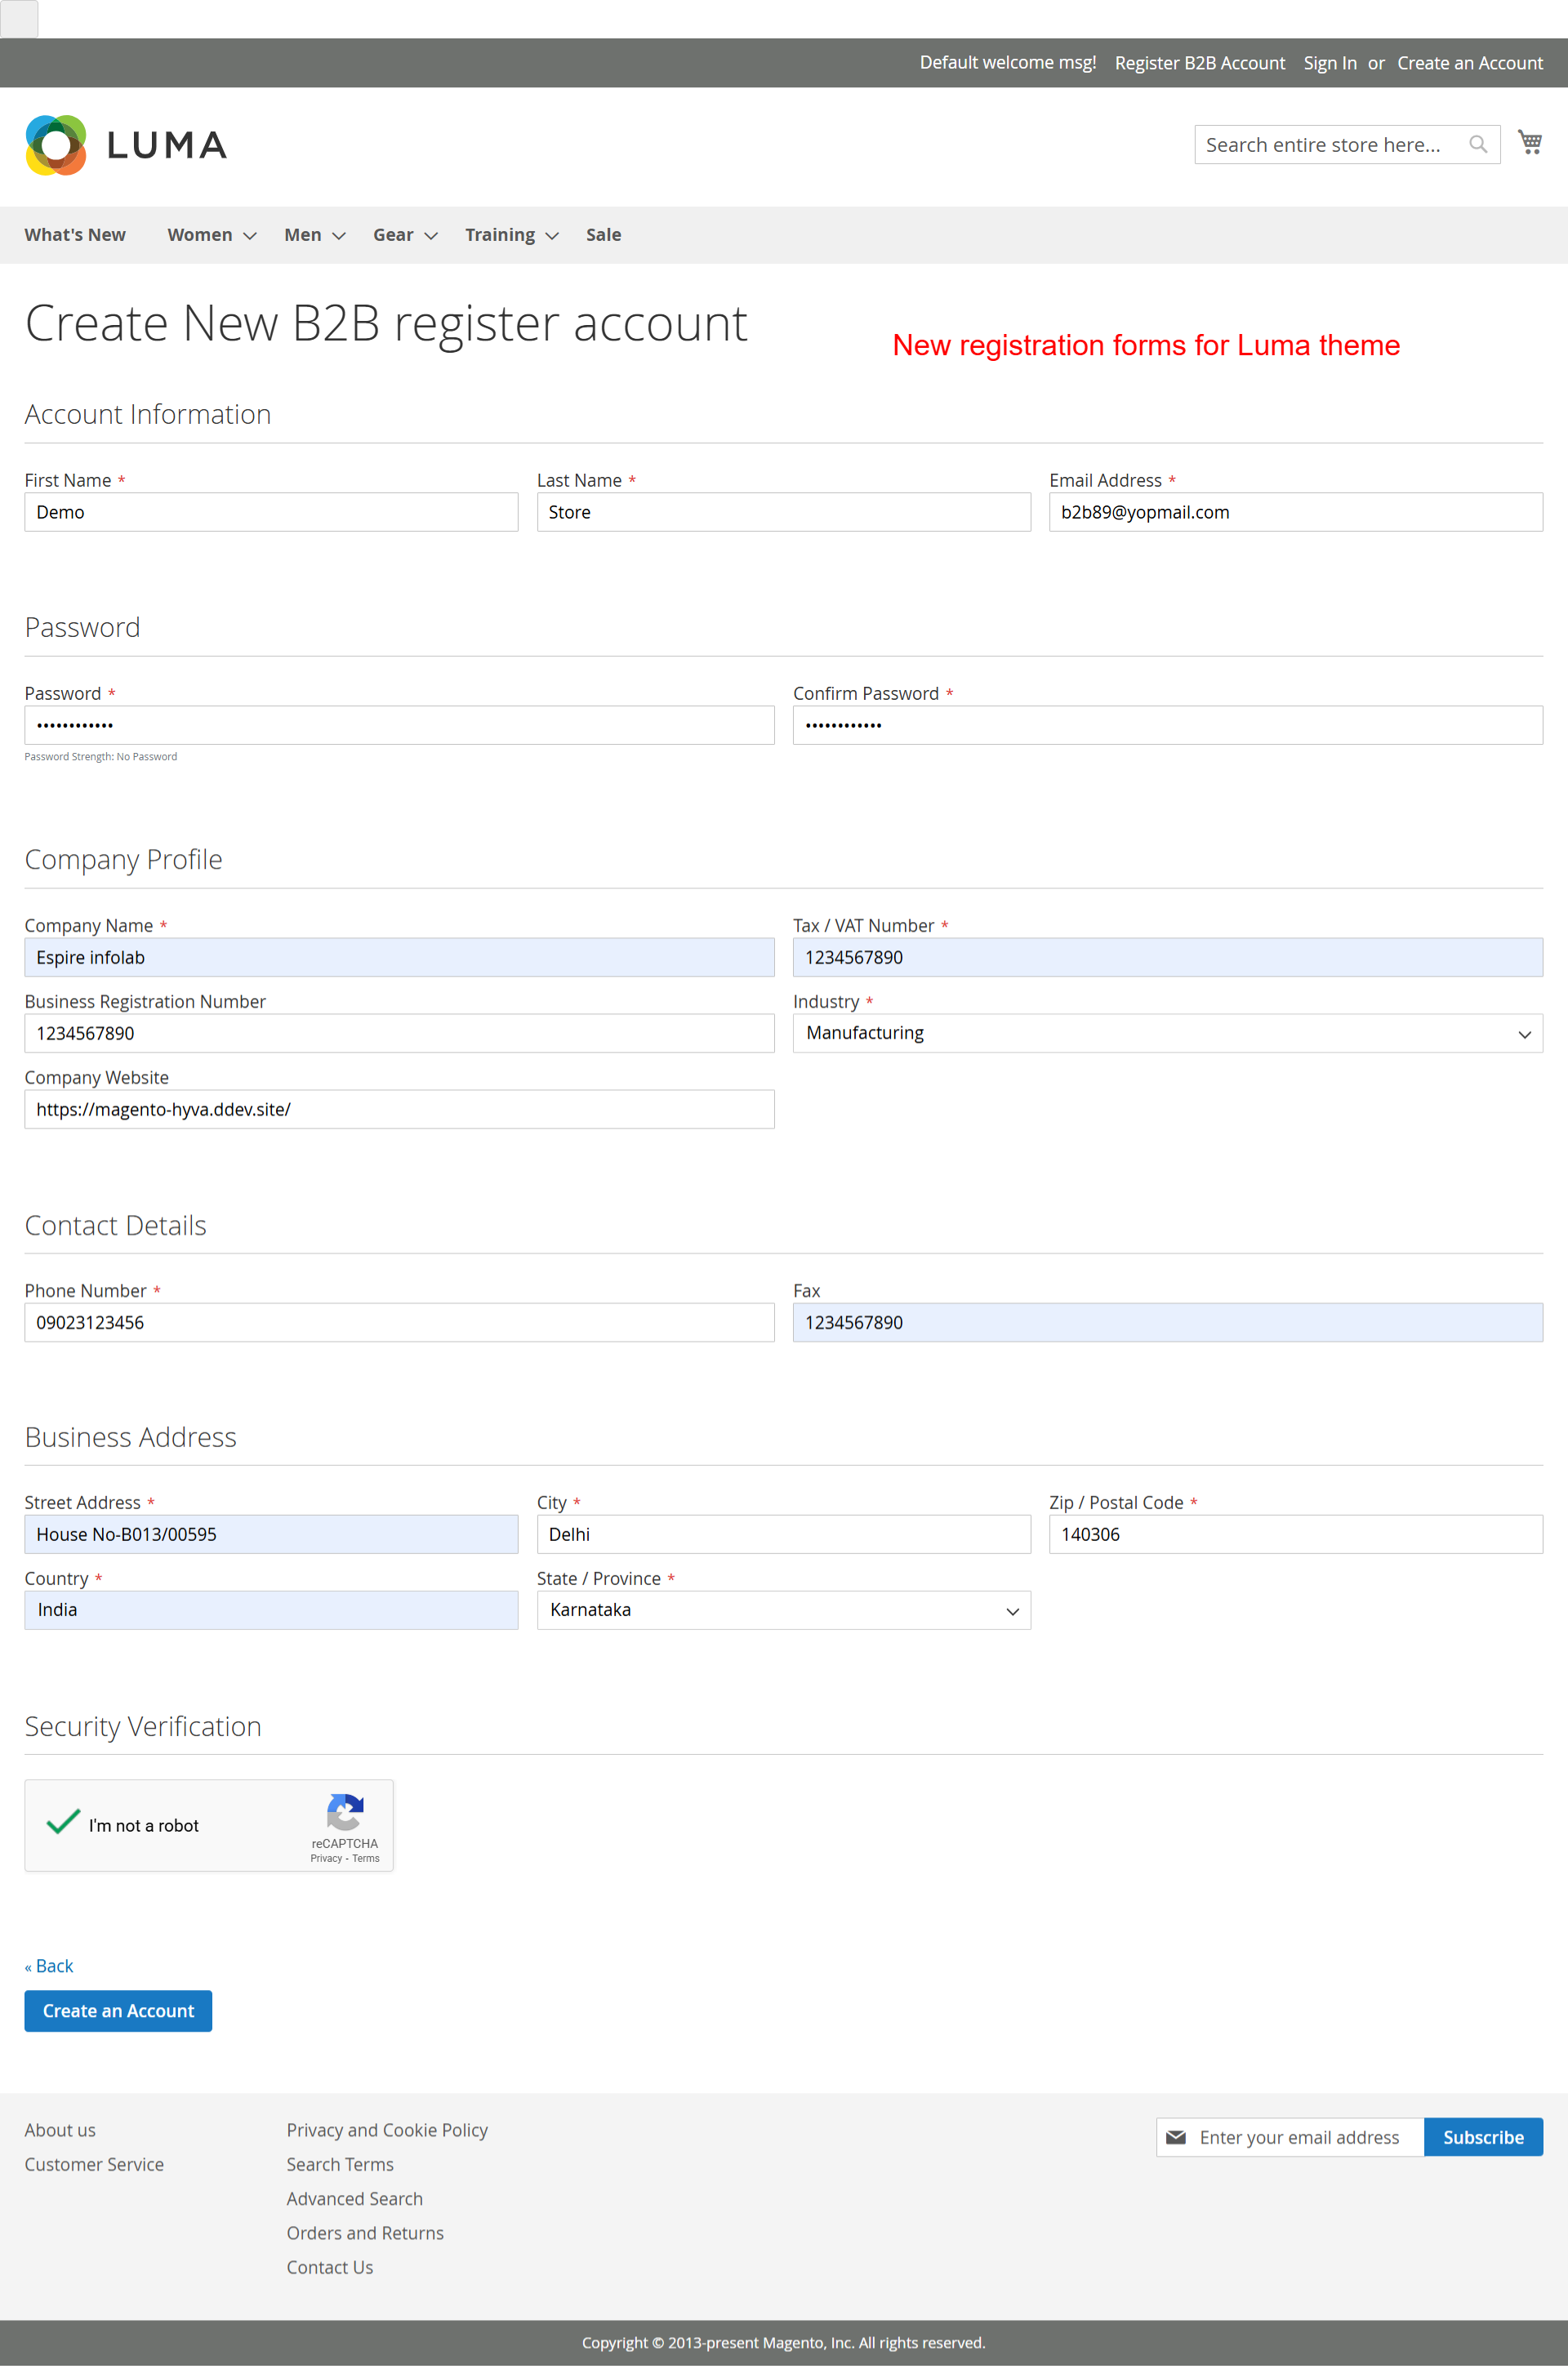 29
Frontend: Luma My Account PageWhat this shows: Displays contact information and additional fields such as Business Registration Number, Fax, and Industry, emphasizing custom fields. The My Account page provides users access to personal and company-specific information, enhanced by custom registration fields. This allows users to review and update details, reflecting the extension's capability to tailor user data management. 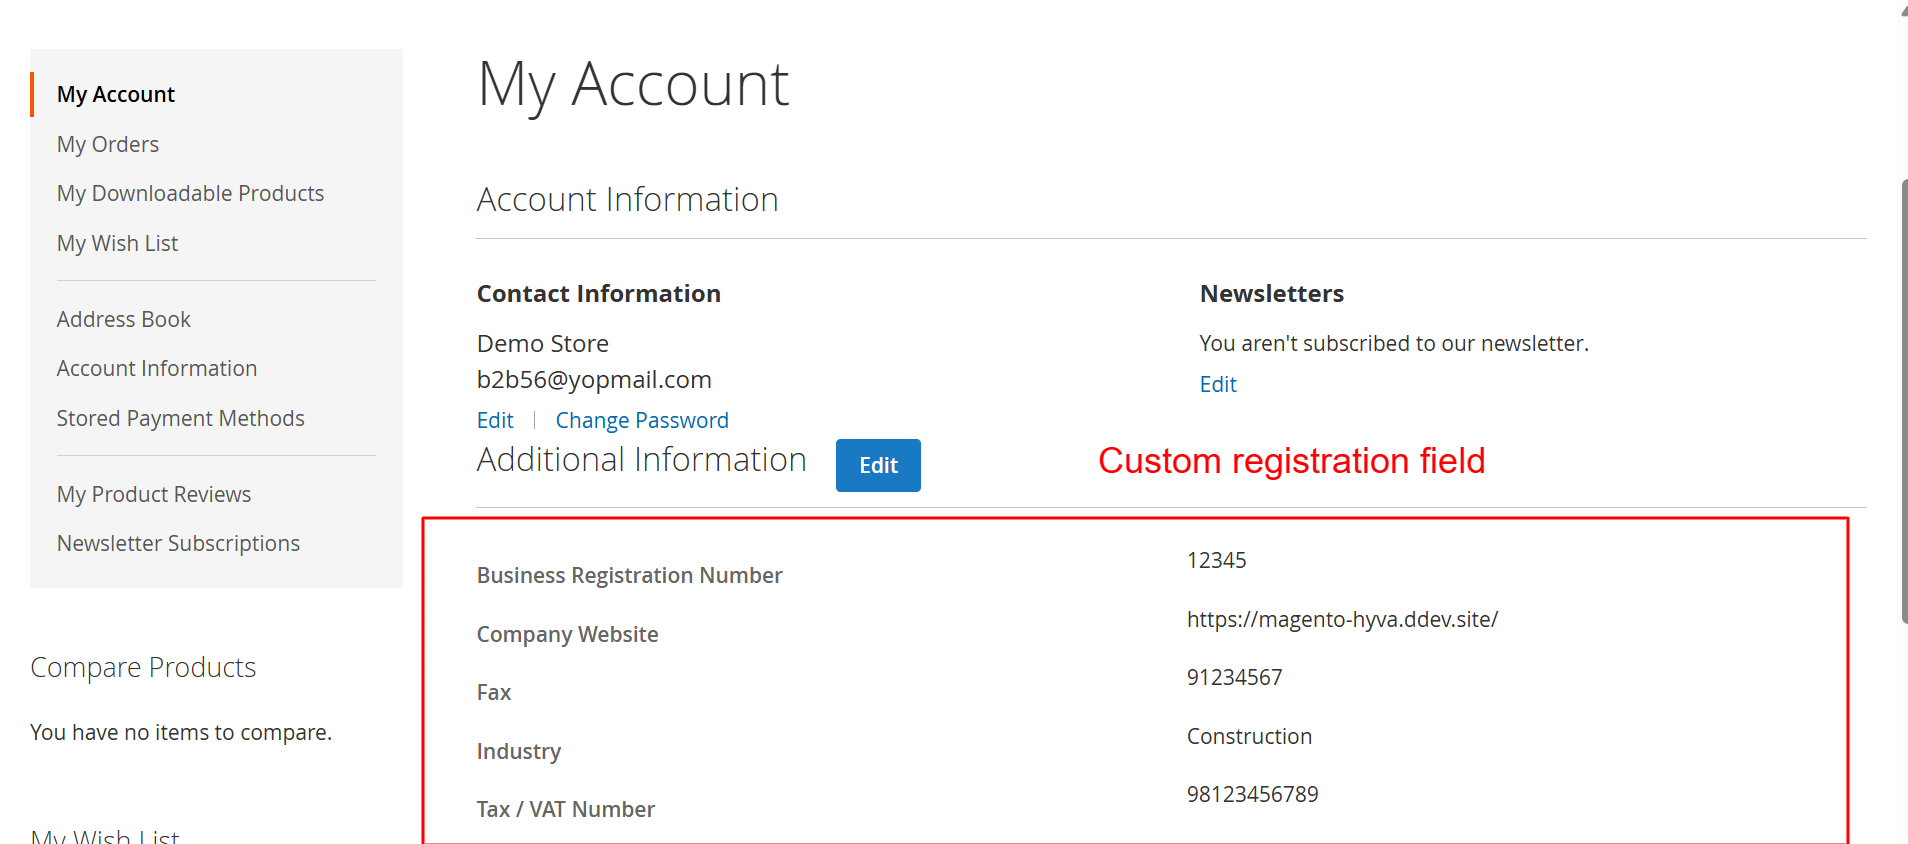 30
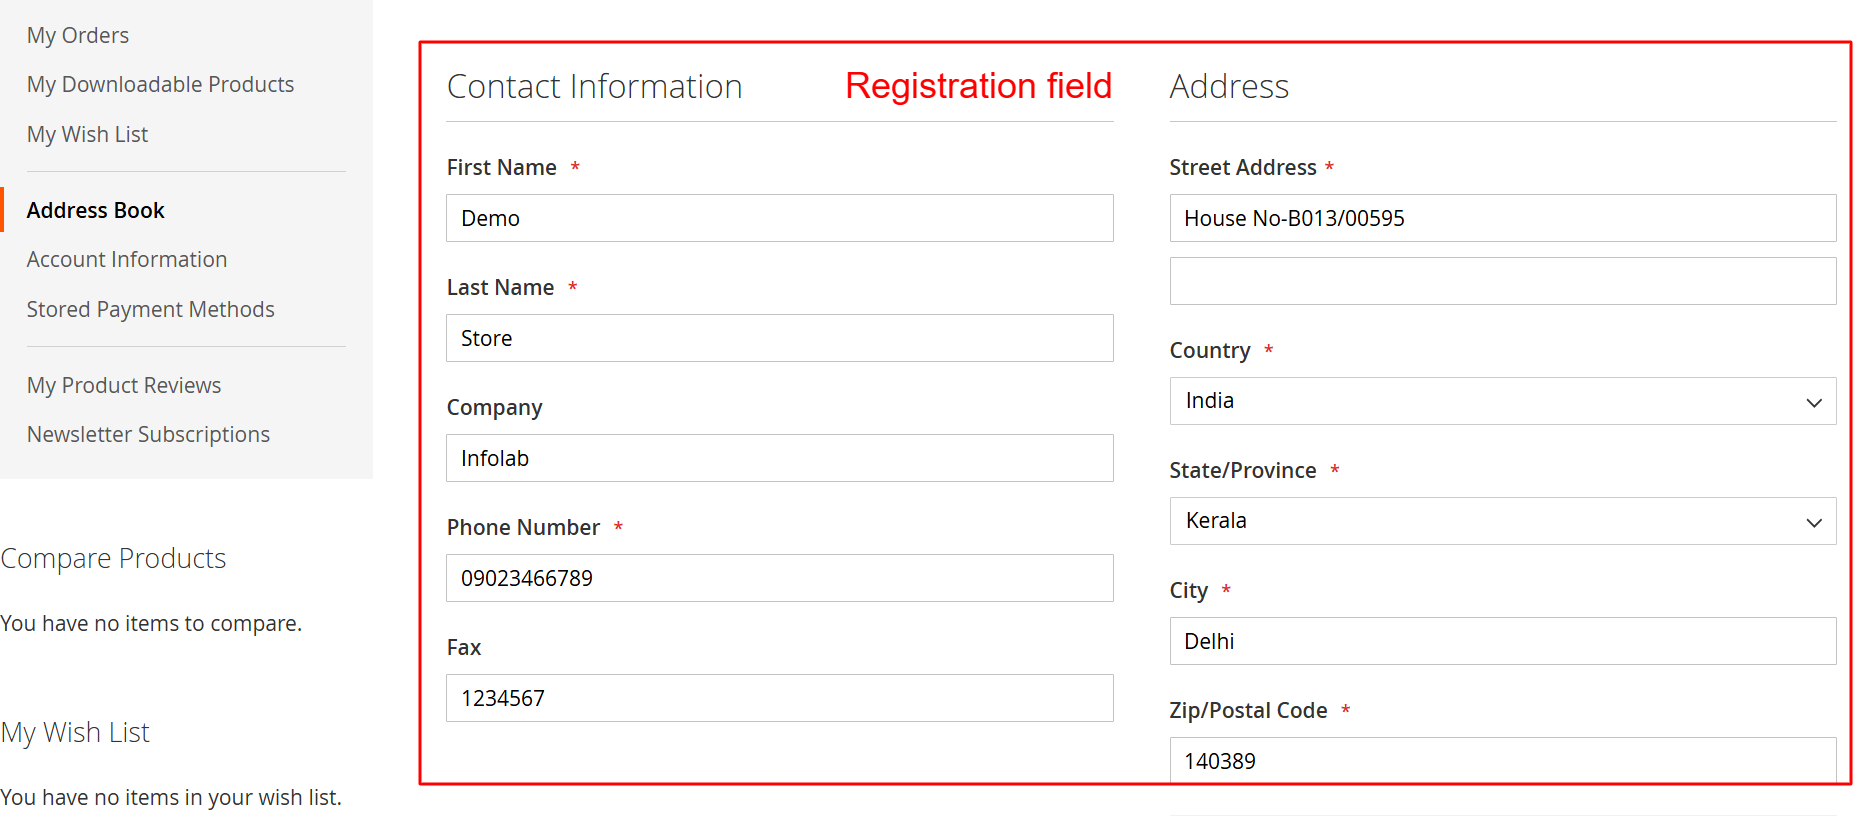
Frontend: Luma Edit Address FormWhat this shows: This form allows users to modify address and contact information, including custom fields like Company and Fax. Users can update their contact and address details, with fields extended to include company data. This flexibility highlights the module's ability to support complex user profiles, useful for businesses requiring comprehensive customer data. 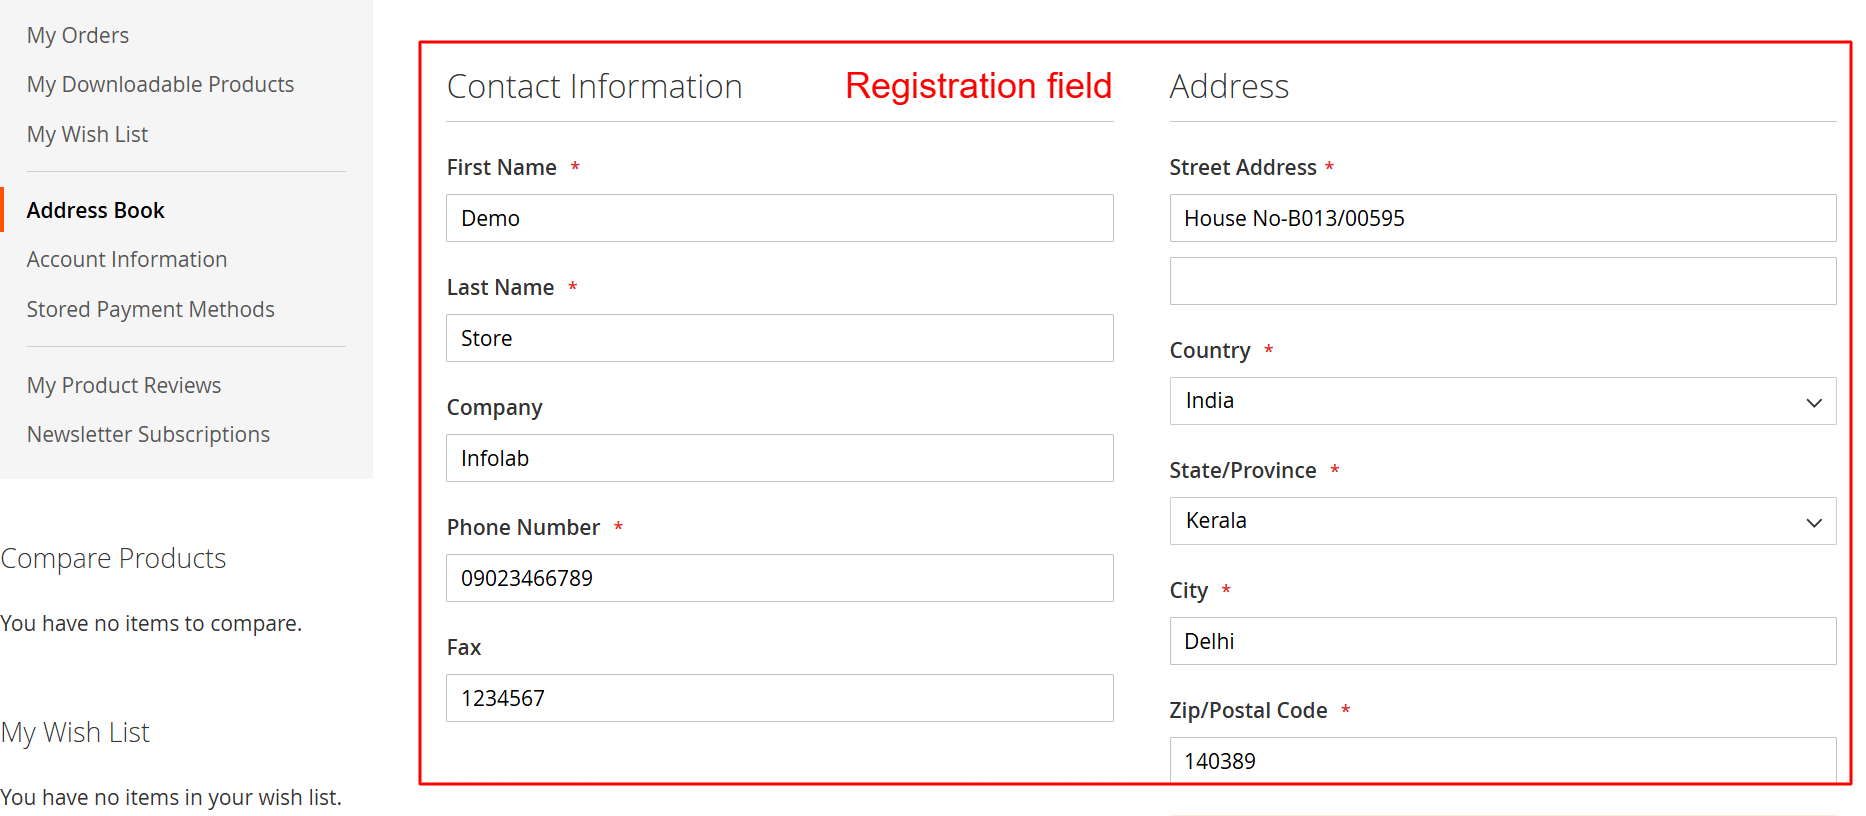 31
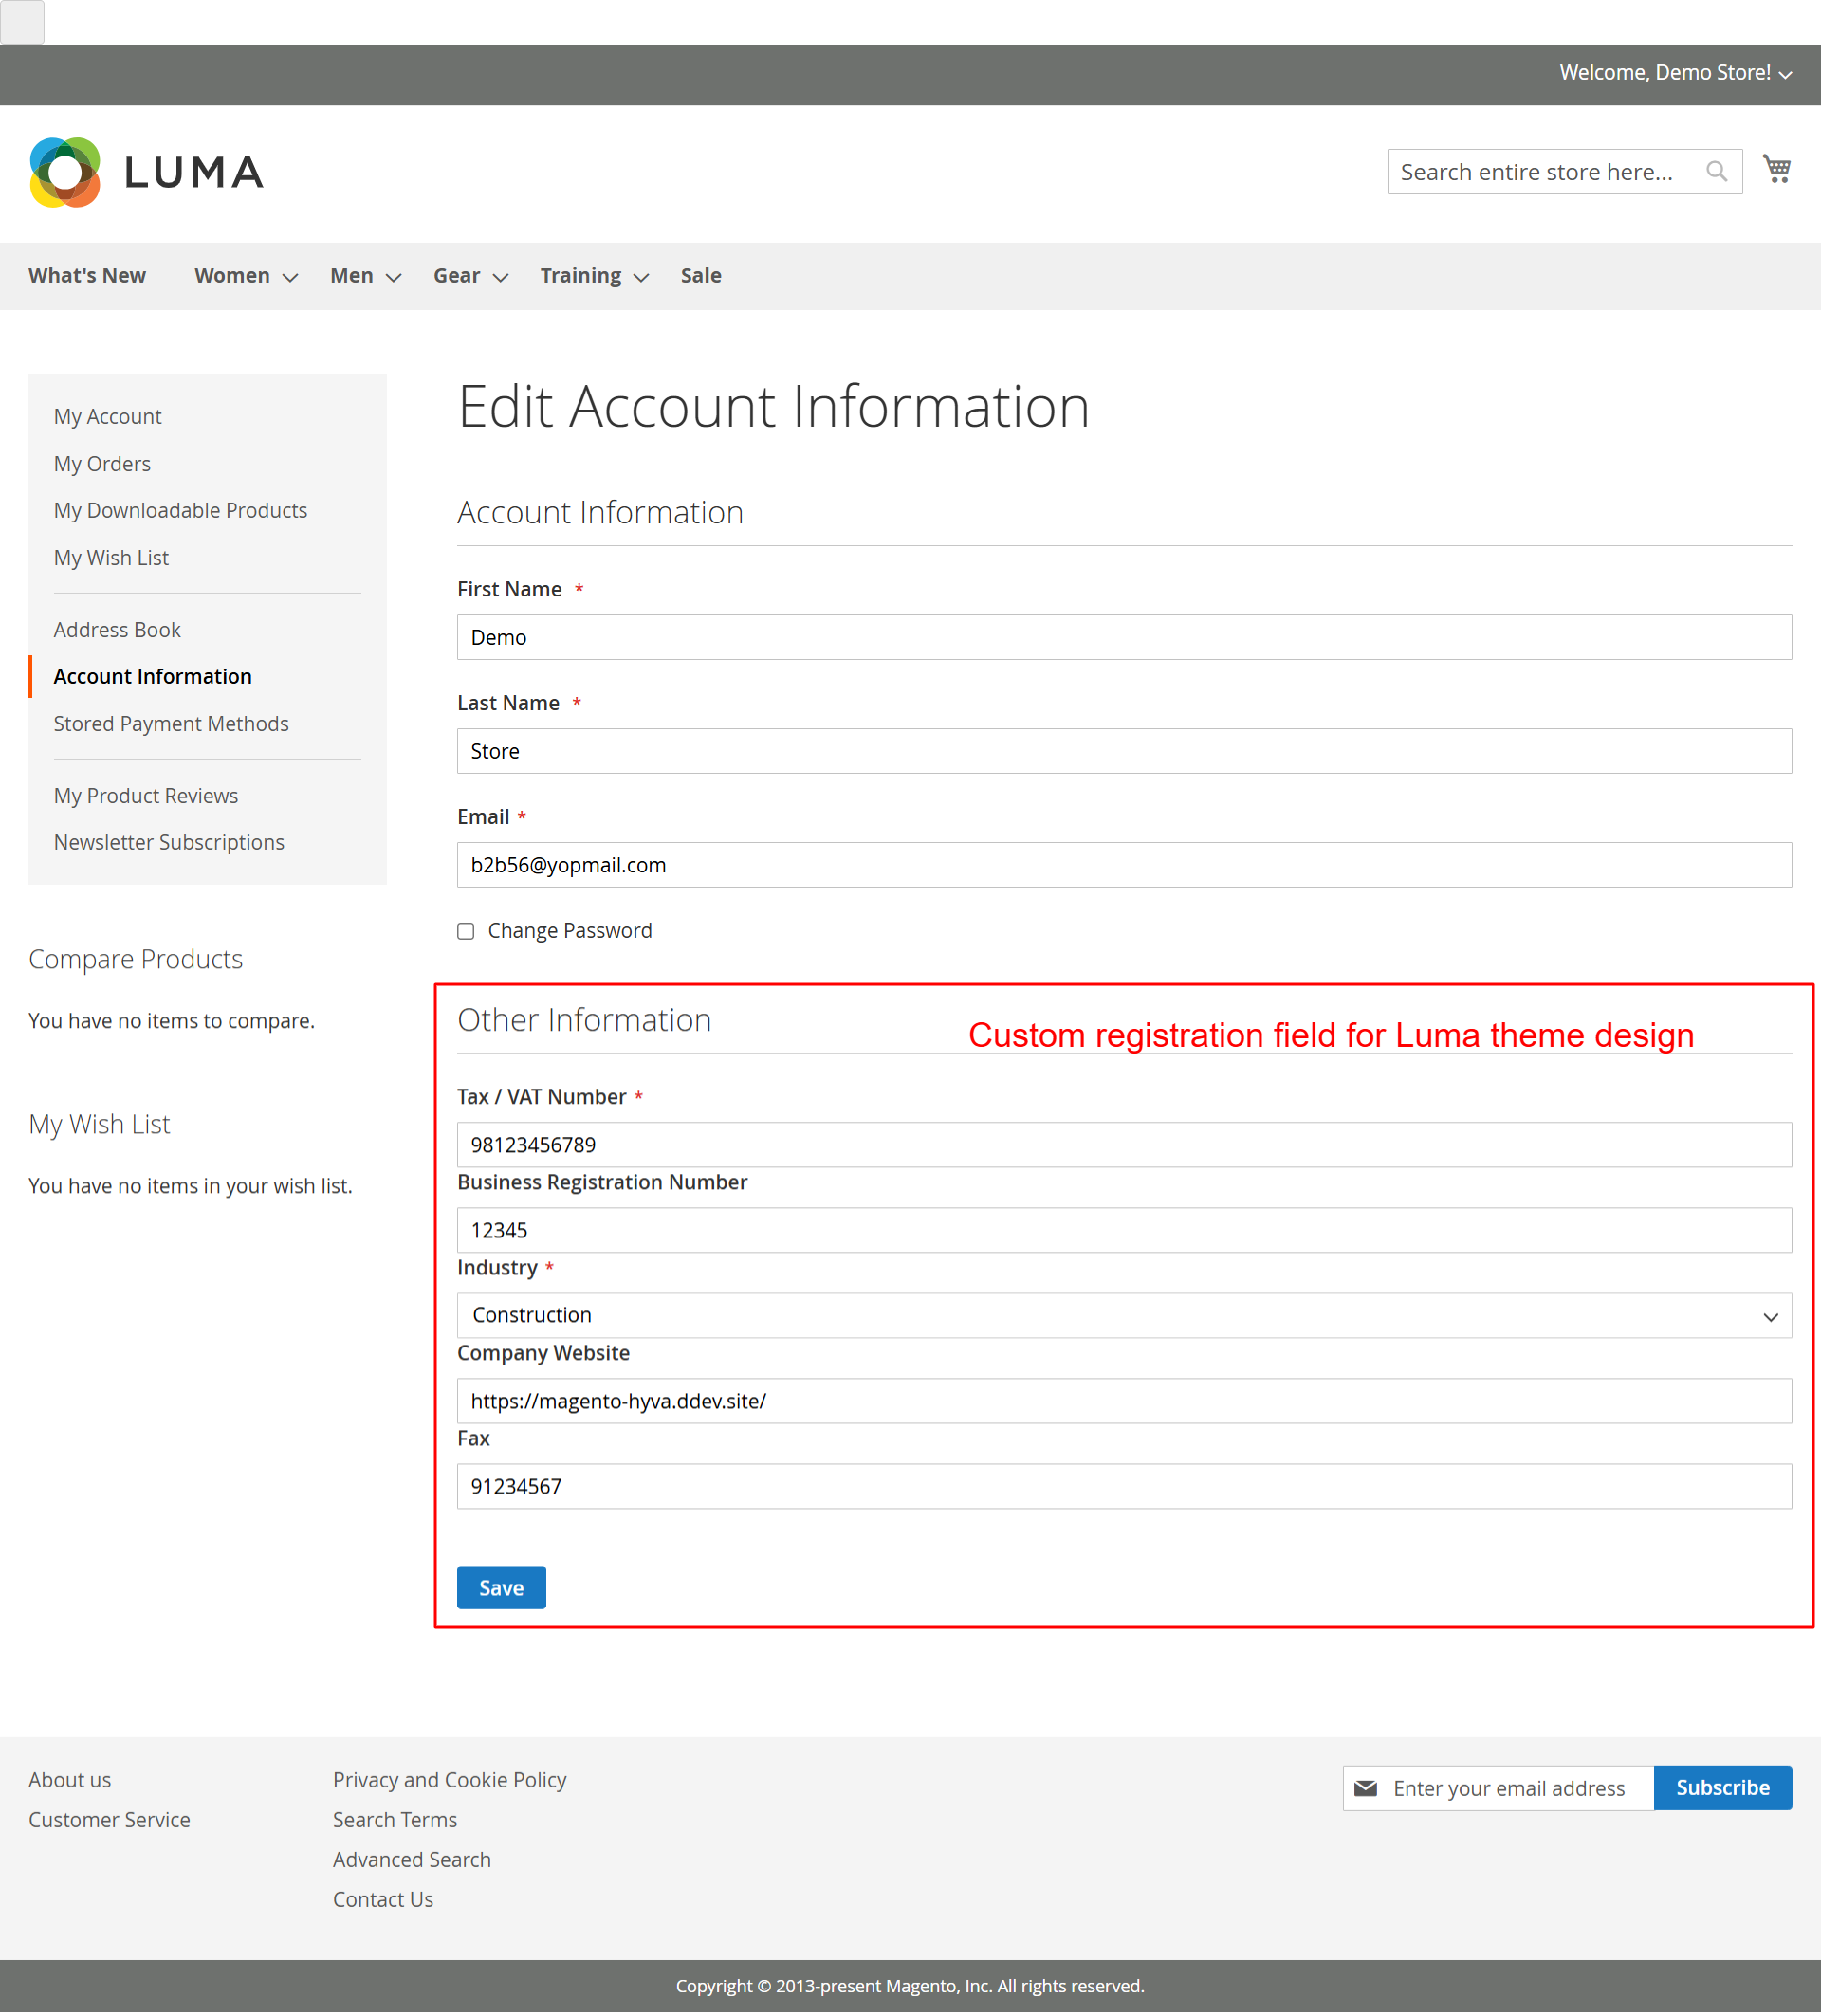
Frontend: Luma Edit Account InformationWhat this shows: Displays editable personal and additional information fields like Tax/VAT Number and Business Registration Number. This screen enables users to modify their account details, with emphasis on additional business-related fields. The customizable nature supports diverse user requirements, underpinning the module's adaptability in managing varied customer profiles. 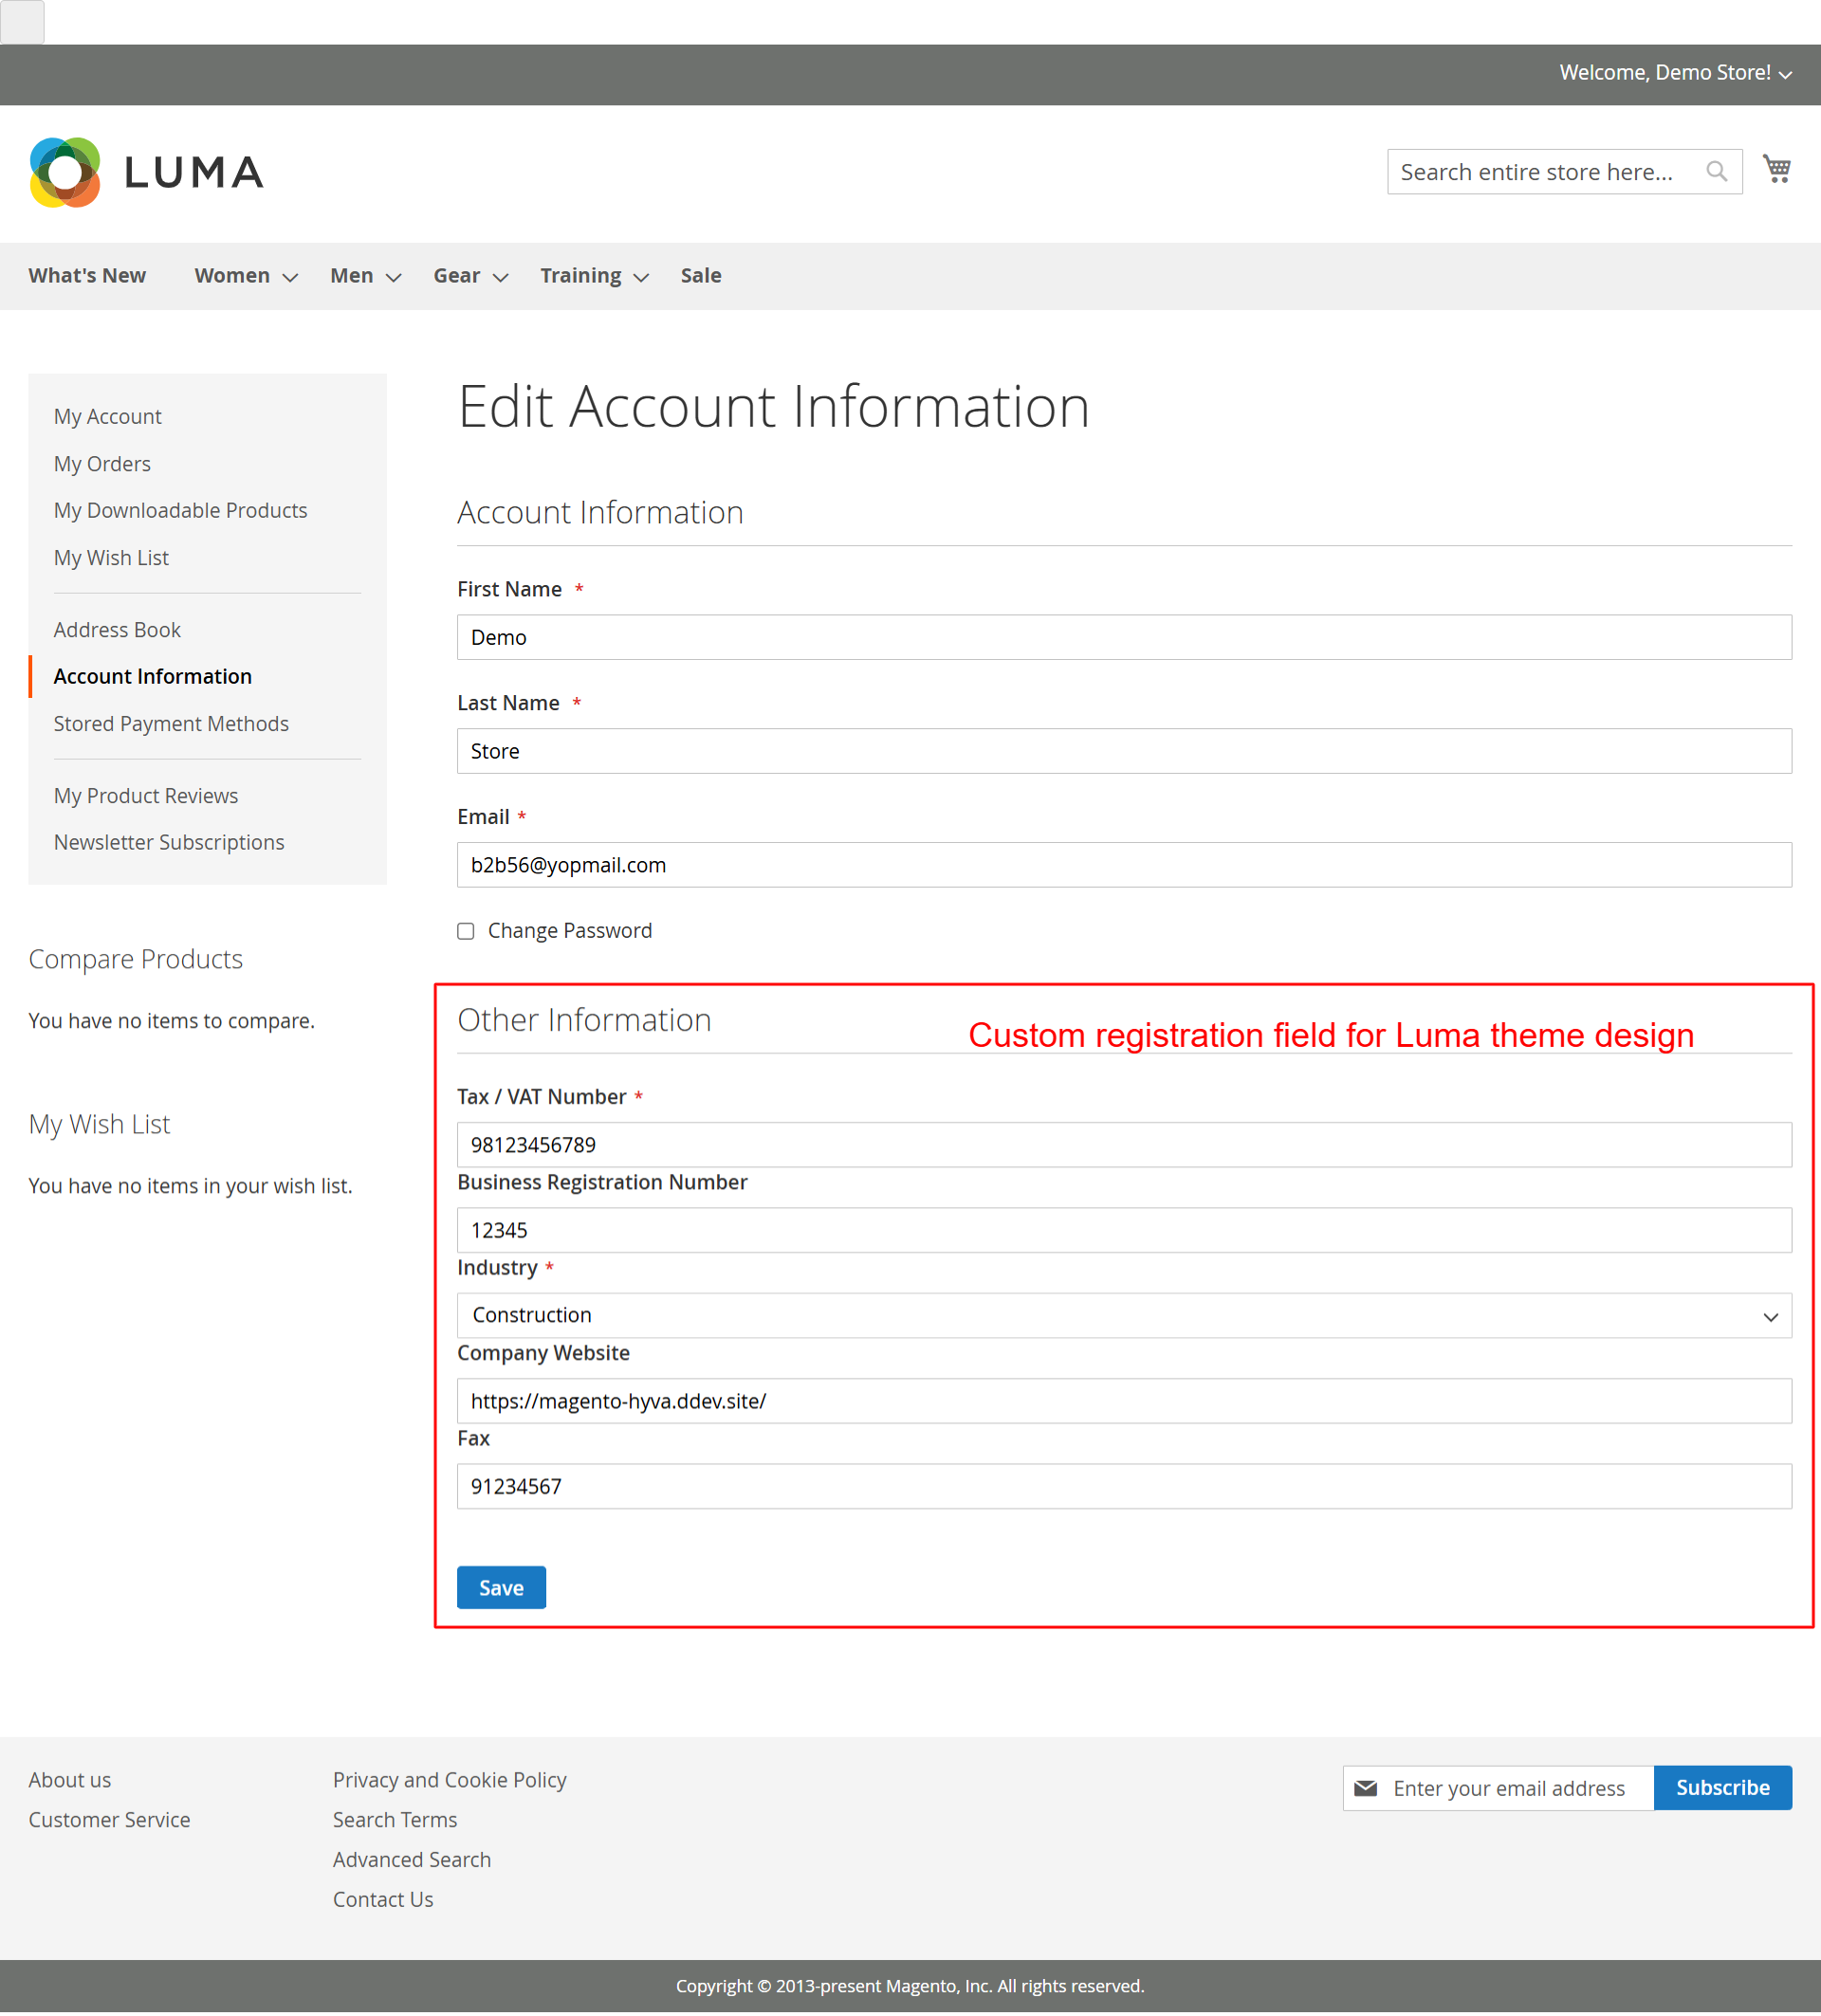 32
Frontend: Hyva Theme My Account DashboardWhat this shows: Contains sections for Account Information and Address Book, highlighting custom registration fields and additional business data. In the My Account Dashboard, users can access and manage their full profile, including custom fields enabled by the extension. The Hyva theme compatibility ensures a seamless user experience, facilitating easy navigation through personal and business data. 33
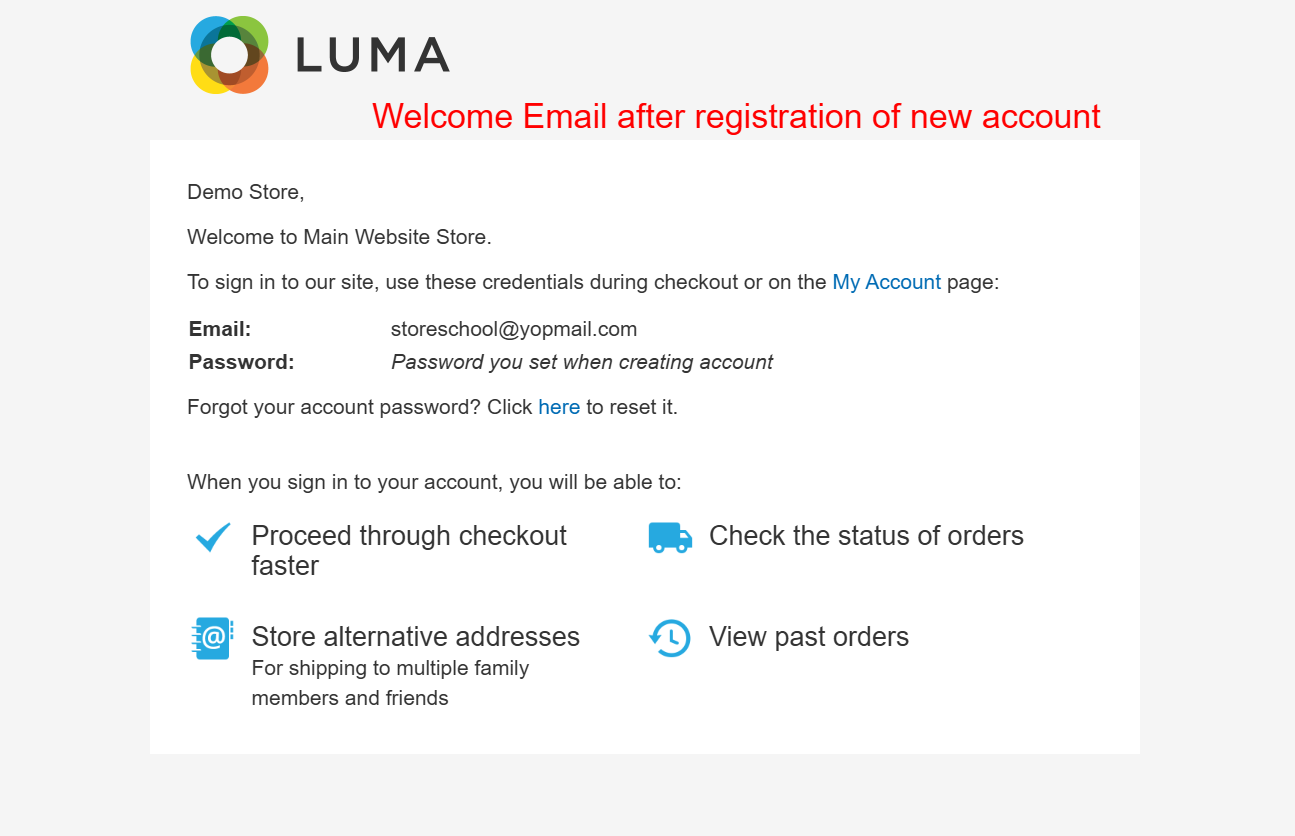
Frontend: New Account Registration EmailWhat this shows: The screenshot shows a welcome email for new account registration, including user login credentials (email and password) and links for account management like password reset. It outlines benefits such as faster checkout and order tracking. Upon registering a new account on the Magento 2 platform, users receive this welcome email, confirming their registration and providing essential login details. It serves as an introduction to the account's functions and features, promoting benefits such as expedited checkout processes and enhanced order management. This email underscores the customization capabilities provided by the Ewebecommerce RegistrationFieldSuite, ensuring users can manage their accounts seamlessly while being aware of all available features. 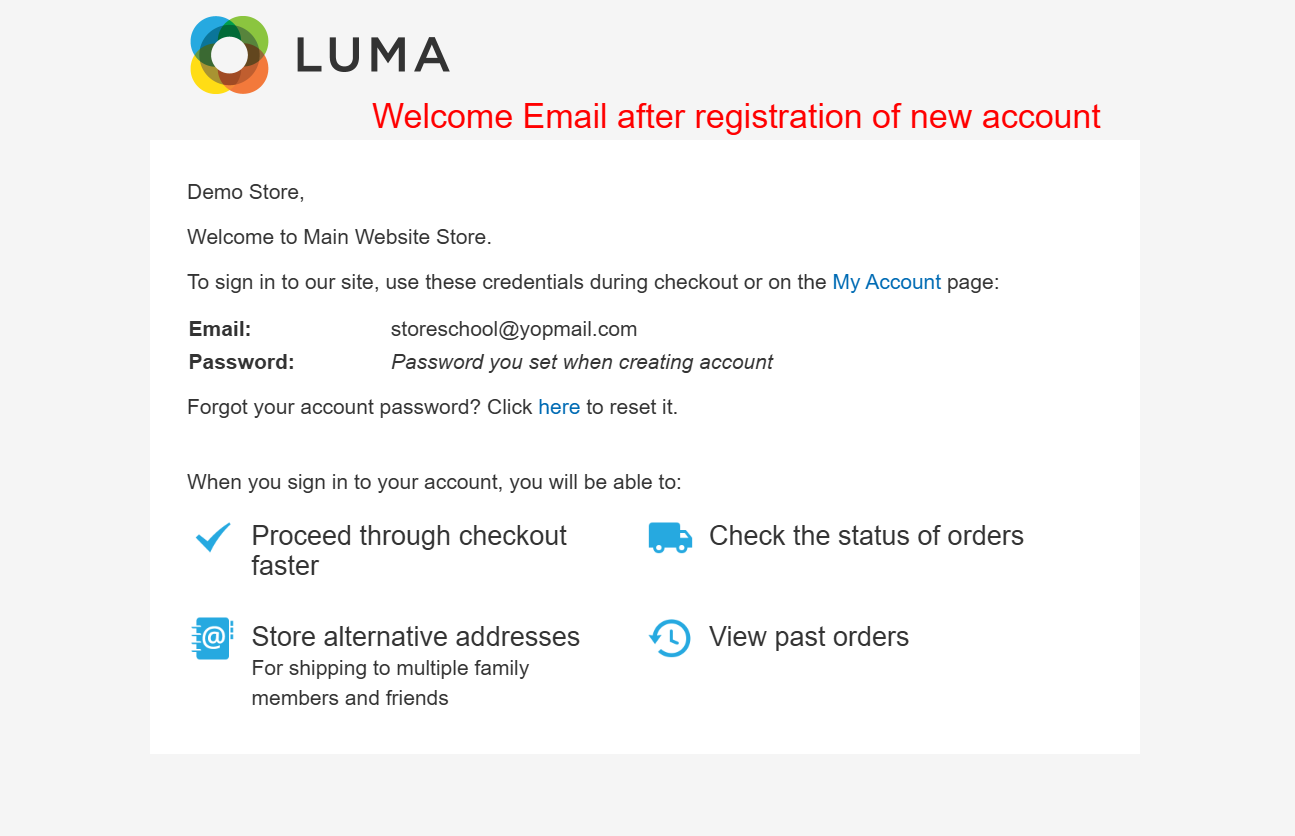 |





Reviews
There are no reviews yet.