


1 Overview
Effortlessly create and manage custom registration forms with AI-enhanced capabilities for WooCommerce.
Registration Field Suite is a comprehensive WooCommerce extension designed to streamline custom registration form creation and management. With features like a visual drag-and-drop builder and AI-powered form generation, users can build unlimited forms customized to fit specific business needs. The suite facilitates thorough data collection and management of customer approvals, ensuring a seamless registration process.
The plugin offers robust features like multiple captcha options, pending registration approval workflows, and custom field integration across various WooCommerce pages. Administrators can take advantage of intuitive tools to craft forms that enhance both user experience and data integrity. This makes Registration Field Suite an essential plugin for businesses requiring tailored registration solutions.
At a Glance
- AI-powered form generation
- Multiple registration forms and URLs
- Pending approval workflows
- Custom fields on WooCommerce pages
- Five captcha types for security
- Drag-and-drop form builder
- Inline status editing
- Email notifications configuration
| Plugin | Registration Field Suite |
|---|---|
| Version | 2.0.0 |
| Author | RegistrationFieldSuite |
| License | GPL-2.0+ |
| WooCommerce | Compatible |
| Files | 119 total (57 PHP) |
To begin using the features of the Registration Field Suite v2.0.0, administrators must first activate the plugin from the WordPress plugins page. This step is crucial as it enables the consolidated functionalities of custom registration fields and pending registration handling, which can then be configured according to the site's needs.
2 Features
OpenAI, Anthropic, and Google AI integrations
Prompt-based form generation
Pre-built templates available
Enhances form creation speed
AI generates field structures
Unlimited forms with unique URLs
Drag-and-drop form builder
Shortcode for easy embedding
Grid layouts (1-4 columns)
Independent settings per form
Form cloning for easier setups
Admin approval process
Role-based approval settings
In-line status editing
Email notifications for process updates
Account activation or decline via admin
Five captcha options
Google reCAPTCHA integration
Image and math captcha types
Dynamic field validations
Data sanitization and verification
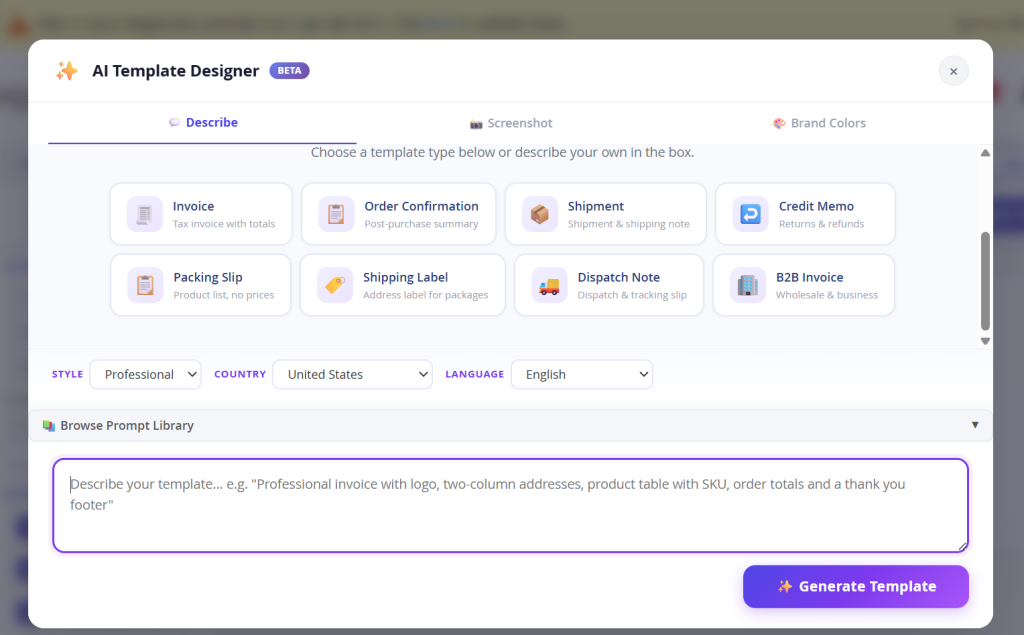
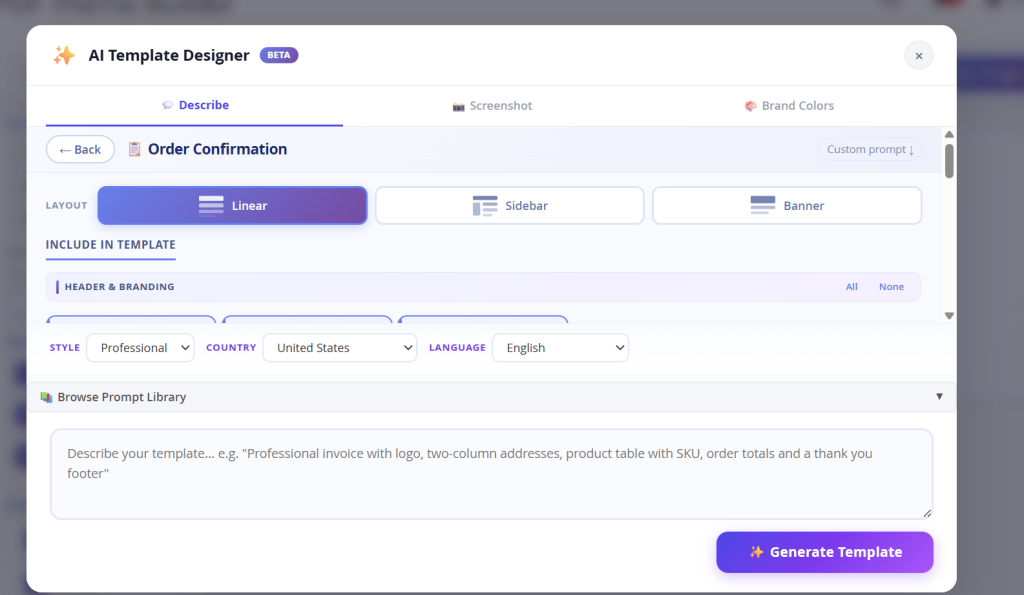
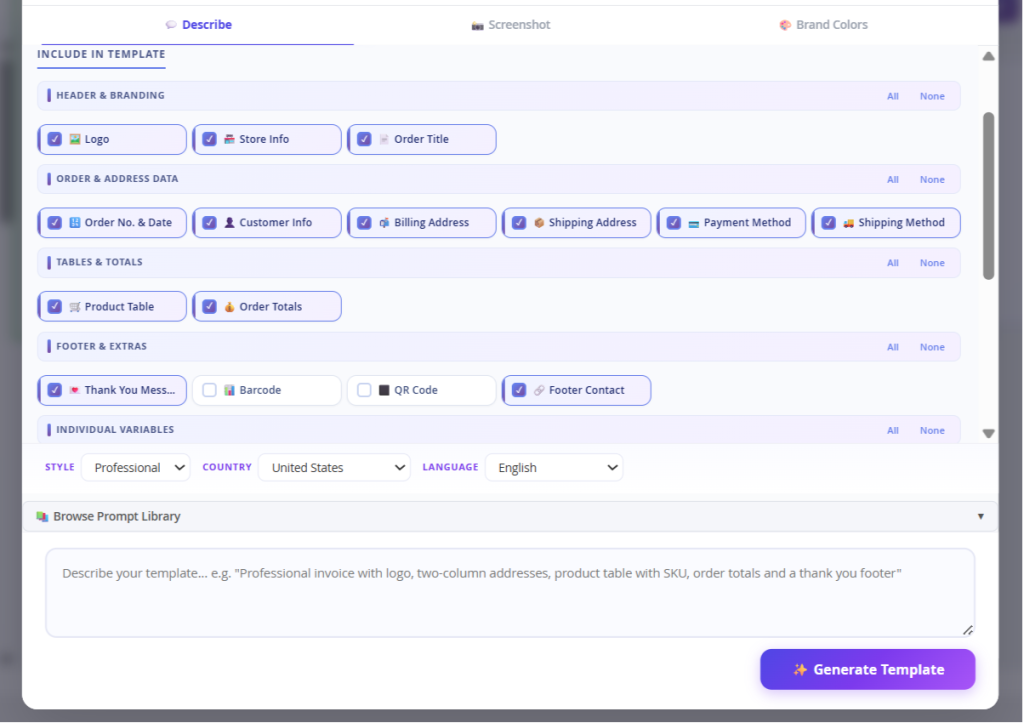
AI-Powered Form Creation
Generate comprehensive forms with AI by simply describing the desired form structure.
- OpenAI, Anthropic, and Google AI integrations
- Prompt-based form generation
- Pre-built templates available
- Enhances form creation speed
- AI generates field structures
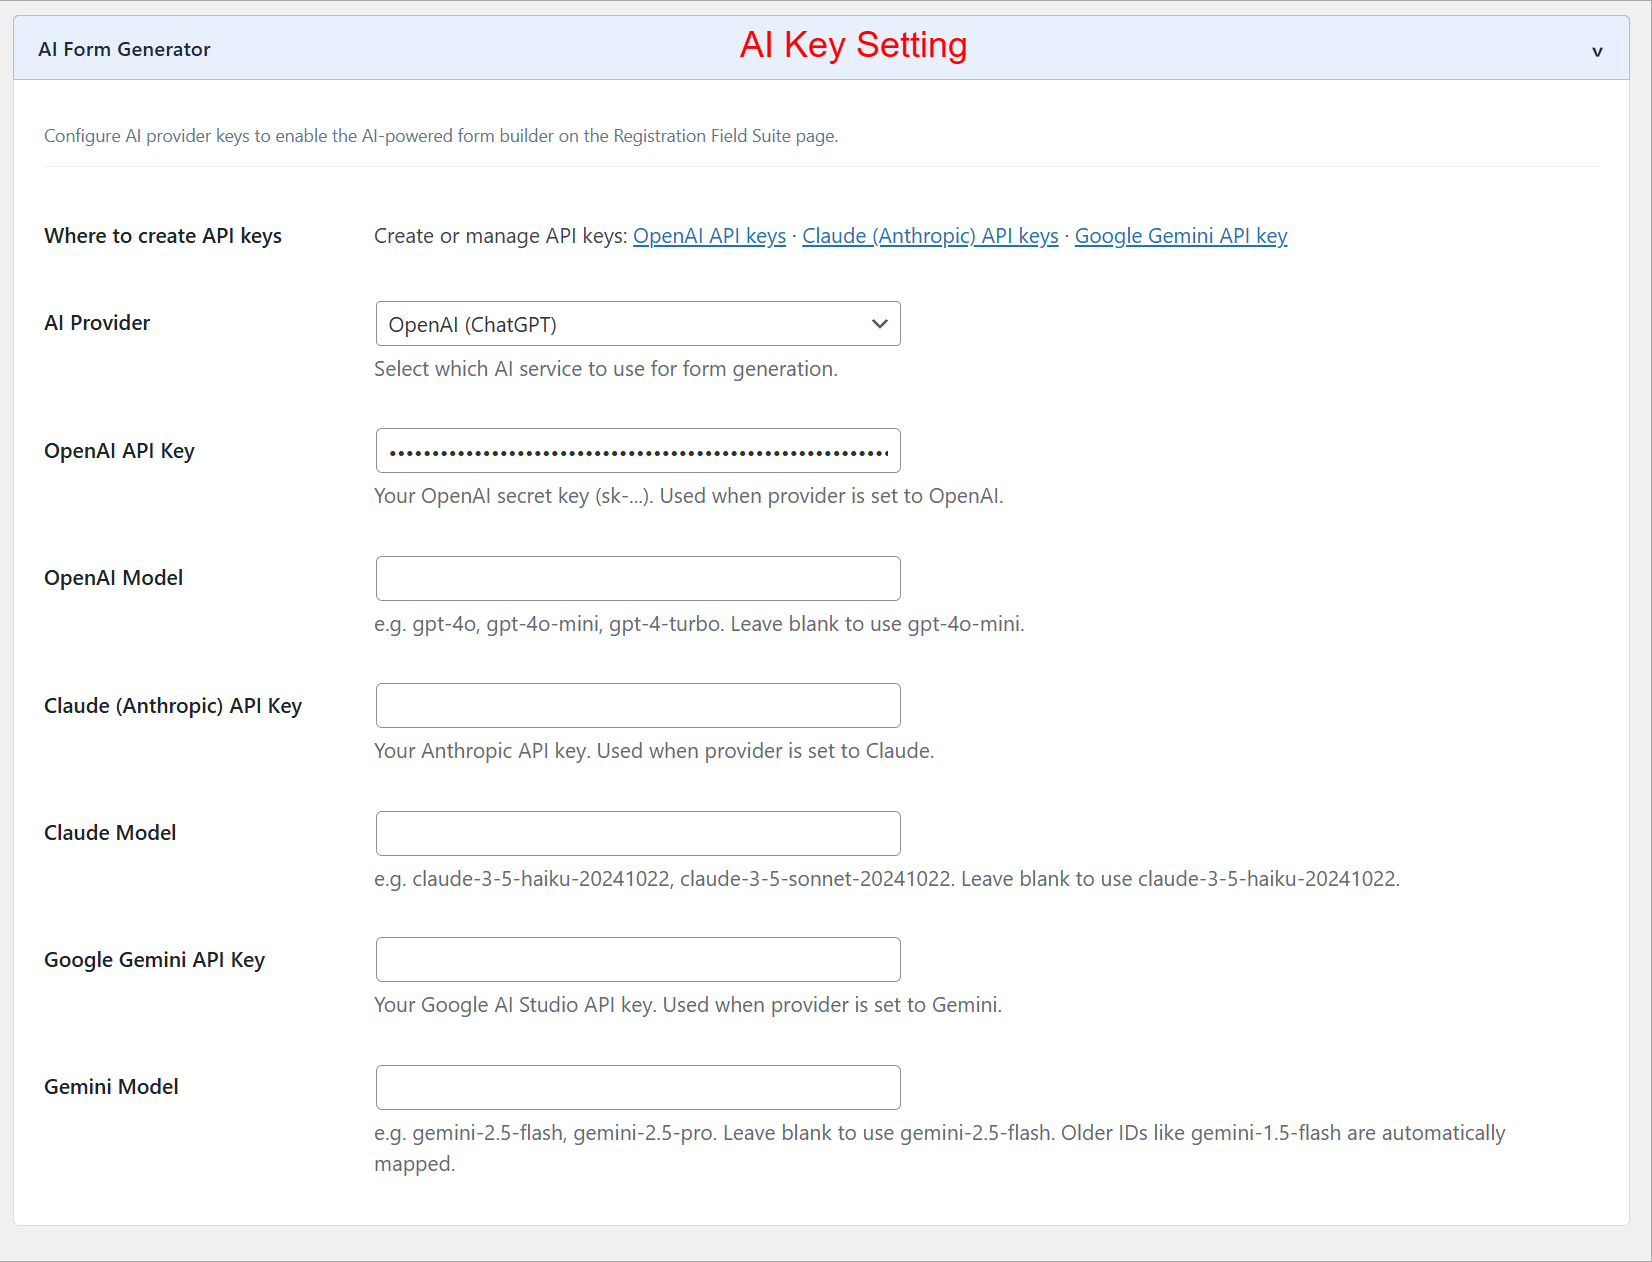
This interface allows administrators to input API keys for AI services to leverage form generation capabilities powered by AI. By configuring these settings, users can utilize advanced AI tools like OpenAI's ChatGPT, enhancing the functionality and responsiveness of registration forms within the suite.
The AI Form Generator simplifies form creation by processing input descriptions to generate appropriate fields and sections automatically. This tool is especially useful for users who need a quick setup of complex forms without manually specifying each detail, thus enhancing efficiency and accuracy in form registration processes.
Registration Forms Management
Organize, create, and manage multiple registration forms efficiently.
- Unlimited forms with unique URLs
- Drag-and-drop form builder
- Shortcode for easy embedding
- Grid layouts (1-4 columns)
- Independent settings per form
- Form cloning for easier setups
This interface displays all the created registration forms in a grid layout. Admins can view details such as form name, identifier, URL, and more. It helps in managing existing forms for quick edits or deletions. The forms are accessible using shortcodes, allowing seamless integration into pages.
This form builder interface allows admins to create customized registration forms with field-specific settings including URLs and button texts. The inclusion of the AI Form Generator enhances usability by suggesting field configurations, helping to streamline form creation.
Pending Registration and Approval
Control user access through customizable pending registration processes.
- Admin approval process
- Role-based approval settings
- In-line status editing
- Email notifications for process updates
- Account activation or decline via admin
Pending Registration settings are pivotal for managing new user entries that require approval. Administrators can choose which customer groups need manual validation, thus exercising control over who gets immediate access and ensuring that only pre-approved users join the platform.
On this configuration screen, administrators can set the default approval status for all existing users. This feature is essential for maintaining standardized user statuses throughout the site. By selecting the desired status from the dropdown and clicking 'Set Status,' admins ensure consistency and visibility across user management operations.
Security Features
Ensure secure form submissions with built-in captcha and verification.
- Five captcha options
- Google reCAPTCHA integration
- Image and math captcha types
- Dynamic field validations
- Data sanitization and verification
Security is paramount during user registration. In this section, administrators can enter their Google reCAPTCHA keys to protect forms from spam and abuse. Configuring these keys helps ensure that only legitimate users can complete registration, maintaining the integrity of the site's user base.
Adding Captcha is crucial for protecting registration forms from automated spam submissions. Administrators use this interface to set up Captcha verification, ensuring that form submissions are from genuine users and maintaining system security.
3 Configuration Walkthrough
Activate the Plugin
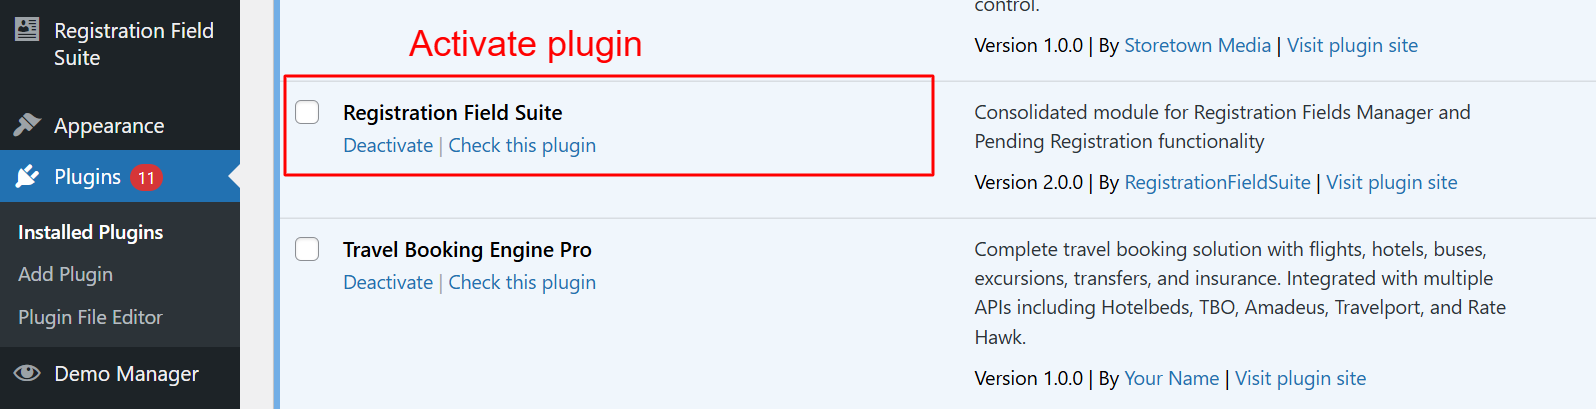
To start using the Registration Field Suite, go to Plugins > Installed Plugins in your WordPress admin panel. Find 'Registration Field Suite' and click on Activate to enable the plugin's functionalities. This action activates both the custom registration features and the pending registration approval system necessary for your site's registration flows.
To begin using the features of the Registration Field Suite v2.0.0, administrators must first activate the plugin from the WordPress plugins page. This step is crucial as it enables the consolidated functionalities of custom registration fields and pending registration handling, which can then be configured according to the site's needs.
Configure General Settings
Access the Registration Field Suite menu and select Settings to open configuration options. Under General, toggle Enable Registration Fields to activate or deactivate custom fields. Customize these settings to fit site-specific data requirements and enhance user registration.
Once the Registration Field Suite is activated, navigate to its settings area to start managing registration forms and configuring general settings. Selecting 'Settings' opens up pathways to enable custom registration options, crucial for tailoring user registration experiences.
In the General Settings section, administrators can enable or disable the custom registration fields feature. Activating this setting allows customized fields to be included in the user registration process, offering a personalized registration experience tailored to the website's specific data collection needs.
Set AI Key Configurations
Under the AI Form Generator tab in Settings, input APIs for your chosen AI provider, such as OpenAI or Google. These keys enable AI-driven features for form creation, facilitating faster development and maintenance of professional registration forms.
This interface allows administrators to input API keys for AI services to leverage form generation capabilities powered by AI. By configuring these settings, users can utilize advanced AI tools like OpenAI's ChatGPT, enhancing the functionality and responsiveness of registration forms within the suite.
Enable Pending Registration
Navigate to the Pending Registration settings to require admin approval for new users. Select which customer roles need approval, set status defaults, and configure automated workflows to manage user entries effectively.
Pending Registration settings are pivotal for managing new user entries that require approval. Administrators can choose which customer groups need manual validation, thus exercising control over who gets immediate access and ensuring that only pre-approved users join the platform.
Setup Email Notifications
Configure Email Notifications to keep parties informed about registration events. Input your email settings, select templates, and adjust sender details to ensure consistent communication for registration processes.

The Email Notifications settings let administrators configure email details for various registration events, ensuring both administrators and users are kept informed about account statuses. Configuring these notifications is essential for maintaining effective communication and efficiency in handling pending registrations.
This interface allows administrators to select and customize email templates for notifications triggered by registration events. Customizing these templates, including sender info, helps align communications with the site's branding, ensuring consistent and professional interaction with users during the registration process.
Customize User Status Settings
In User Approval Settings, specify default user statuses using the dropdown menu. This consistent setup ensures that your users are correctly categorized and processed as per the system's logic, maintaining structured user management flows.
On this configuration screen, administrators can set the default approval status for all existing users. This feature is essential for maintaining standardized user statuses throughout the site. By selecting the desired status from the dropdown and clicking 'Set Status,' admins ensure consistency and visibility across user management operations.
4 User Journey
Access Settings and Forms
After plugin activation, navigate to the Registration Field Suite settings from the admin menu. Use the interface to create and manage registration forms, ensuring a tailored and efficient registration setup.
Once the Registration Field Suite is activated, navigate to its settings area to start managing registration forms and configuring general settings. Selecting 'Settings' opens up pathways to enable custom registration options, crucial for tailoring user registration experiences.
Create New Registration Form
The 'Create New Registration Form' option allows administrators to define identifiers and views for tailored forms. This flexibility supports diverse registration requirements, enhancing the plugin’s applicability for various business models.
Here, admins can initiate the creation of a new customer registration form. By specifying a form identifier and selecting a store view, they can customize forms for different purposes. This screen is pivotal for expanding registration capabilities to suit varied business needs.
Customize and Generate via AI
Leverage the AI Form Generator to describe desired form structures and create fields automatically. This rapid prototyping capability harnesses AI technology to simplify complex form setups, enhancing efficiency.
The AI Form Generator simplifies form creation by processing input descriptions to generate appropriate fields and sections automatically. This tool is especially useful for users who need a quick setup of complex forms without manually specifying each detail, thus enhancing efficiency and accuracy in form registration processes.
Review and Finalize Forms
Once a form is generated, use the interface to review, refine, and save your registration form. Ensure all sections accurately capture necessary data before activating the form for user interactions.
After generating a form via the AI tool, this confirmation screen lets administrators know that the form has been successfully created and is ready for review. Users can then tweak individual details before finalizing the form, ensuring it meets all necessary criteria before deployment.
Process Registration Approvals
Post-form submission, review pending registrations in the user list. Approve or decline users efficiently using in-line actions to manage account status smoothly, supporting streamlined user onboarding.
Administrators can quickly update a customer's registration status using the dropdown menu. This feature is vital for maintaining control over user permissions and account activations within the Registration Field Suite v2.0.0.
5 Use Cases
B2B Wholesale Registration
Developers and businesses can leverage the B2B registration form, allowing for detailed corporate information capture, beneficial for wholesale processes.
Student Enrollment Management
Educational institutions can manage student enrollments effectively using tailored forms. Capture relevant academic data for registration without hassle.
Medical Professional Verification
Hospitals and clinics can create medical registration forms, ensuring only qualified professionals with valid credentials can register.
Job Application Capture
HR departments utilize form templates to streamline job applications, collecting relevant candidate information efficiently.
Event Participation
Event managers can set up registration forms catered to event-specific needs, ensuring seamless collection of attendee data.
7 Shortcodes
| Shortcode | File |
|---|---|
[eweb_regist_account] |
includes/frontend/class-frontend.php |
[eweb_regist_captcha] |
includes/frontend/class-frontend.php |
[eweb_regist_confirmation] |
includes/frontend/class-frontend.php |
[eweb_regist_create] |
includes/frontend/class-frontend.php |
[eweb_regist_createpost] |
includes/frontend/class-frontend.php |
[eweb_regist_download] |
includes/frontend/class-frontend.php |
[eweb_regist_edit] |
includes/frontend/class-frontend.php |
[eweb_regist_editpost] |
includes/frontend/class-frontend.php |
[eweb_regist_alikon] |
includes/frontend/class-frontend.php |
[eweb_regist_captchaform] |
includes/frontend/class-frontend.php |
[eweb_regist_securimage] |
includes/frontend/class-frontend.php |
[eweb_regist_confirm] |
includes/frontend/class-frontend.php |
[eweb_regist_alikon] |
includes/frontend/class-frontend.php |
[eweb_regist_captchaform] |
includes/frontend/class-frontend.php |
[eweb_regist_securimage] |
includes/frontend/class-frontend.php |
[eweb_regist_uploadfile] |
includes/frontend/class-frontend.php |
[eweb_registration_form] |
includes/hooks/class-hooks.php |
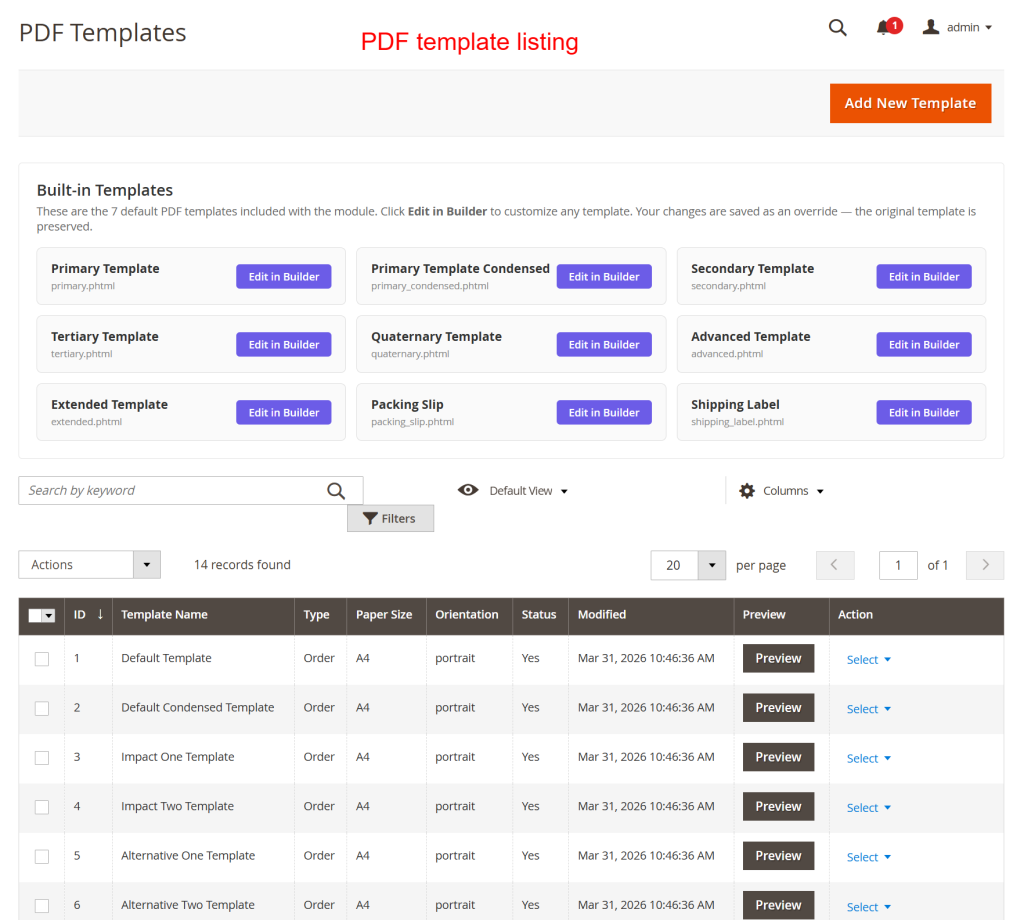
11 Step-by-Step Screenshot Reference
Every captured screen in setup order. Click any image to open the full-size version in a new tab.
wp-admin: Plugins > Activate Registration Field Suite
What this shows: This screen shows the list of installed plugins with an option to activate the 'Registration Field Suite'.
To begin using the features of the Registration Field Suite v2.0.0, administrators must first activate the plugin from the WordPress plugins page. This step is crucial as it enables the consolidated functionalities of custom registration fields and pending registration handling, which can then be configured according to the site's needs.
wp-admin: Registration Field Suite > Settings
What this shows: A menu with options 'Registration Forms' and 'Settings' under the plugin's admin menu.
Once the Registration Field Suite is activated, navigate to its settings area to start managing registration forms and configuring general settings. Selecting 'Settings' opens up pathways to enable custom registration options, crucial for tailoring user registration experiences.
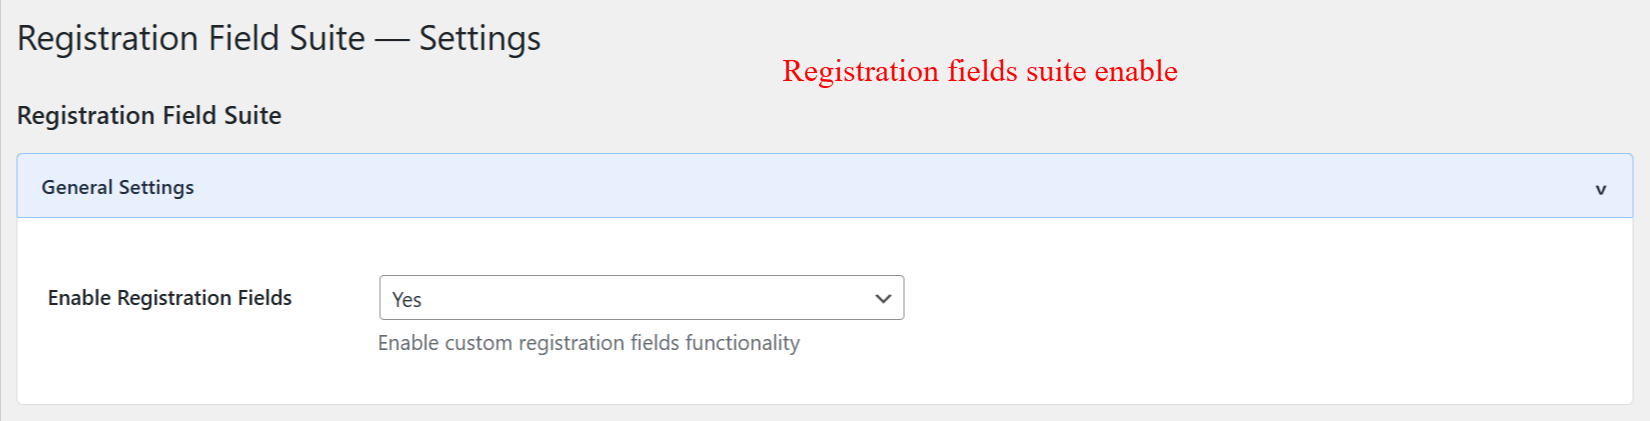
wp-admin: Registration Field Suite Settings > General
What this shows: A dropdown menu labeled 'Enable Registration Fields' with options to turn the feature on or off.
In the General Settings section, administrators can enable or disable the custom registration fields feature. Activating this setting allows customized fields to be included in the user registration process, offering a personalized registration experience tailored to the website's specific data collection needs.
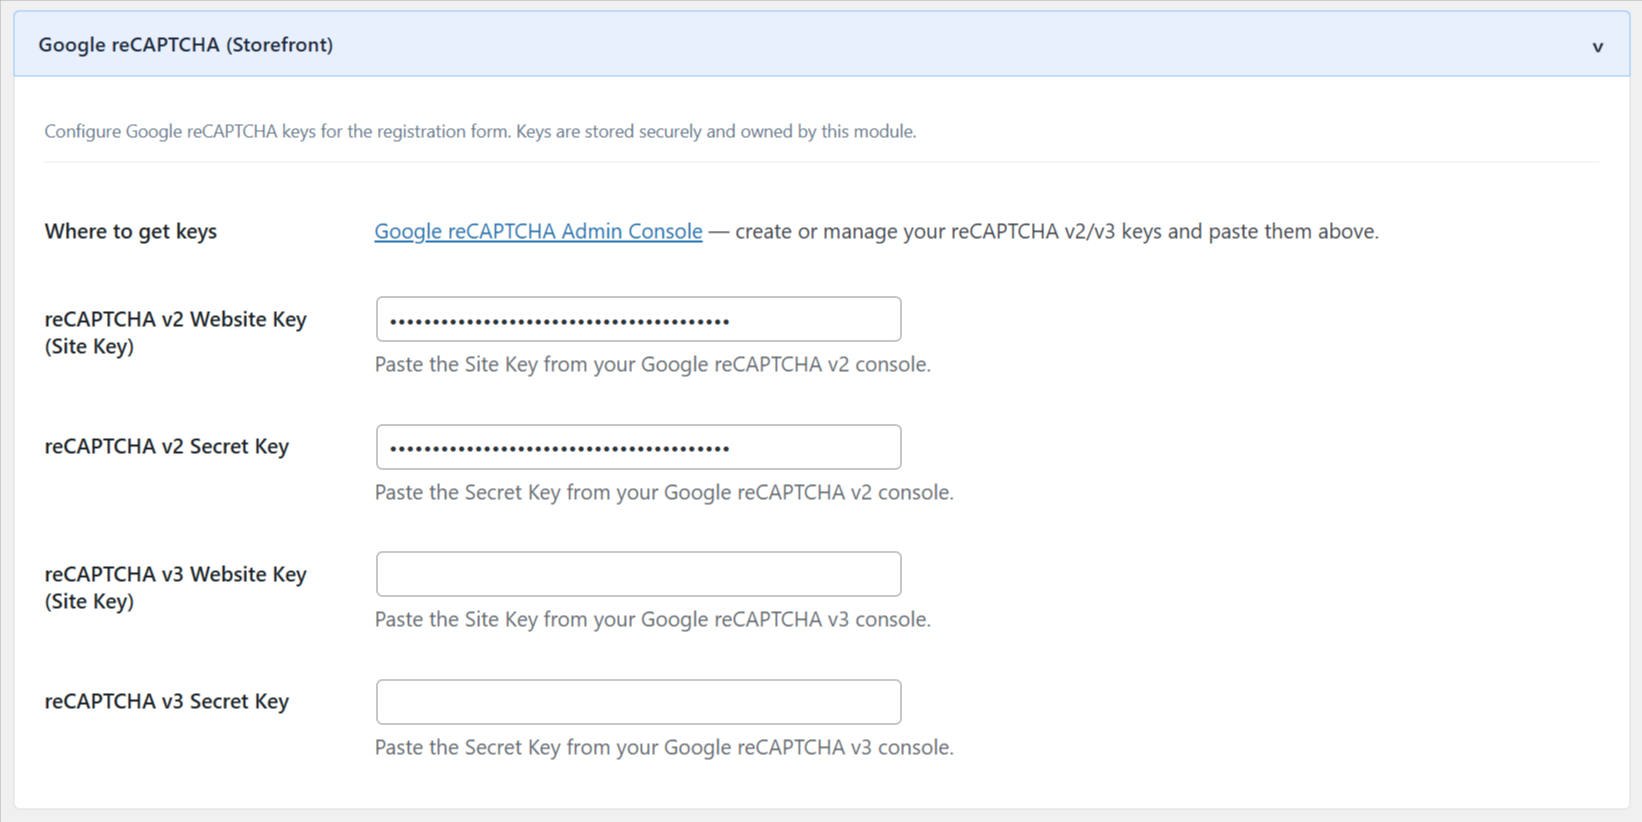
wp-admin: Registration Field Suite Settings > Google reCAPTCHA
What this shows: Form fields for entering Google reCAPTCHA v2 and v3 keys.
Security is paramount during user registration. In this section, administrators can enter their Google reCAPTCHA keys to protect forms from spam and abuse. Configuring these keys helps ensure that only legitimate users can complete registration, maintaining the integrity of the site's user base.
wp-admin: Registration Field Suite Settings > AI Form Generator
What this shows: Fields for selecting AI provider and entering specific API keys for AI form generation.
This interface allows administrators to input API keys for AI services to leverage form generation capabilities powered by AI. By configuring these settings, users can utilize advanced AI tools like OpenAI's ChatGPT, enhancing the functionality and responsiveness of registration forms within the suite.
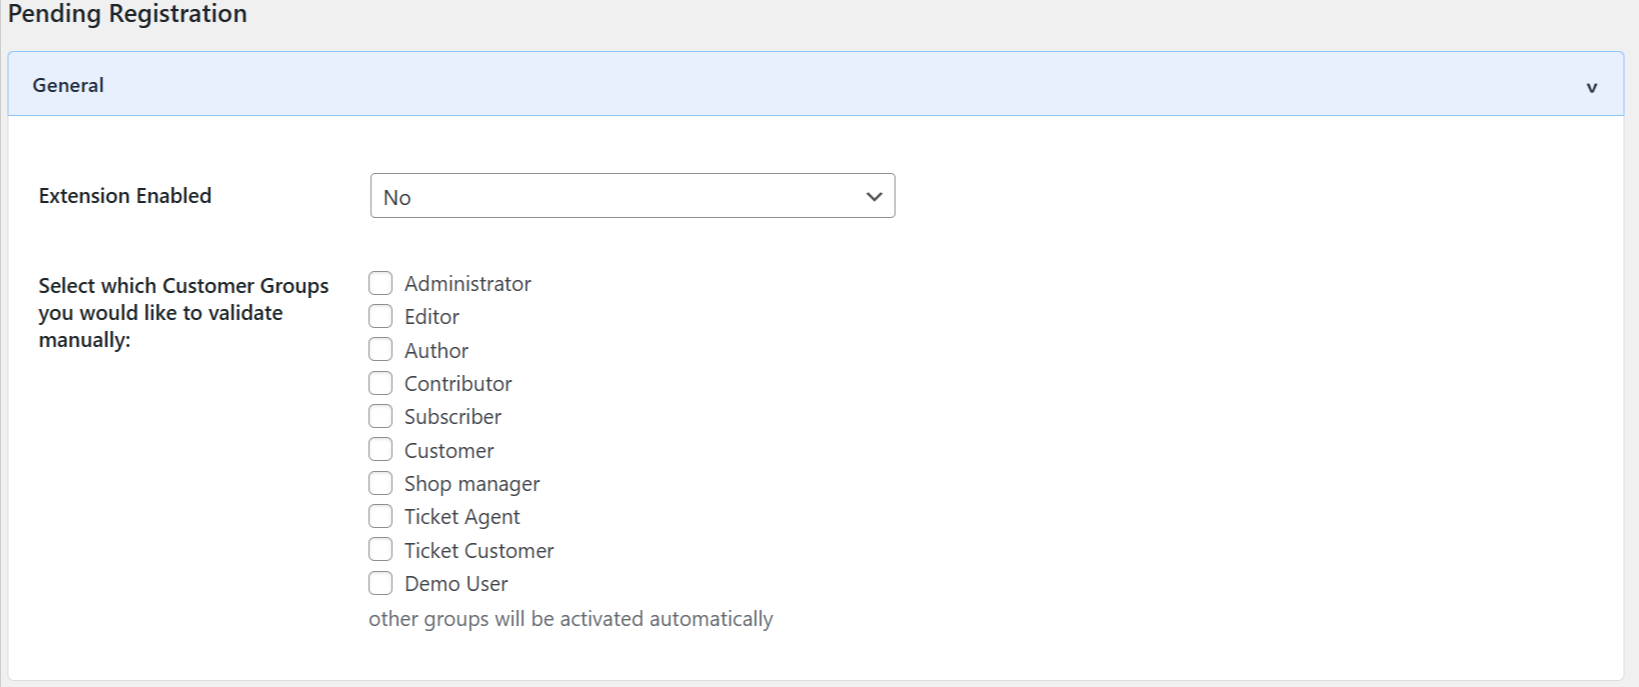
wp-admin: Registration Field Suite Settings > Pending Registration
What this shows: Options to enable the extension and manually validate customer groups.
Pending Registration settings are pivotal for managing new user entries that require approval. Administrators can choose which customer groups need manual validation, thus exercising control over who gets immediate access and ensuring that only pre-approved users join the platform.
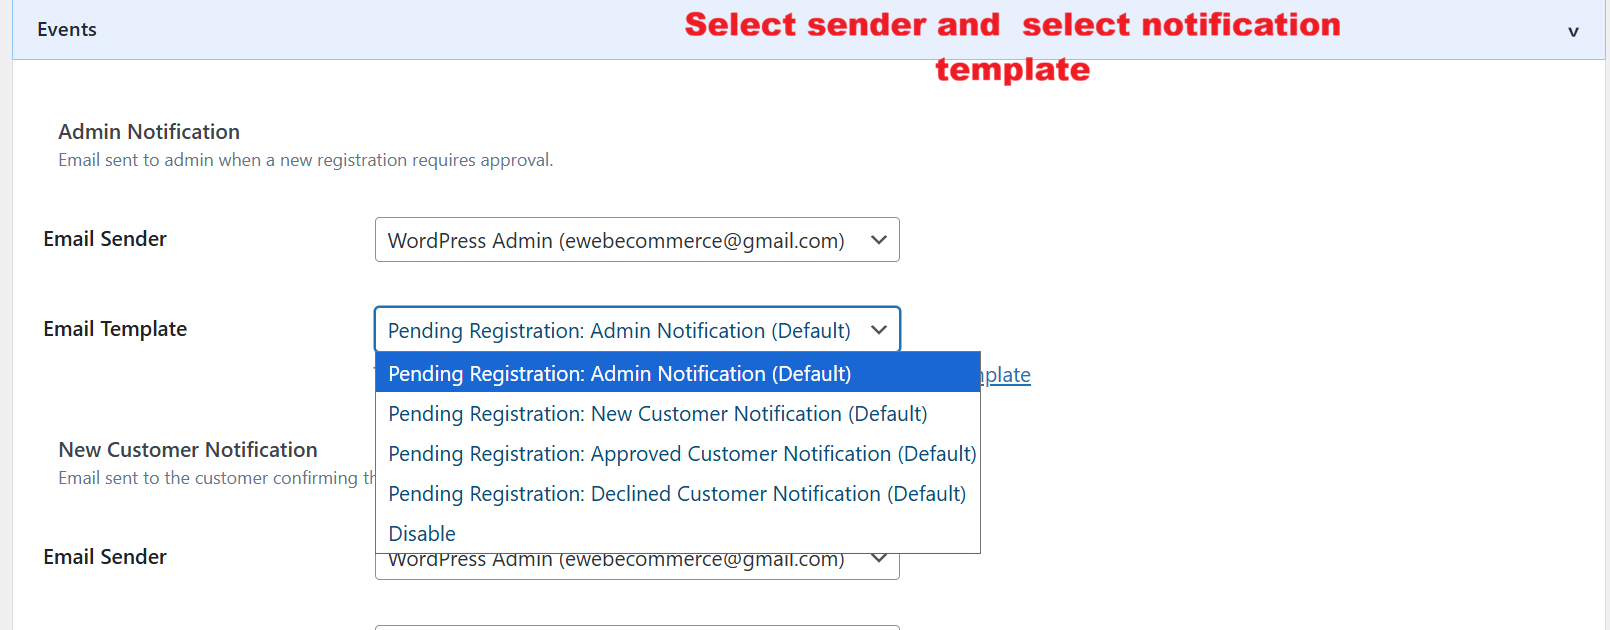
wp-admin: Registration Field Suite Settings > Email Notifications
What this shows: Email settings for sending notifications related to registration approval processes.
The Email Notifications settings let administrators configure email details for various registration events, ensuring both administrators and users are kept informed about account statuses. Configuring these notifications is essential for maintaining effective communication and efficiency in handling pending registrations.
wp-admin: Registration Field Suite Email Templates
What this shows: Dropdown menu to select email templates and customize sender information.
This interface allows administrators to select and customize email templates for notifications triggered by registration events. Customizing these templates, including sender info, helps align communications with the site's branding, ensuring consistent and professional interaction with users during the registration process.
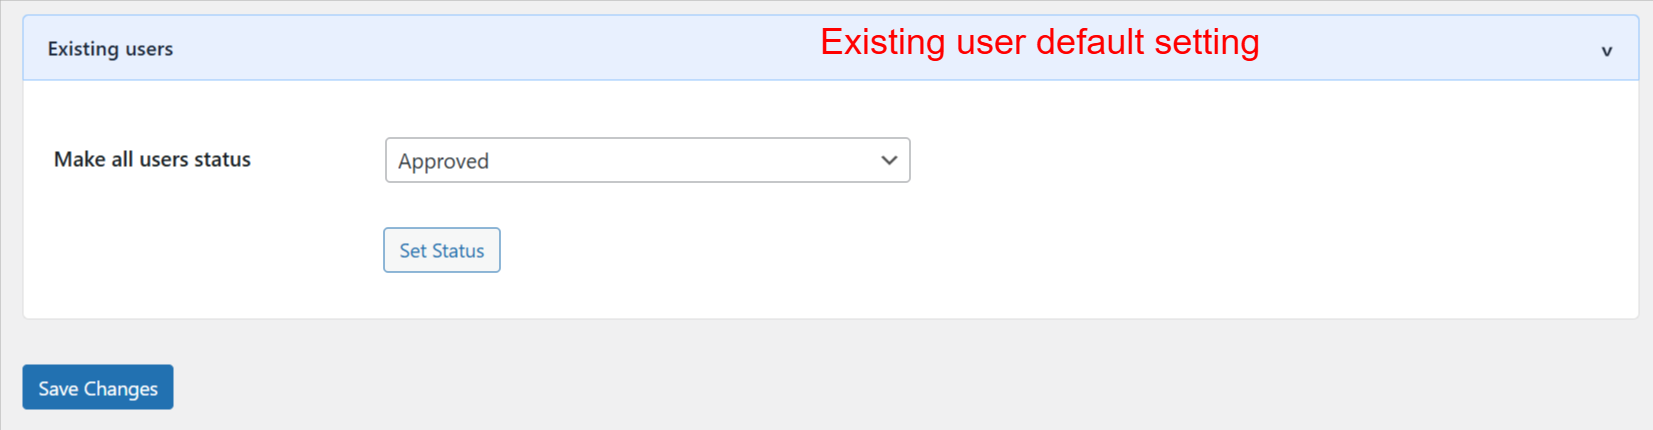
wp-admin: User Approval Settings
What this shows: This screen allows the admin to set the default status for existing users with a dropdown menu to select user status and a 'Set Status' button.
On this configuration screen, administrators can set the default approval status for all existing users. This feature is essential for maintaining standardized user statuses throughout the site. By selecting the desired status from the dropdown and clicking 'Set Status,' admins ensure consistency and visibility across user management operations.
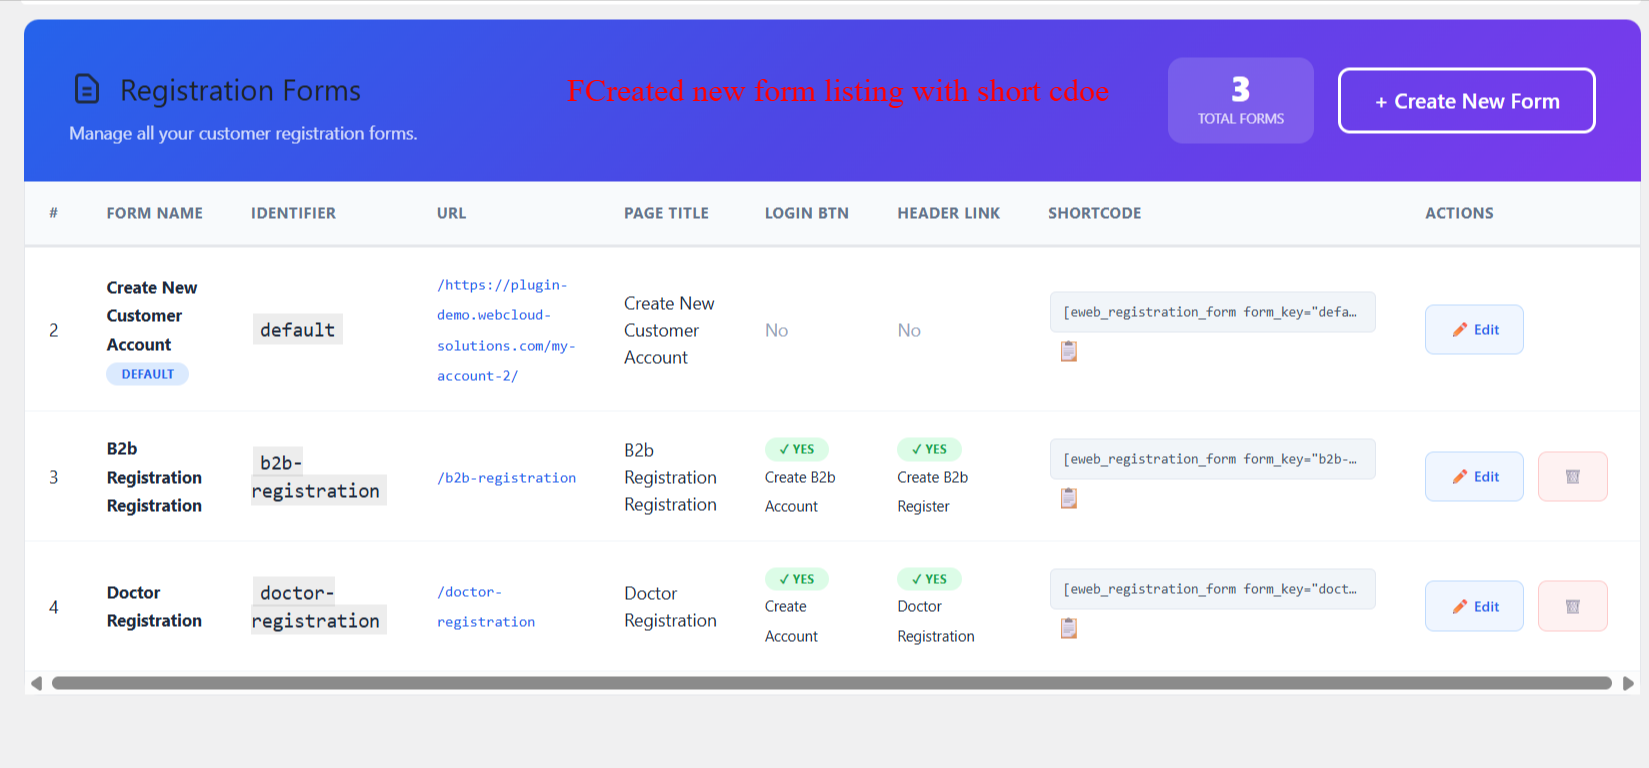
wp-admin: Registration Forms List View
What this shows: A grid listing of registration forms showing columns for Form Name, Identifier, URL, Page Title, Login BTN, Header Link, Shortcode, and Actions.
This interface displays all the created registration forms in a grid layout. Admins can view details such as form name, identifier, URL, and more. It helps in managing existing forms for quick edits or deletions. The forms are accessible using shortcodes, allowing seamless integration into pages.
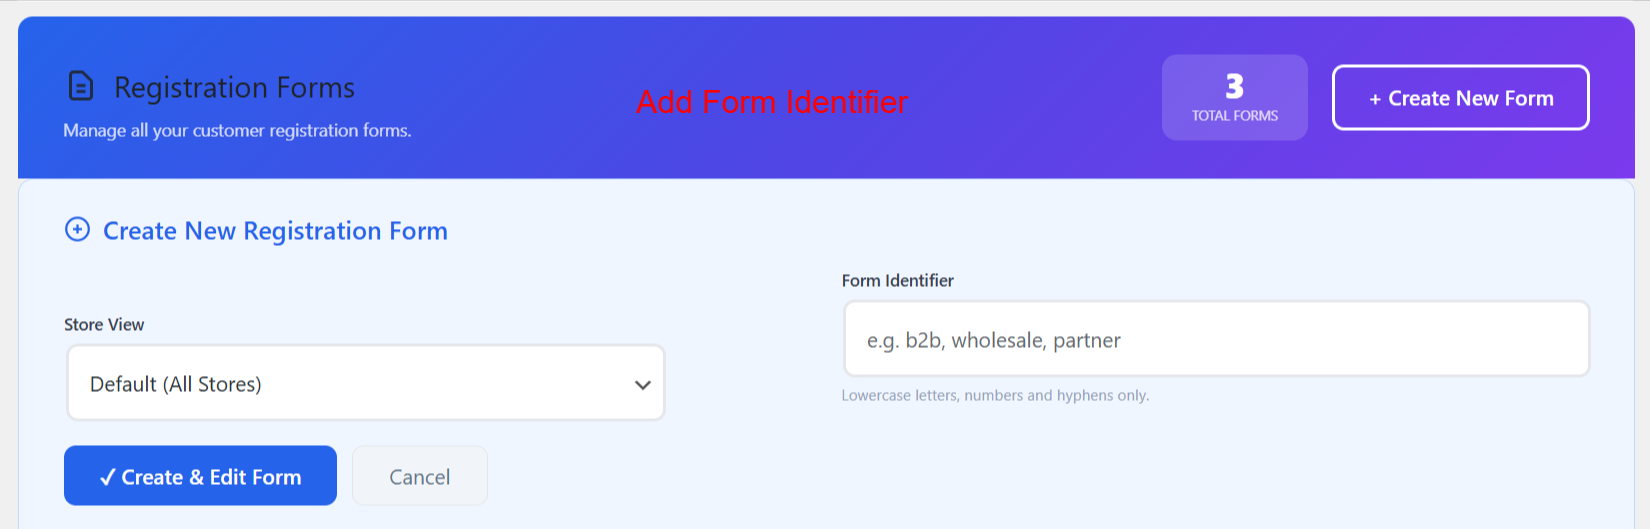
wp-admin: Create New Registration Form
What this shows: A form to create a new registration form, featuring fields for Store View and Form Identifier, and buttons for 'Create & Edit Form' and 'Cancel'.
Here, admins can initiate the creation of a new customer registration form. By specifying a form identifier and selecting a store view, they can customize forms for different purposes. This screen is pivotal for expanding registration capabilities to suit varied business needs.
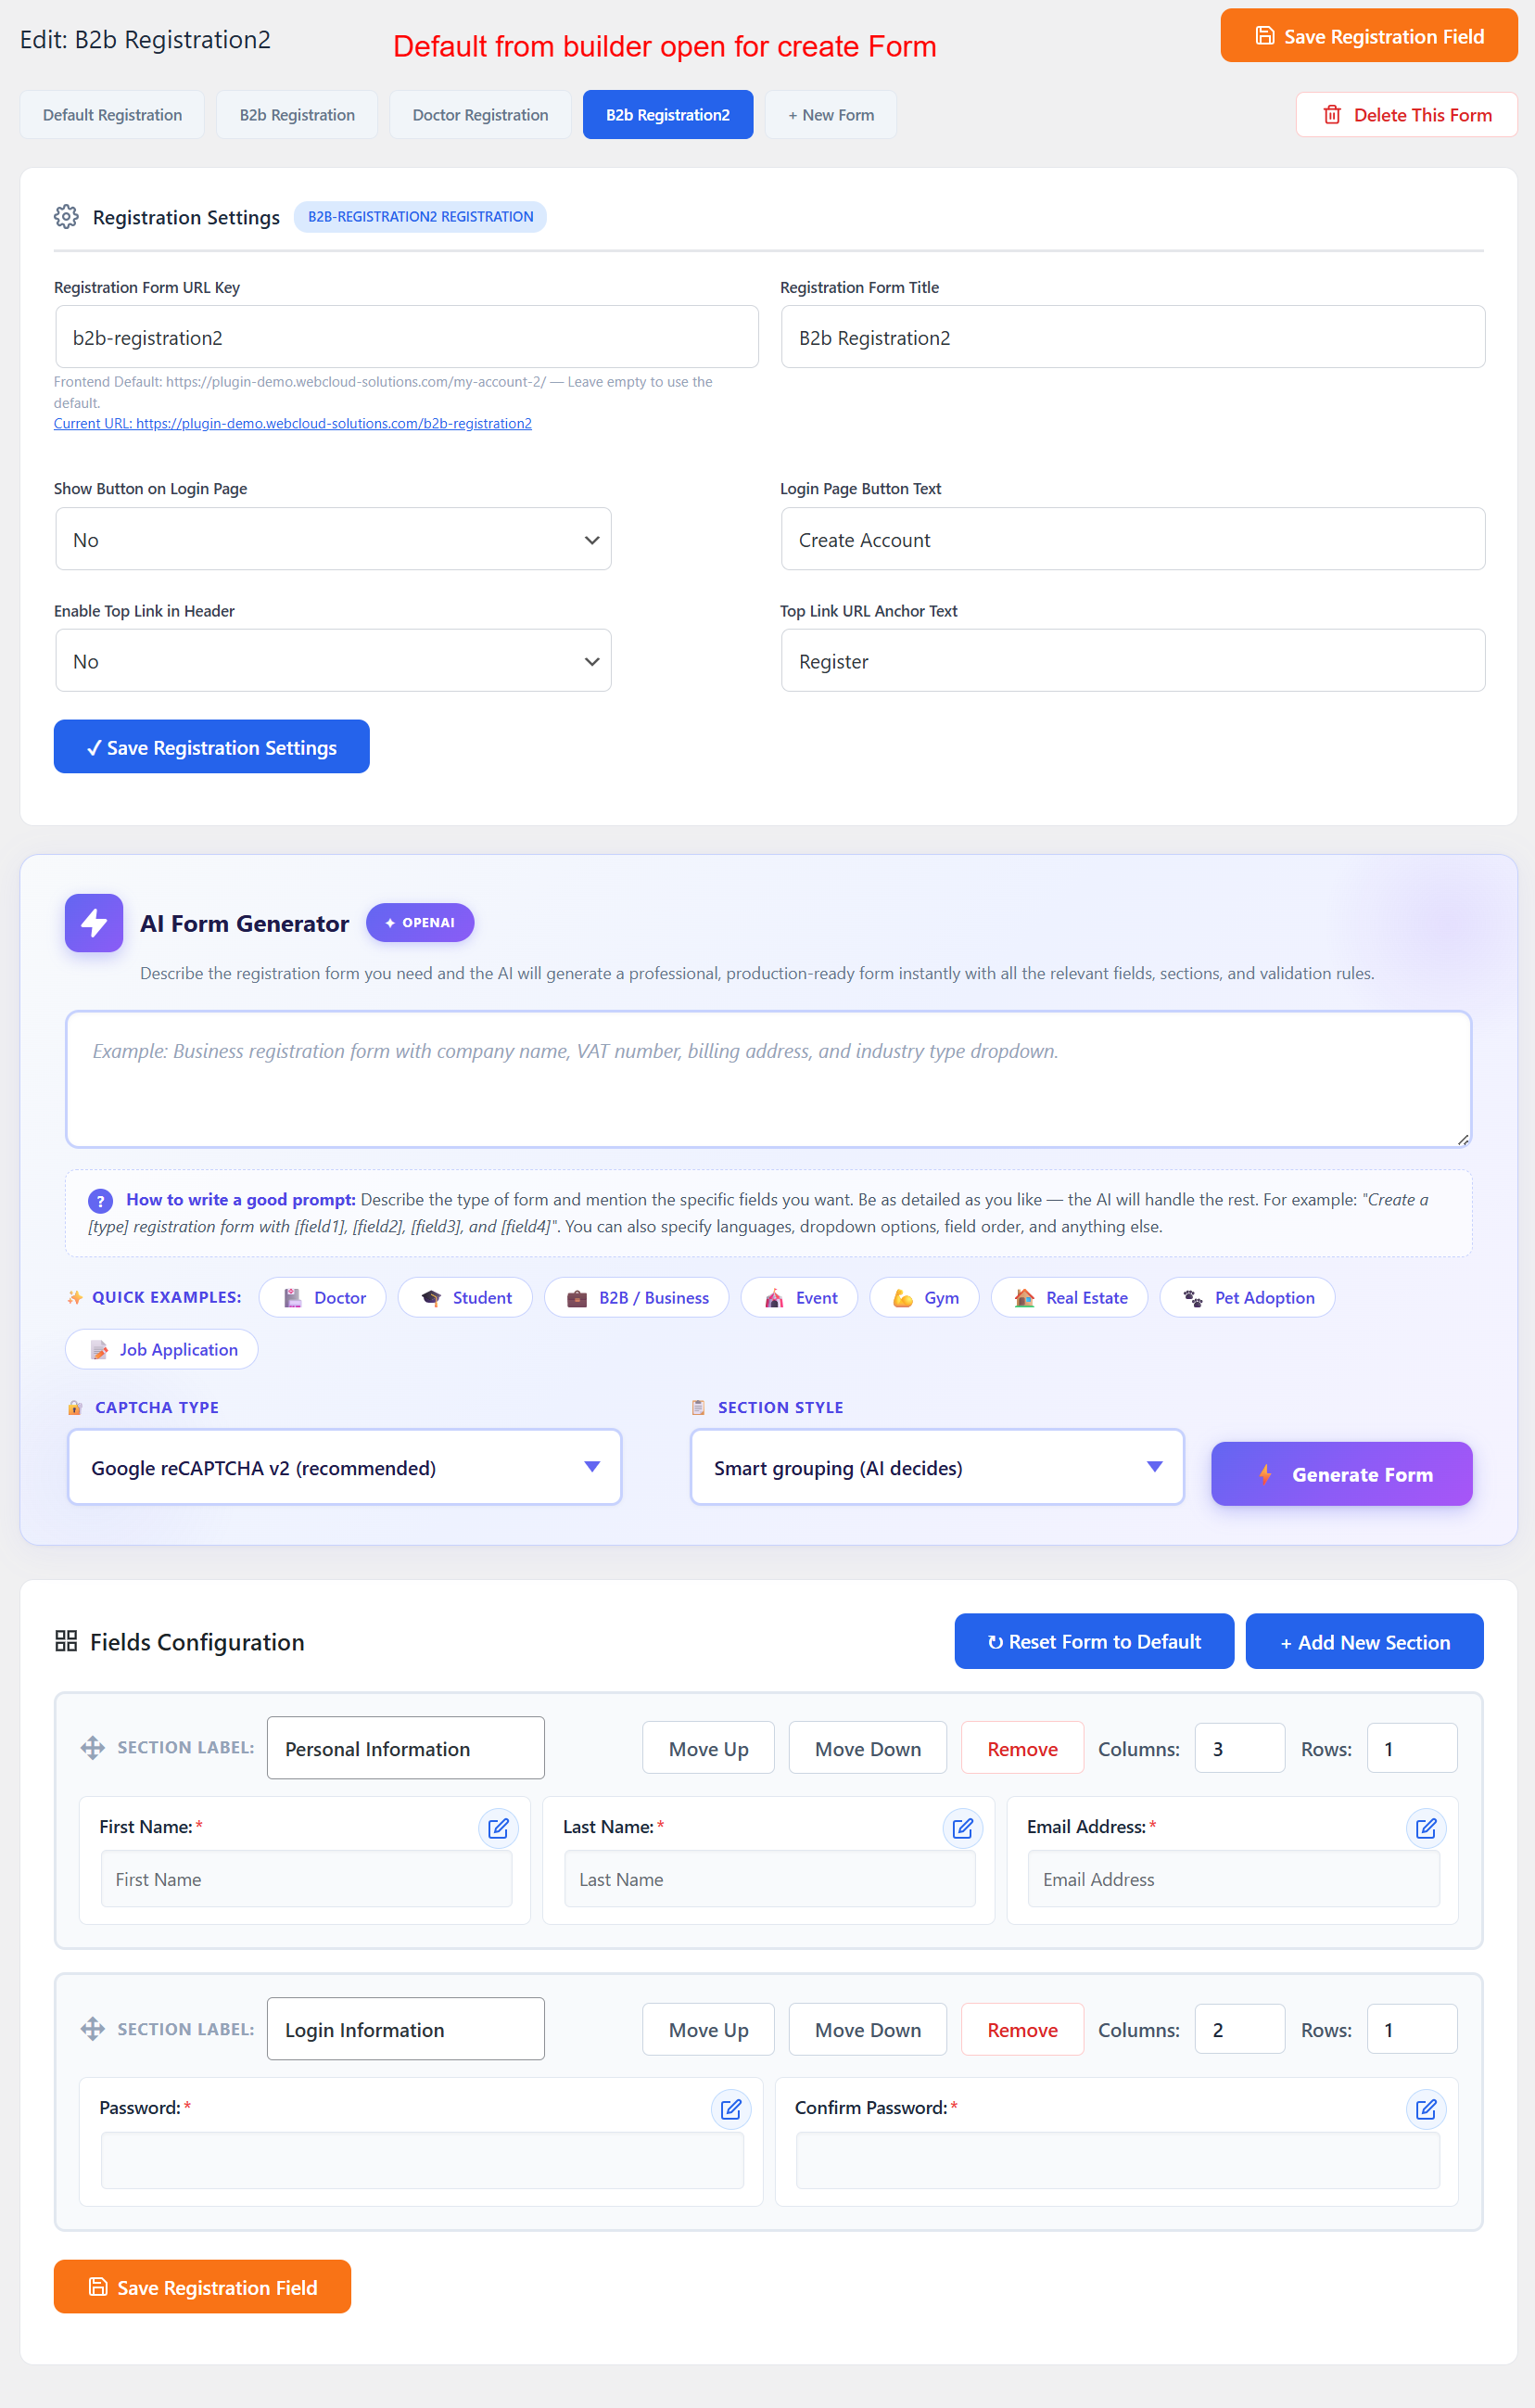
wp-admin: Registration Form Builder
What this shows: A registration form builder with fields for Registration Form URL Key, Title, Login Page Button Text, and more, along with AI Form Generator options.
This form builder interface allows admins to create customized registration forms with field-specific settings including URLs and button texts. The inclusion of the AI Form Generator enhances usability by suggesting field configurations, helping to streamline form creation.
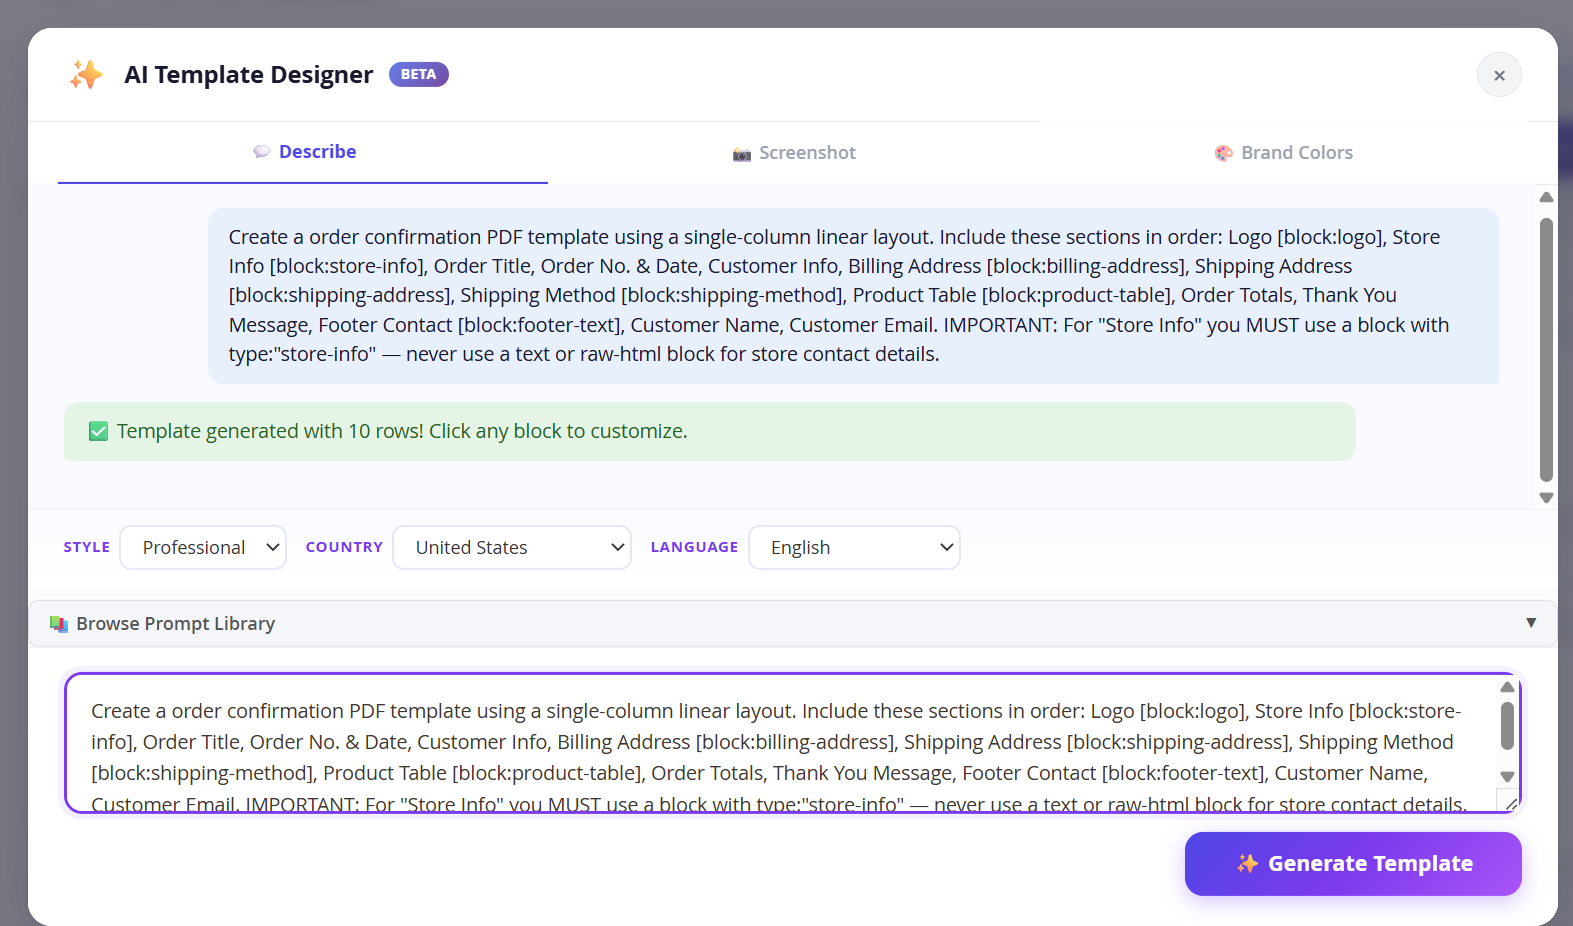
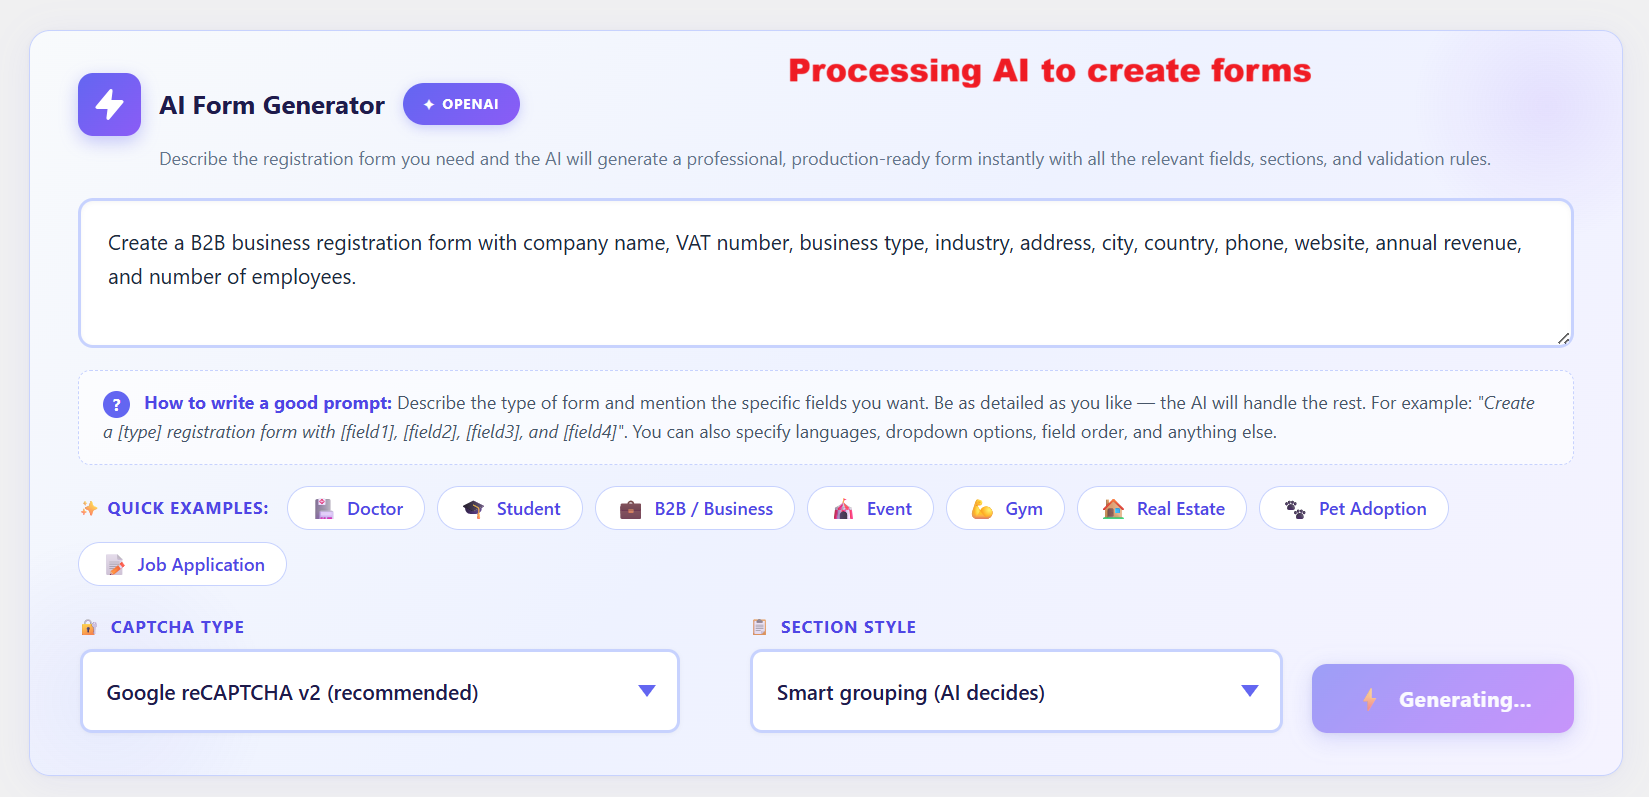
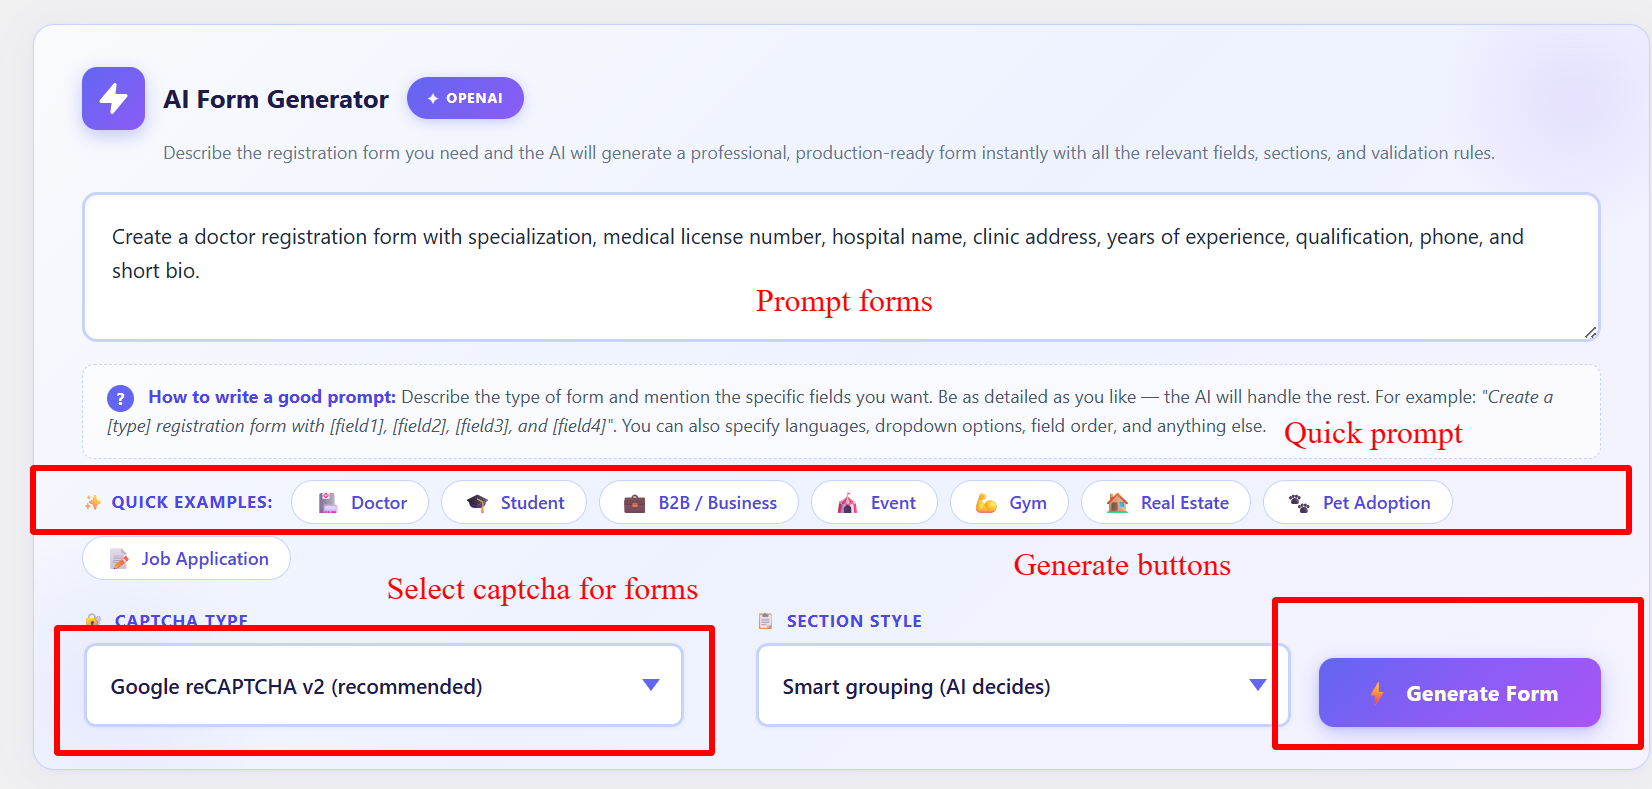
wp-admin: AI Form Generator Prompt
What this shows: The AI Form Generator section with a prompt input area, quick examples, CAPTCHA Type, and a 'Generate Form' button.
Admins can utilize this section to generate forms using AI by entering detailed prompts. With quick example buttons and CAPTCHA settings, the AI assists in creating professional forms efficiently. This feature supports admins with template ideas and ensures faster form deployment.
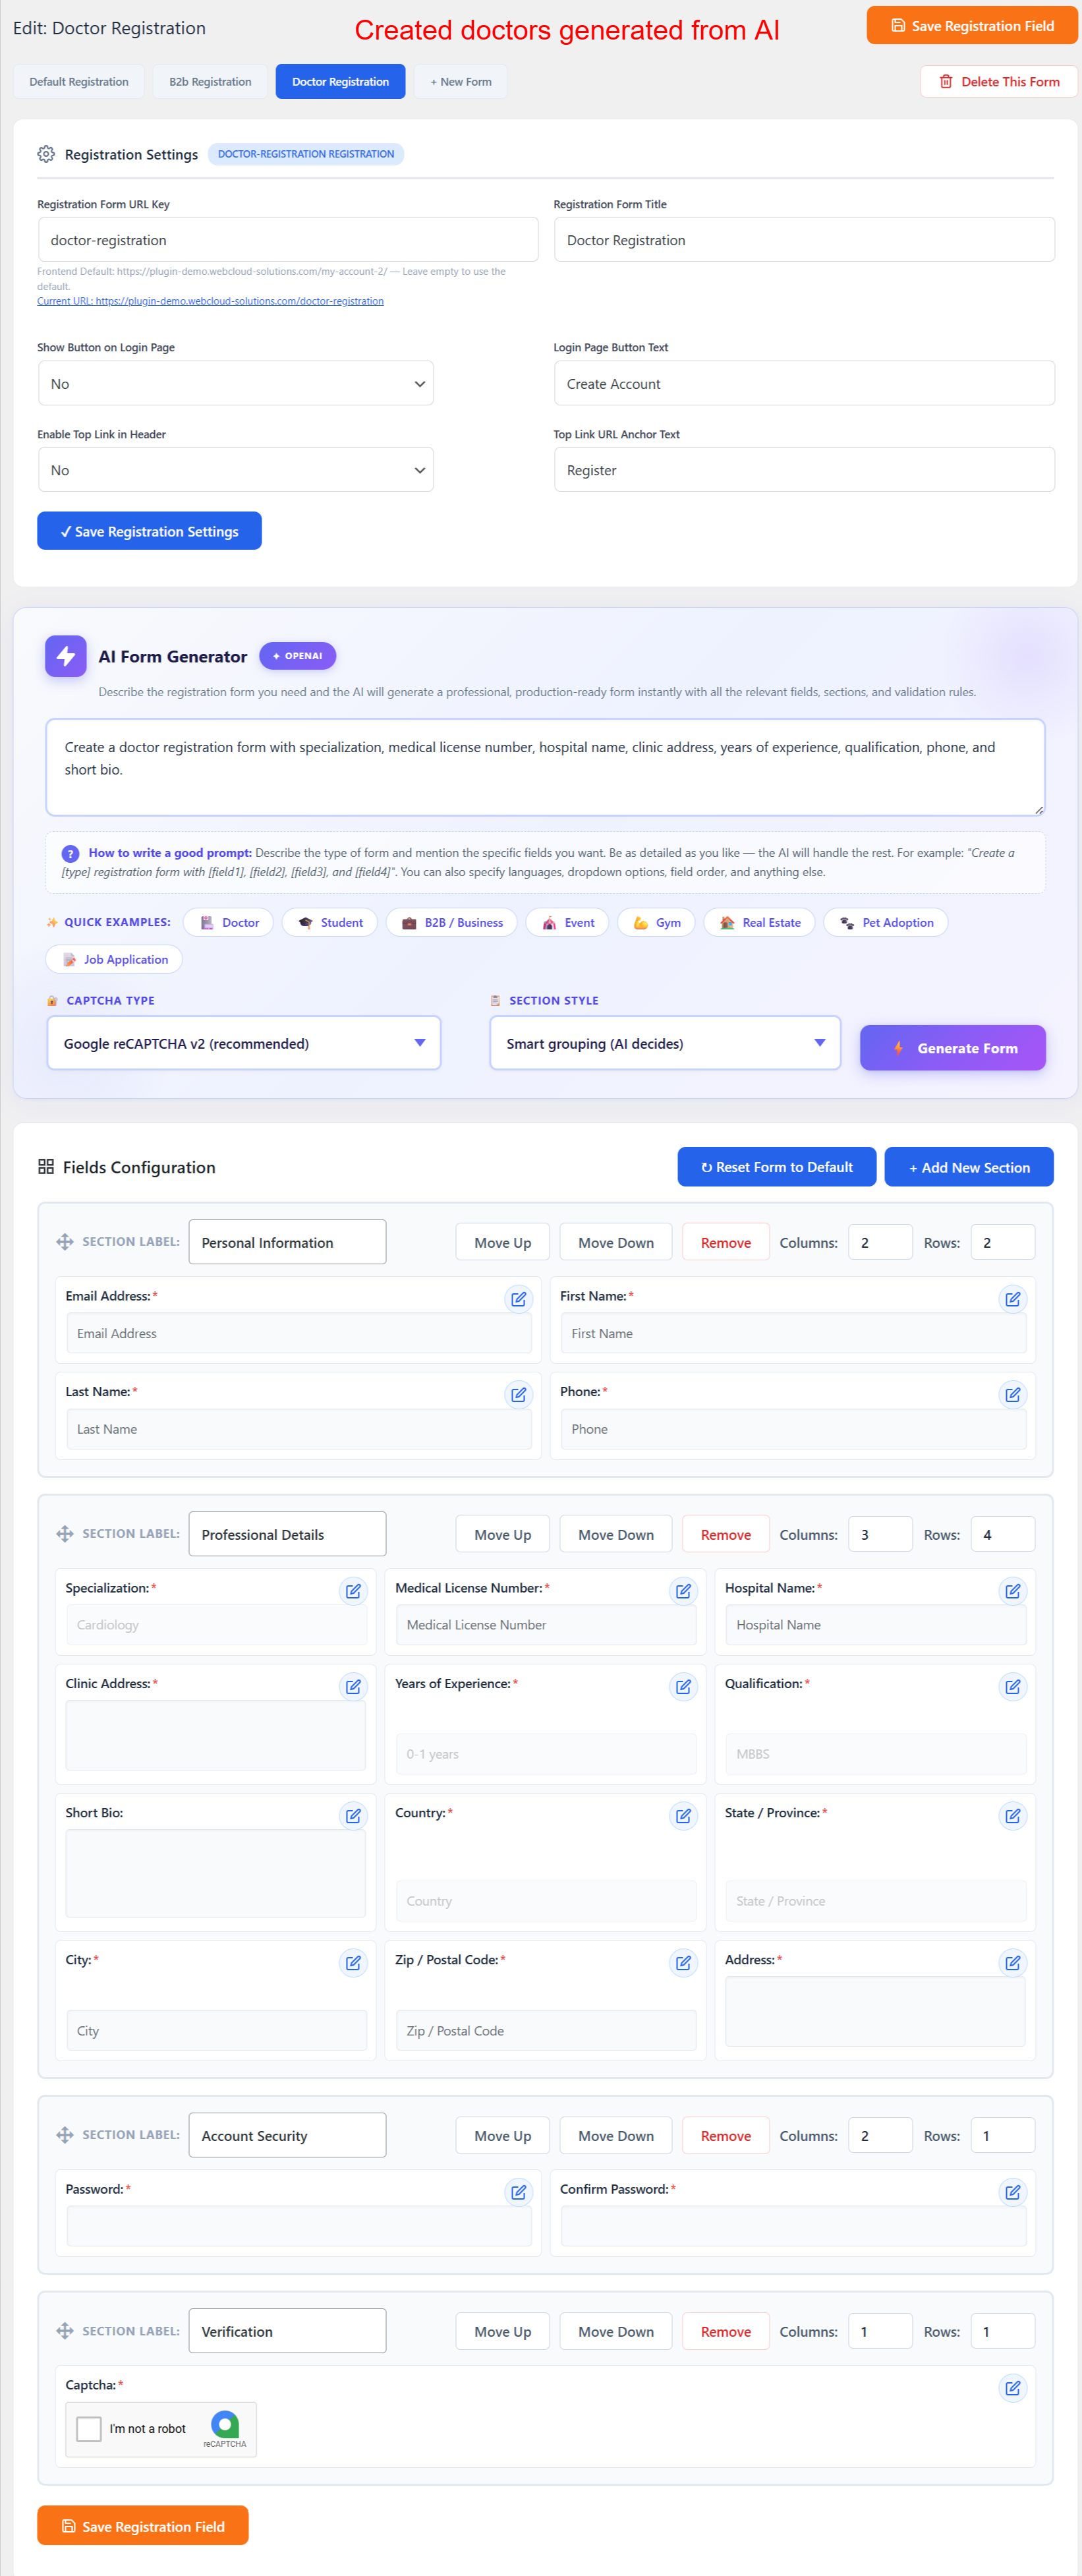
wp-admin: AI-Generated Form Fields
What this shows: An overview of AI-generated form fields under sections like Personal Information and Professional Details with options to edit or move fields.
The AI-generated fields result from input prompts and provide structured sections that admins can edit as needed. This feature simplifies the task of form design, allowing greater focus on content without worrying about complex layout issues.
wp-admin: B2B Registration Form Settings
What this shows: Interface for setting up B2B registration forms with fields for URL key, registration title, and AI Form Generator options.
This screen facilitates the setup of B2B registration forms, a significant feature for businesses targeting corporate clients. Admins can define custom settings and leverage AI to customize forms according to B2B requirements, ensuring relevance and professionalism in user interactions.
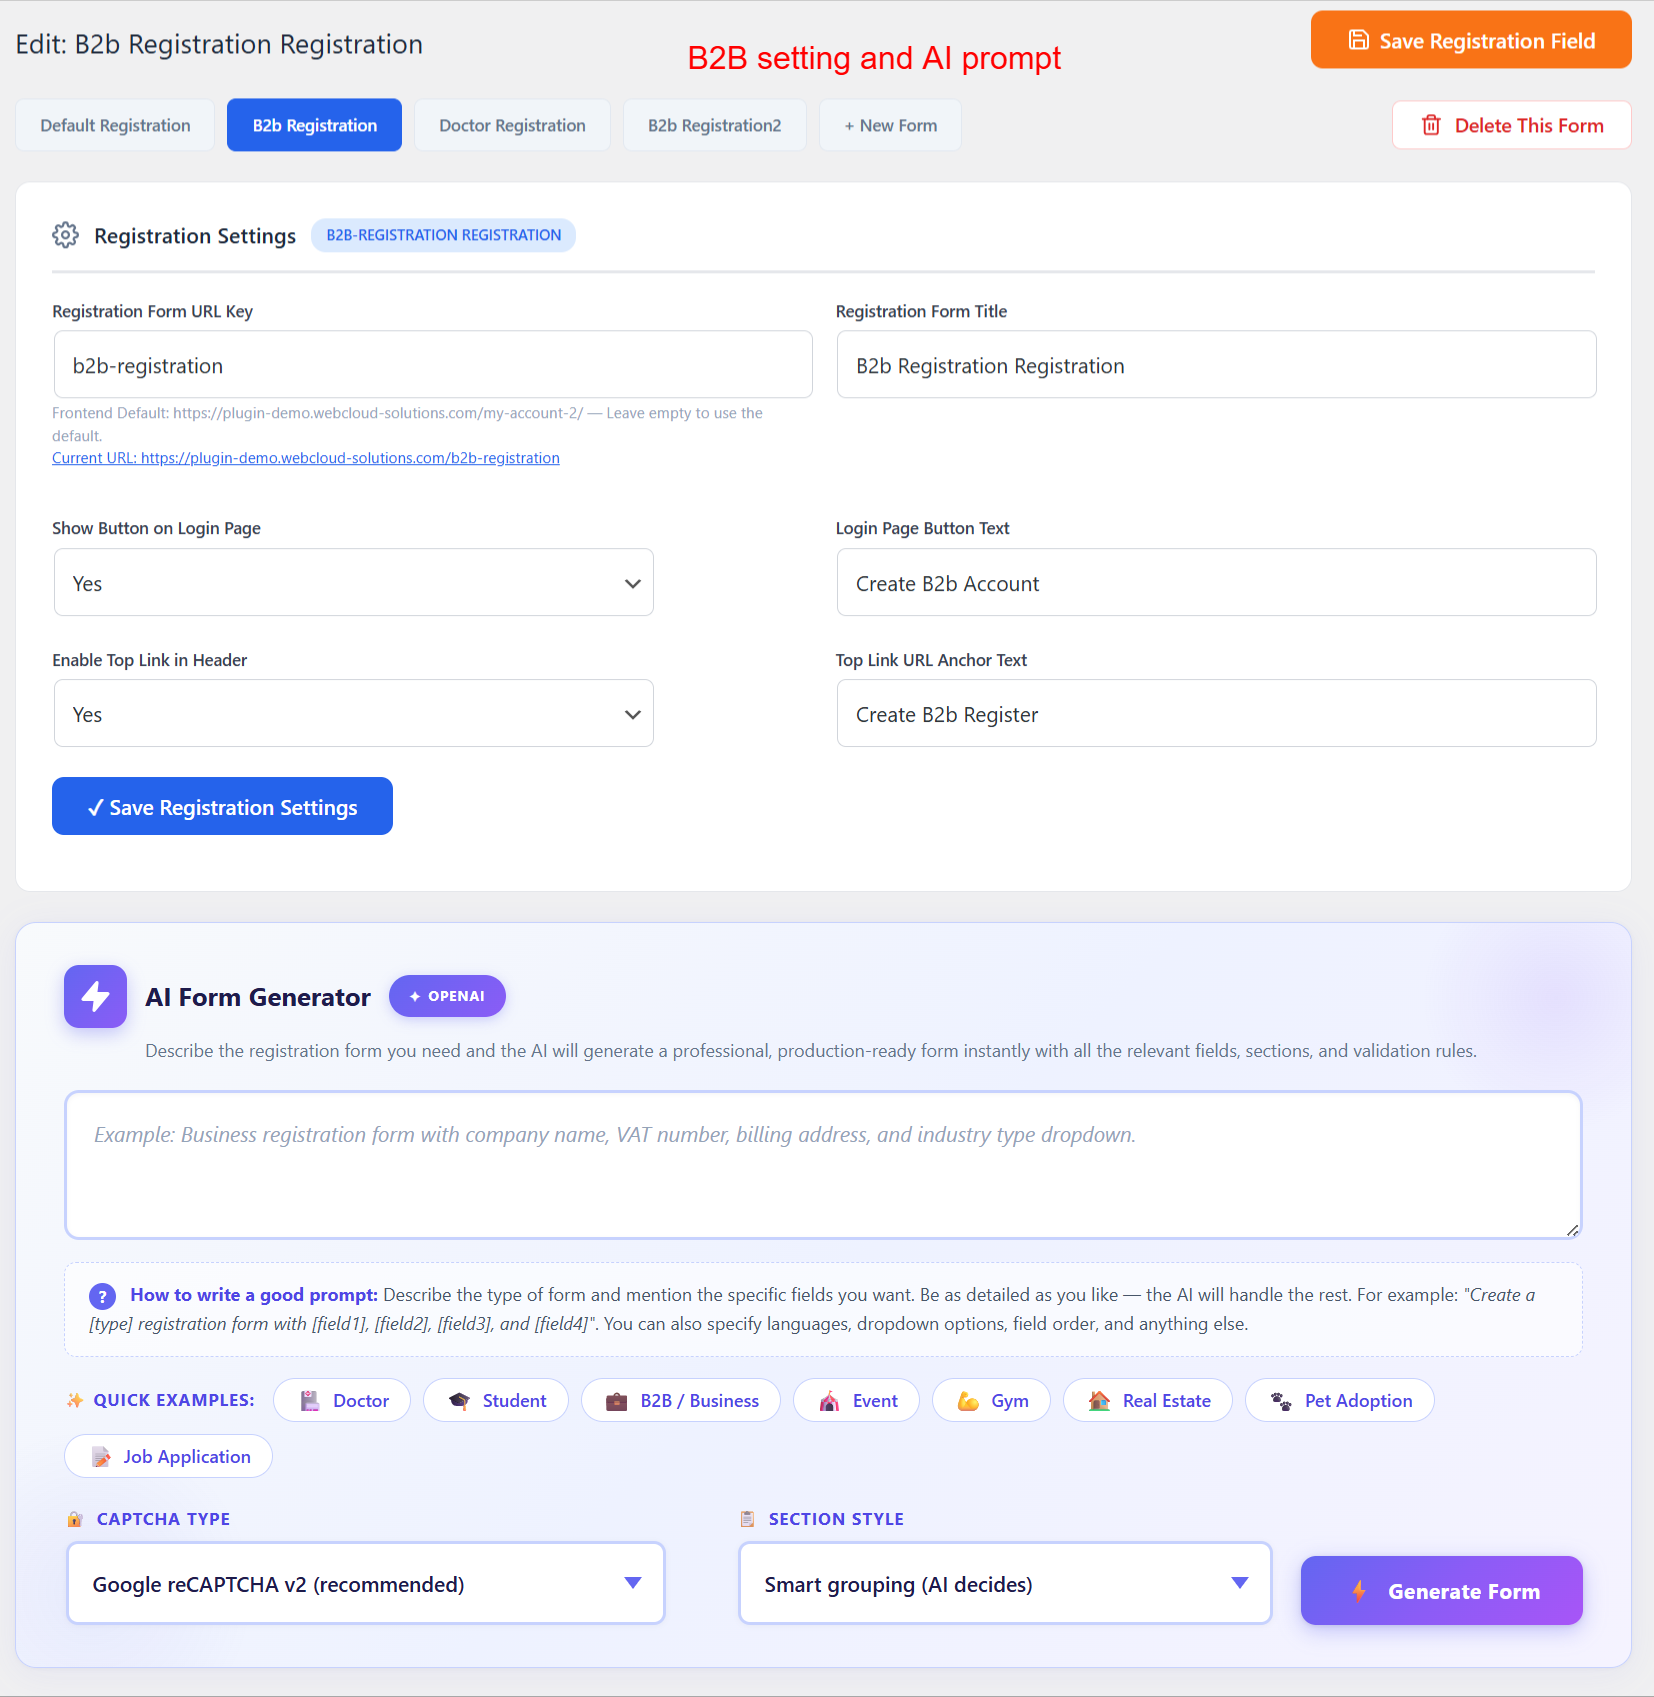
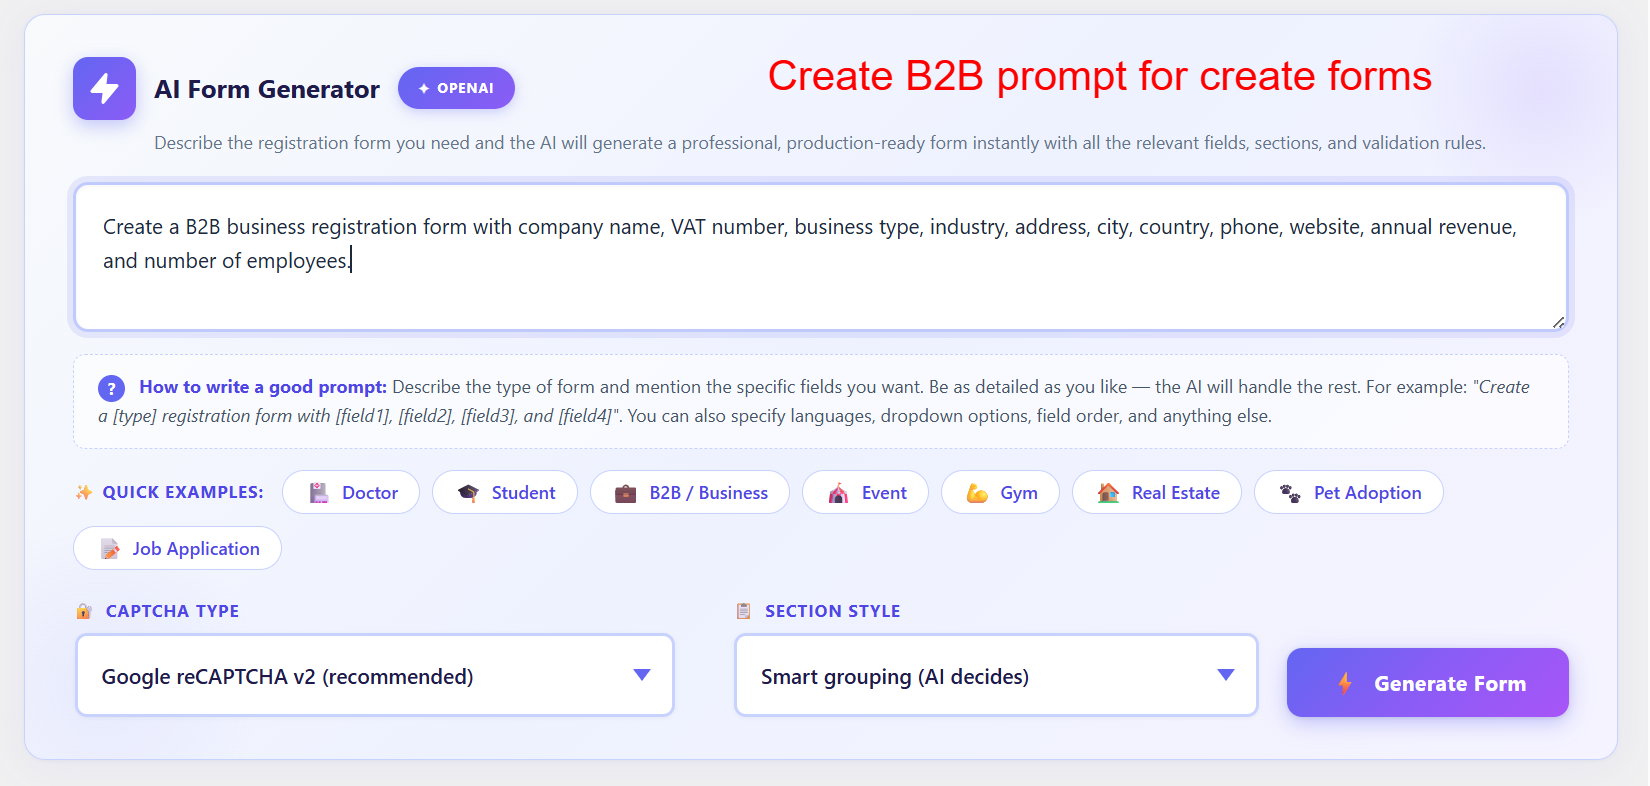
wp-admin: B2B AI Form Generator Prompt
What this shows: Contains a prompt for generating a B2B registration form and options like CAPTCHA type and section style.
Admins are guided to provide a detailed prompt to generate comprehensive B2B registration forms, integrating multiple business-specific fields. The tools included aid in defining precise form requirements quickly, a vital asset for tailored customer acquisition strategies.
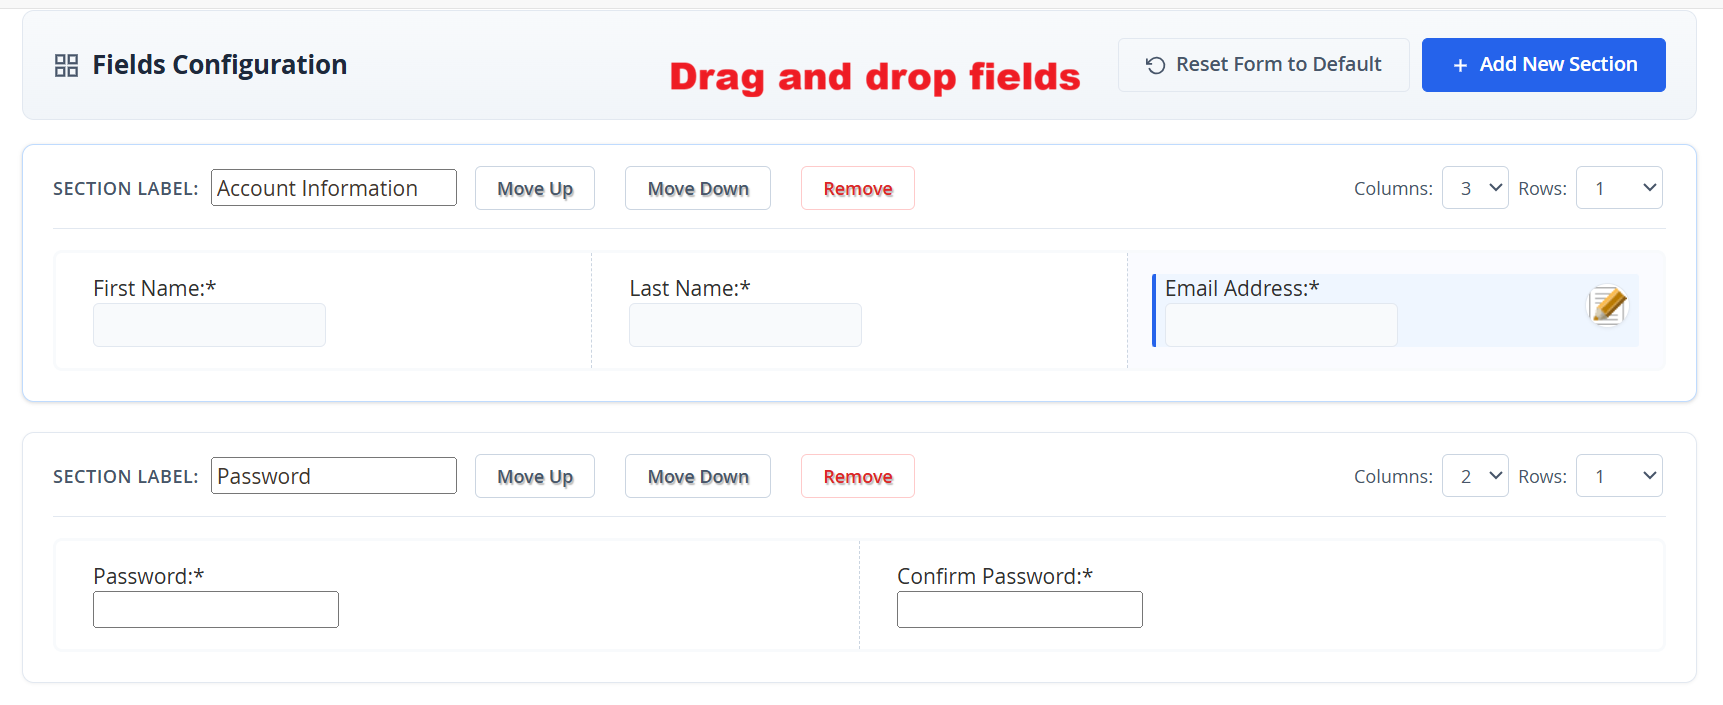
wp-admin: Fields Configuration with Drag and Drop
What this shows: The screen shows drag and drop functionality for configuring fields within sections labeled 'Account Information' and 'Password'. It includes buttons for 'Move Up', 'Move Down', and 'Remove', alongside options to add new sections.
This screen allows administrators to configure form fields by dragging and dropping them within different sections. Users can adjust the order of fields, remove them if unnecessary, or add new sections to better group their fields logically. This feature enables administrators to tailor registration forms precisely to their needs, simplifying the user experience.
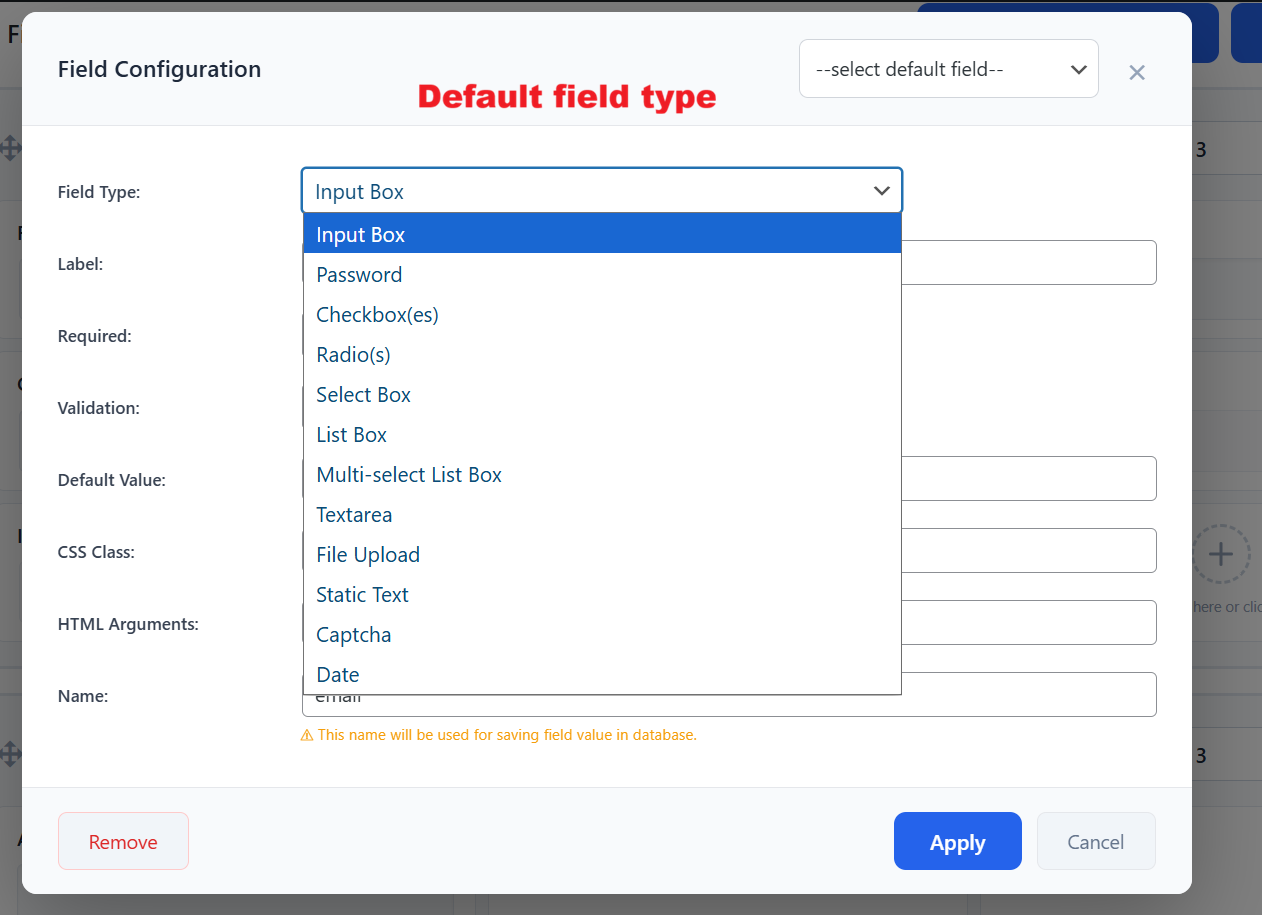
wp-admin: Default Field Type Selection
What this shows: The screen presents a dropdown for selecting a default field type among options such as Input Box, Password, Checkbox, and more. Additional inputs are provided for setting labels, validation, and default values.
Administrators use this interface to select the default field type for new fields being added to a form. Choosing the appropriate field type is crucial for ensuring proper data input and validation. This functionality helps streamline form creation by allowing consistent and accurate input formats right from the start.
wp-admin: AI Form Generation Interface
What this shows: This interface shows an AI Form Generator where users can input a description of the desired form. It includes options for CAPTCHA type and section style, along with quick example prompts.
The AI Form Generator simplifies form creation by processing input descriptions to generate appropriate fields and sections automatically. This tool is especially useful for users who need a quick setup of complex forms without manually specifying each detail, thus enhancing efficiency and accuracy in form registration processes.
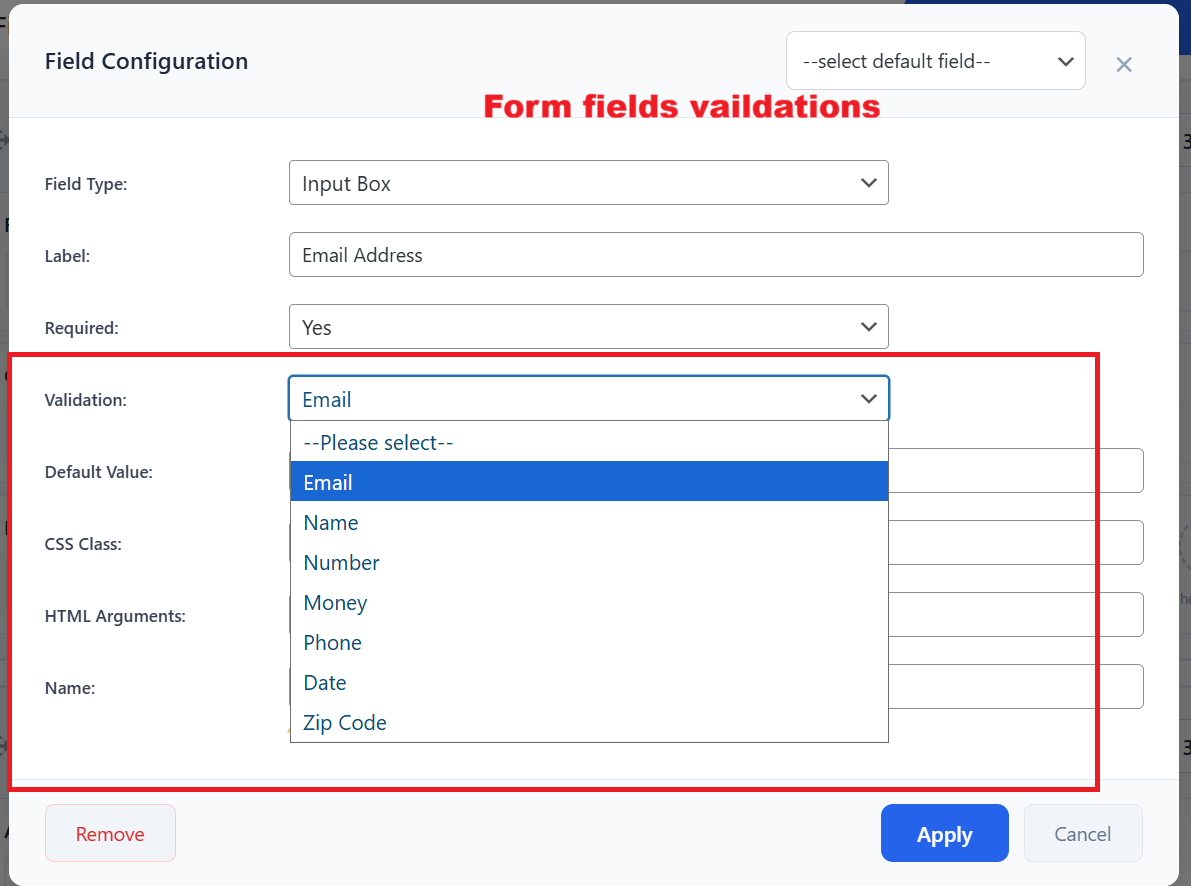
wp-admin: Form Field Validation Configuration
What this shows: The screen shows a dropdown menu for selecting validation rules, such as Email, Name, and Number, within the field configuration panel.
Validation rules are critical for ensuring that user input meets specified criteria, such as correct email formats or number ranges. Administrators configure these rules within the field settings to prevent errors during form submission, thus improving data integrity and reducing the need for manual correction.
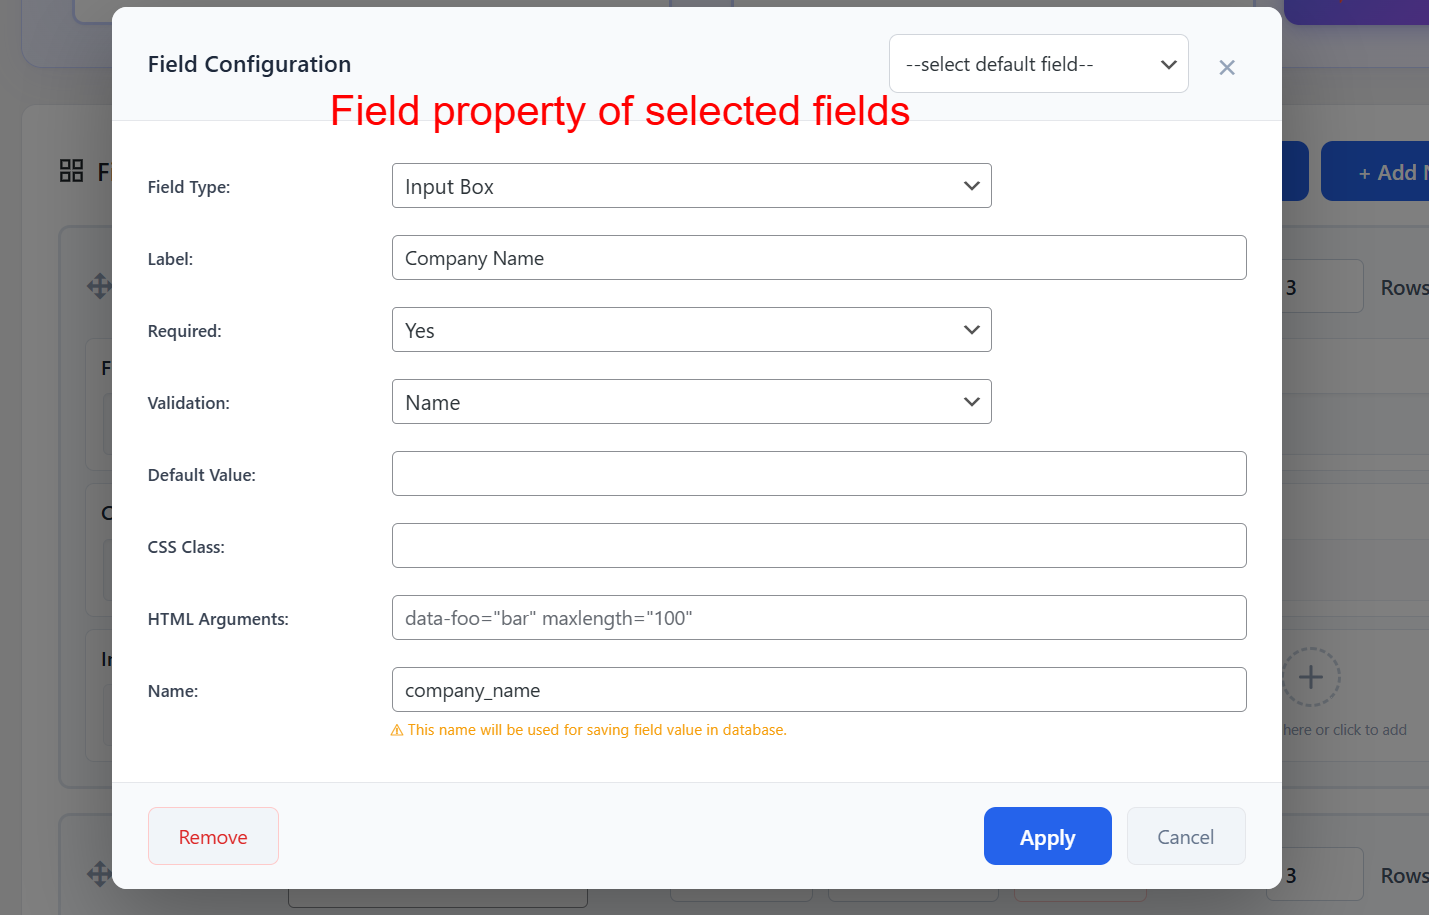
wp-admin: Select Field Properties
What this shows: The screen displays input fields to set properties such as Field Type, Label, Required status, Validation, CSS Class, and more for a selected form field.
Setting precise field properties allows administrators to customize each form element according to specific needs. From labels and HTML attributes to validation settings, these configurations aid in ensuring that all form inputs are captured as intended and meet both user and business requirements.
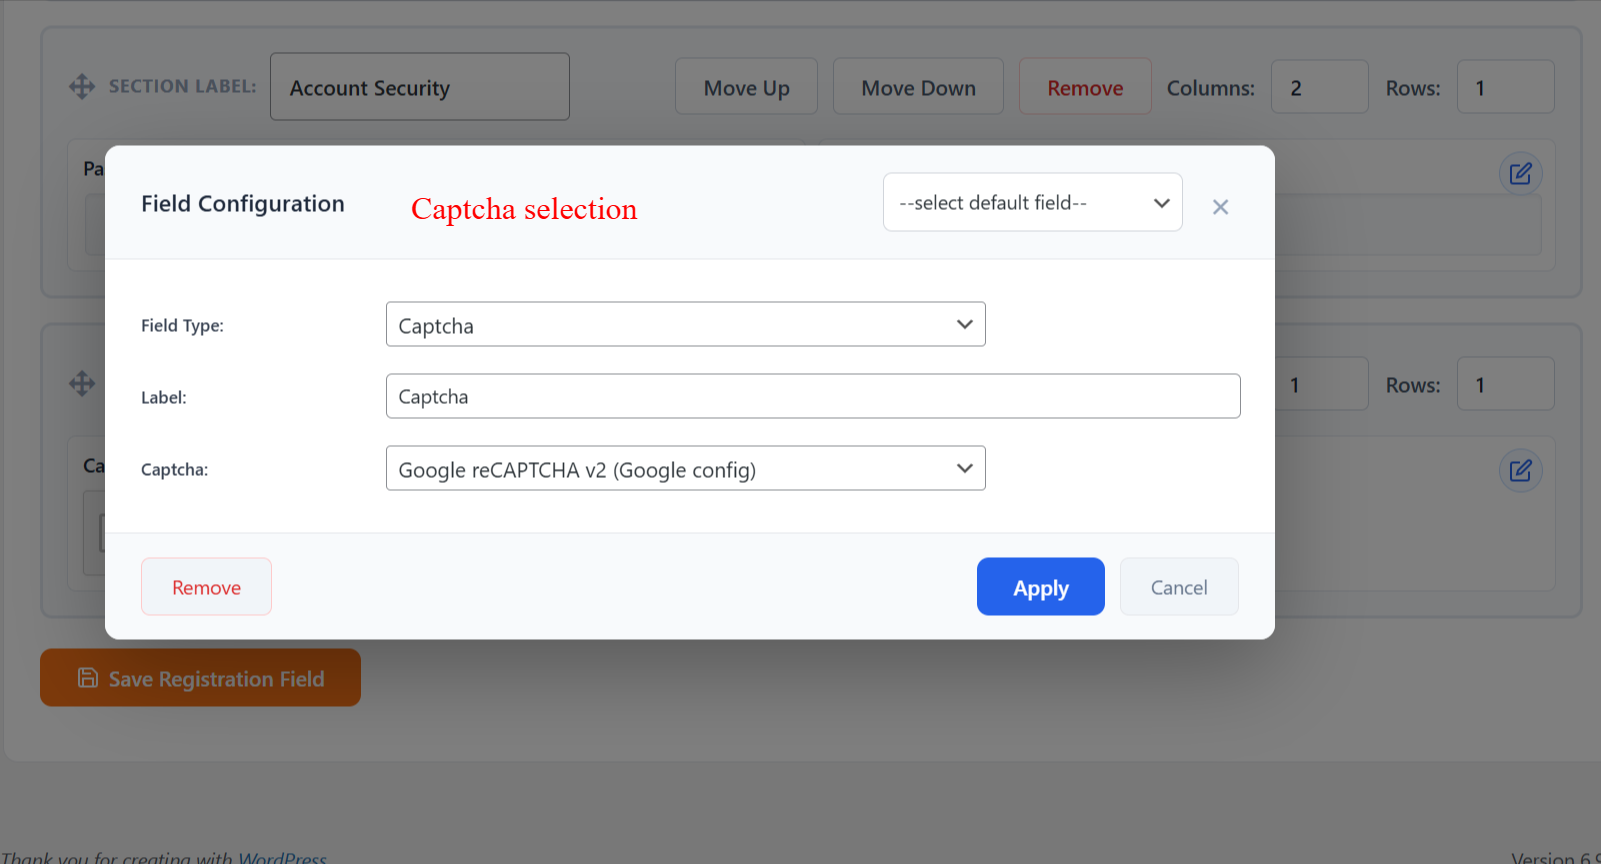
wp-admin: Captcha Configuration for Form Fields
What this shows: This interface is for selecting Captcha settings, including field type, label, and captcha type, like Google reCAPTCHA v2.
Adding Captcha is crucial for protecting registration forms from automated spam submissions. Administrators use this interface to set up Captcha verification, ensuring that form submissions are from genuine users and maintaining system security.
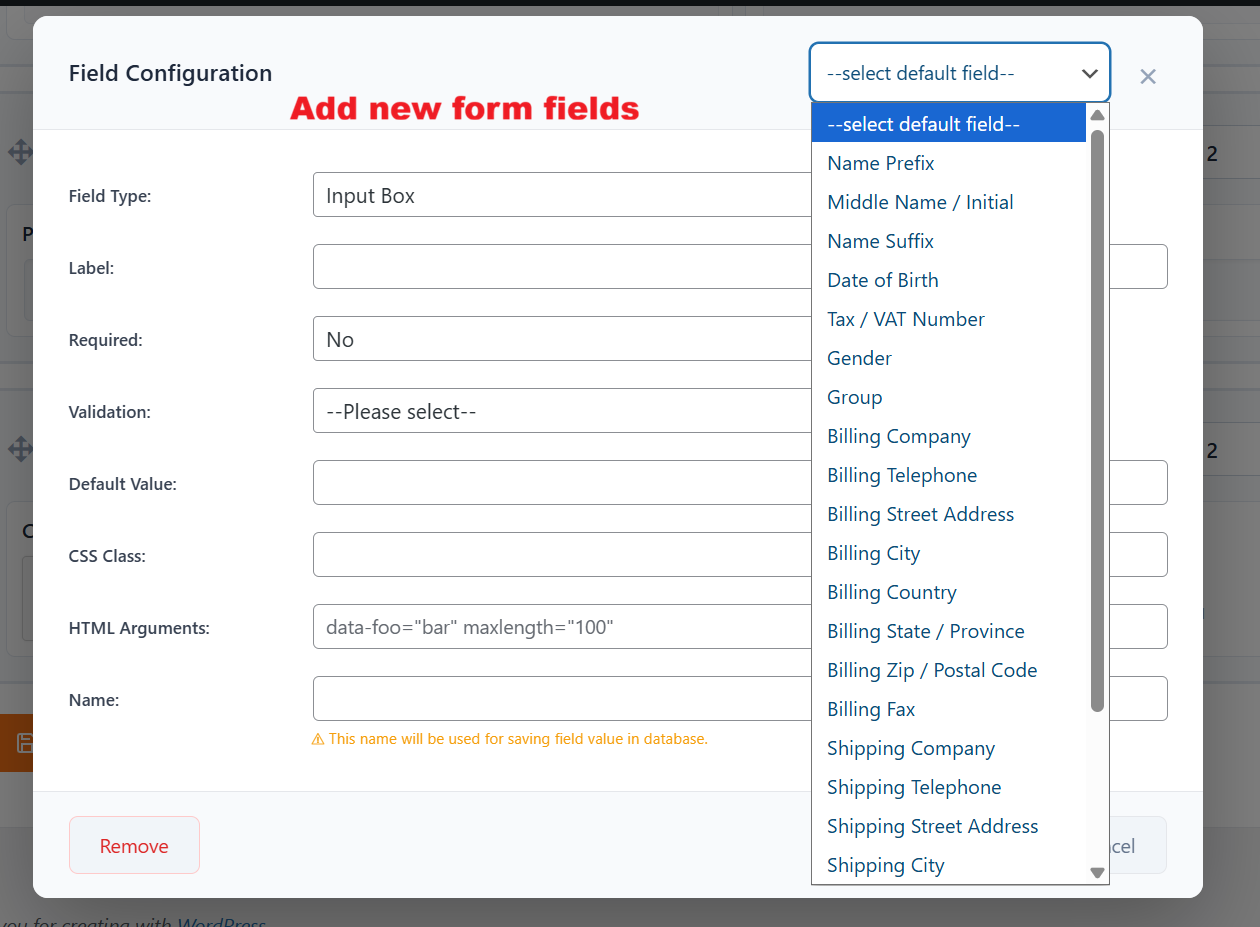
wp-admin: Add New Fields to Form
What this shows: A configuration panel allows the user to add new fields with default type selection, including input for field labels, required status, validation, and more.
Adding new fields to a registration form is straightforward, with a variety of field types and options for customization. This flexibility enables administrators to capture all necessary data for their registration processes, tailoring forms to precise business and data collection needs.
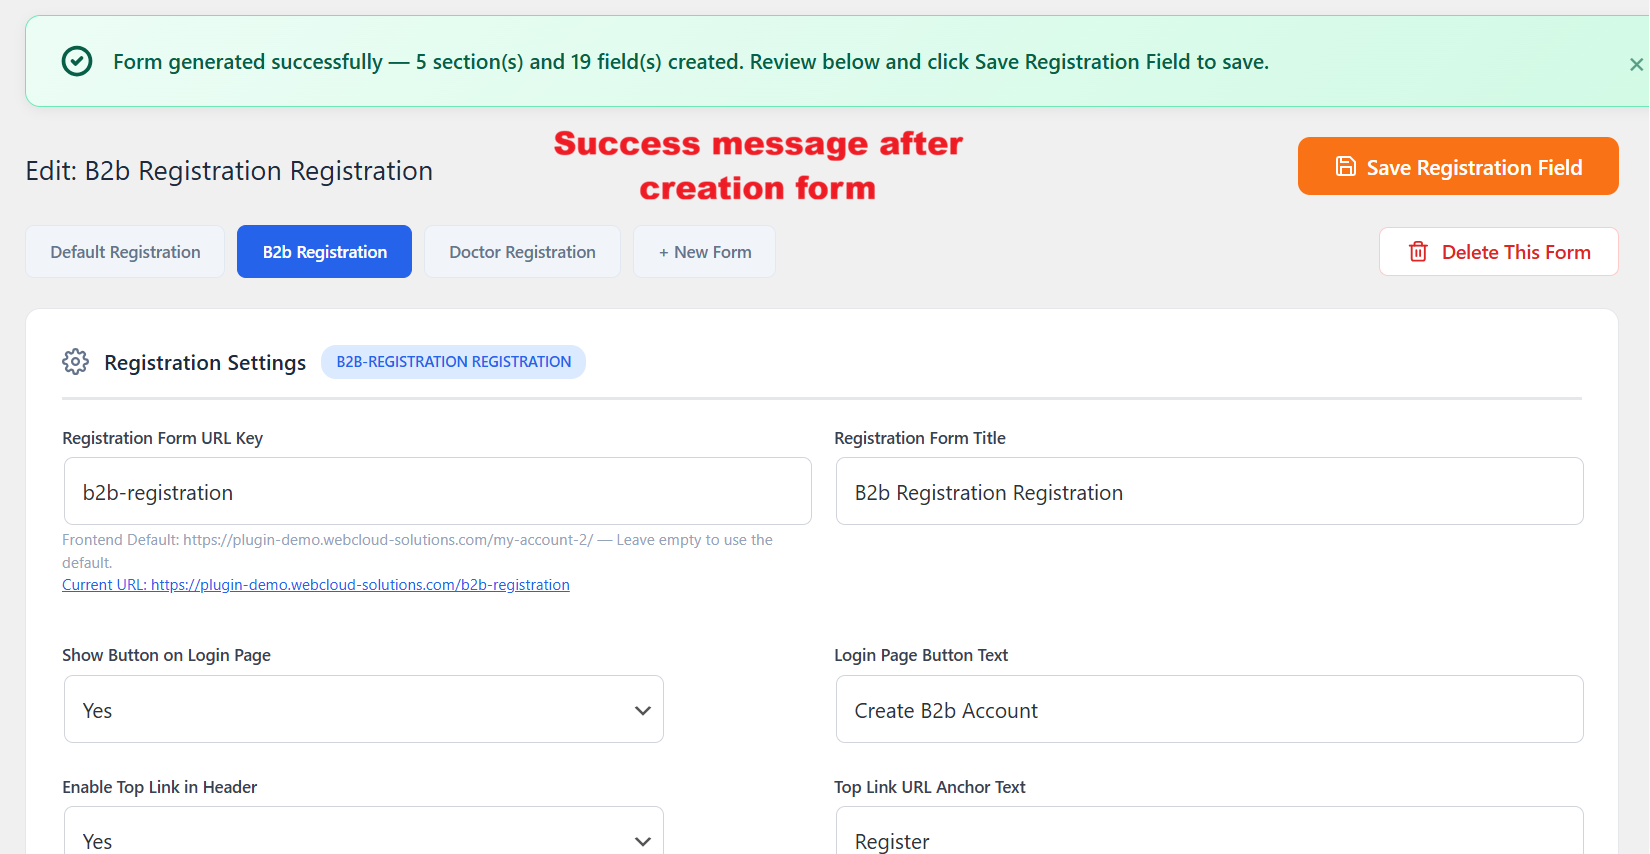
wp-admin: Form Creation Success Confirmation
What this shows: A success message indicates that a form with several sections and fields has been created. The screen includes options to review, edit, and save the registration form.
After generating a form via the AI tool, this confirmation screen lets administrators know that the form has been successfully created and is ready for review. Users can then tweak individual details before finalizing the form, ensuring it meets all necessary criteria before deployment.
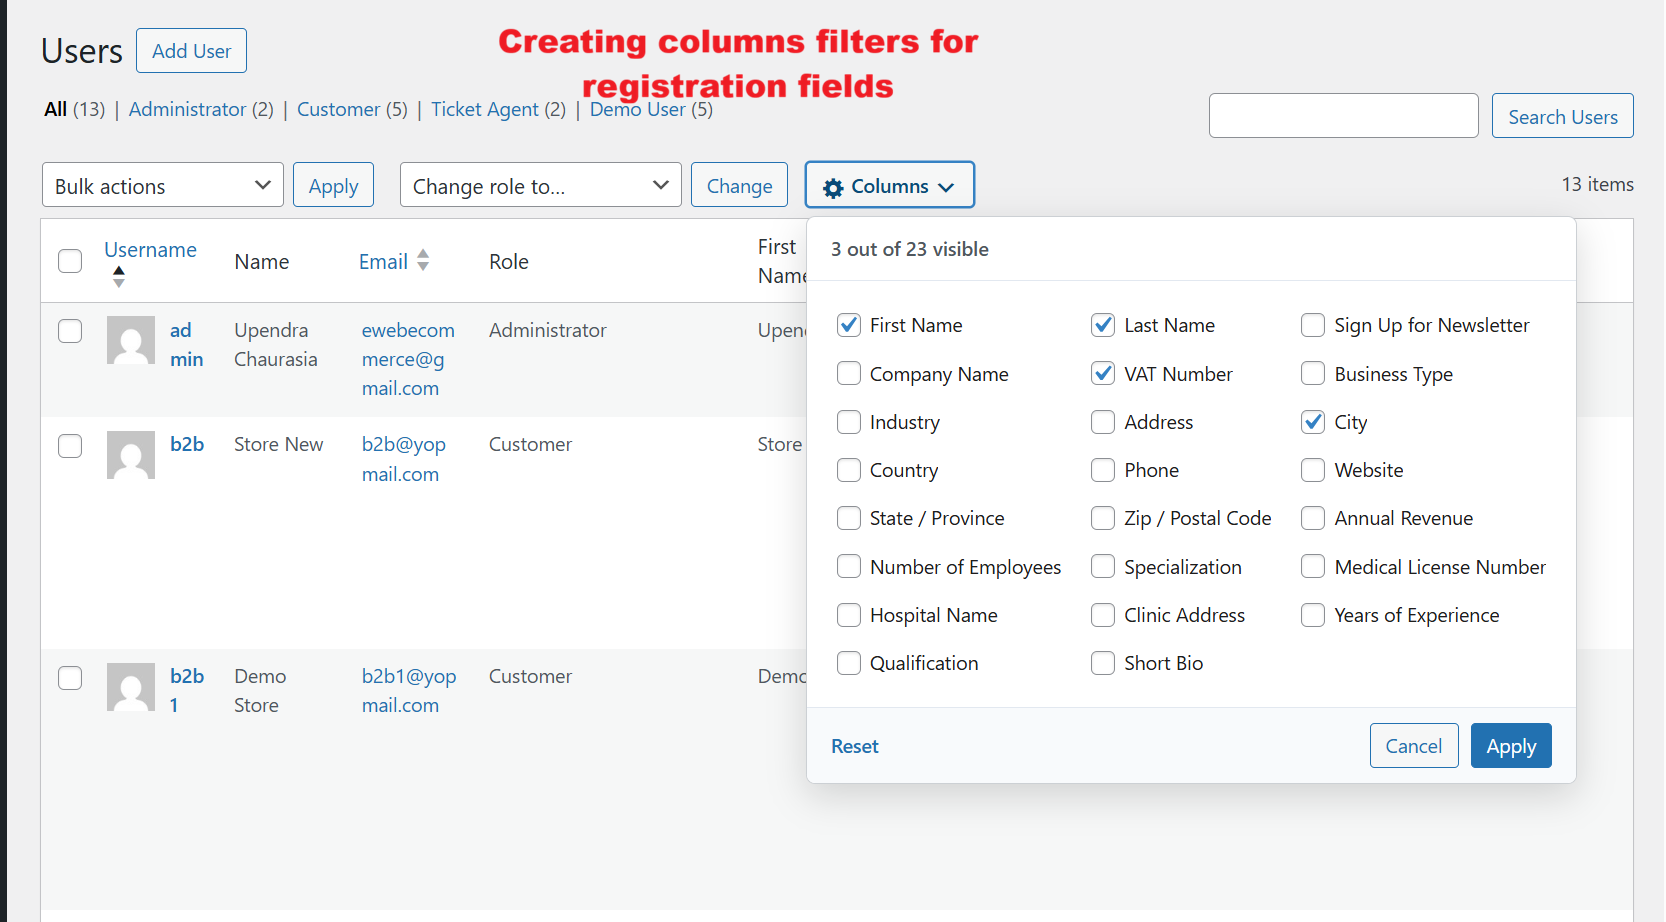
wp-admin: User Registration Dashboard
What this shows: This screen features a table of users with columns for Username, Name, Email, Role, and other custom fields. The 'Columns' button offers a dropdown for customizing visible columns.
The User Registration Dashboard allows administrators to see and manage registered users. You can customize the visible information by selecting fields through the 'Columns' dropdown. This functionality is crucial for tailoring user data views to specific business needs, enhancing the plugin's usability.
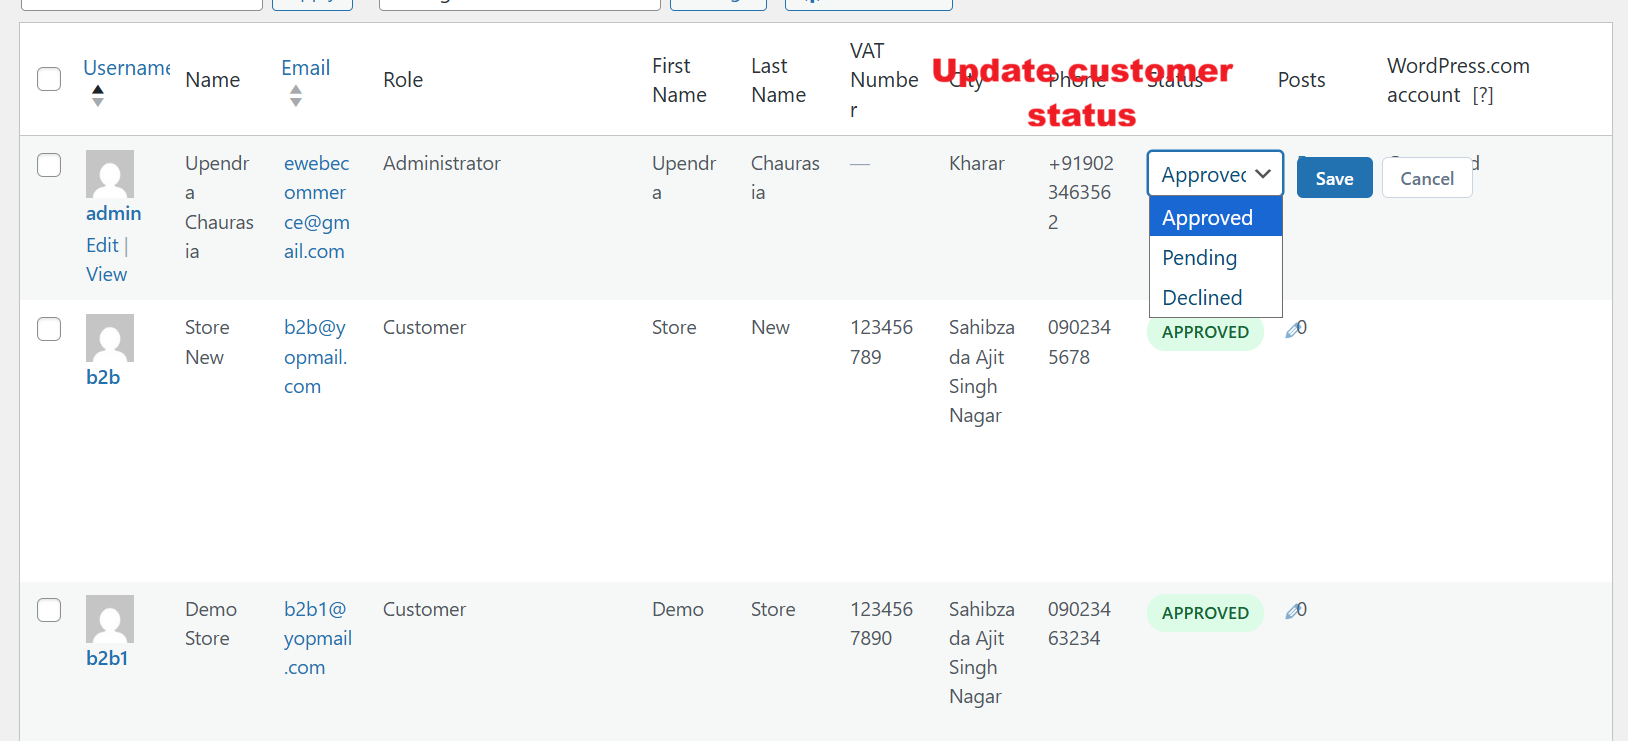
wp-admin: Update Customer Registration Status
What this shows: Displayed is a user list table with an option to change customer status using a dropdown menu with 'Approved', 'Pending', and 'Declined' options.
Administrators can quickly update a customer's registration status using the dropdown menu. This feature is vital for maintaining control over user permissions and account activations within the Registration Field Suite v2.0.0.
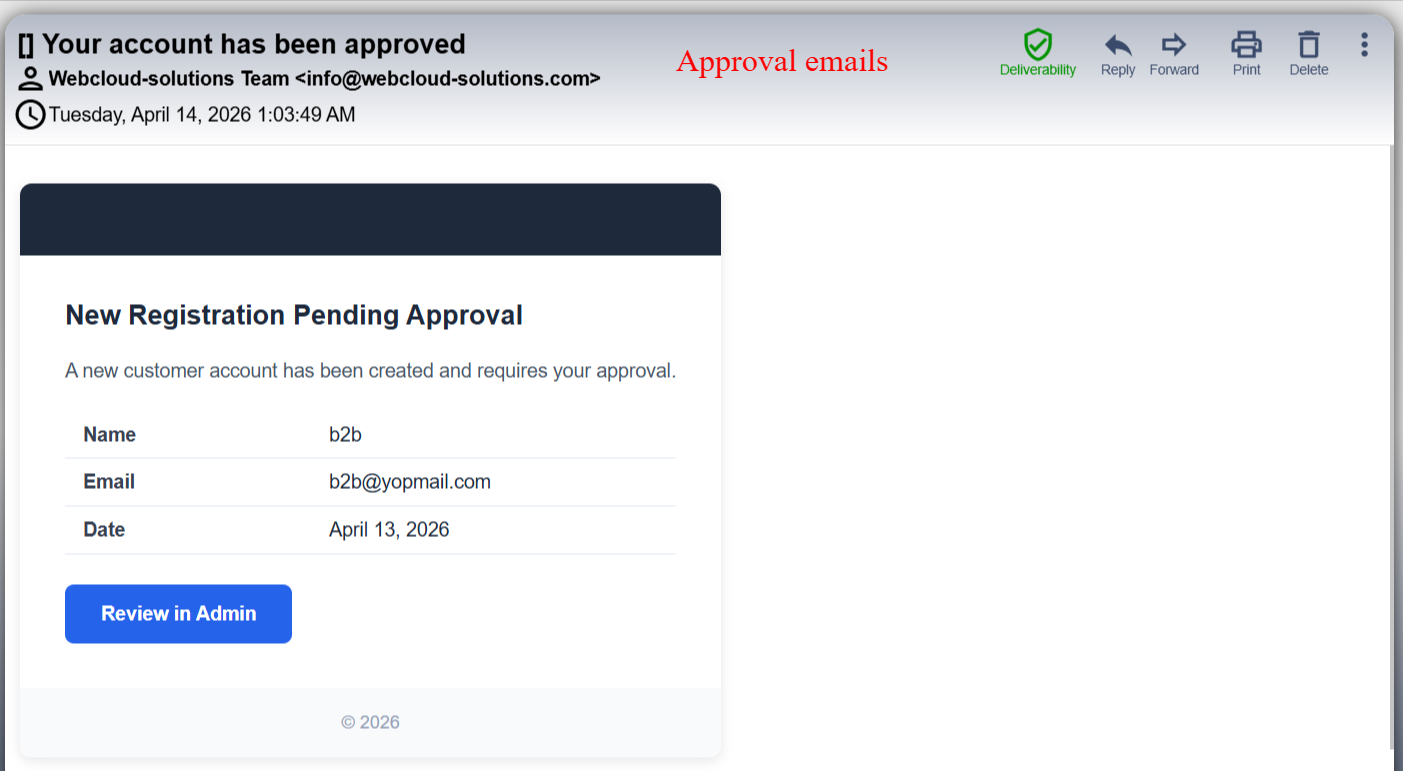
Email Notification: Customer Registration Approval
What this shows: An email template with details about a user account approval, including name, email, and a call-to-action button 'Review in Admin'.
Once a customer's registration is approved, an automatic email notification is sent, containing a summary and a link to the admin review page. This ensures timely communication and streamlines the approval process, highlighting the plugin's automated workflow capabilities.
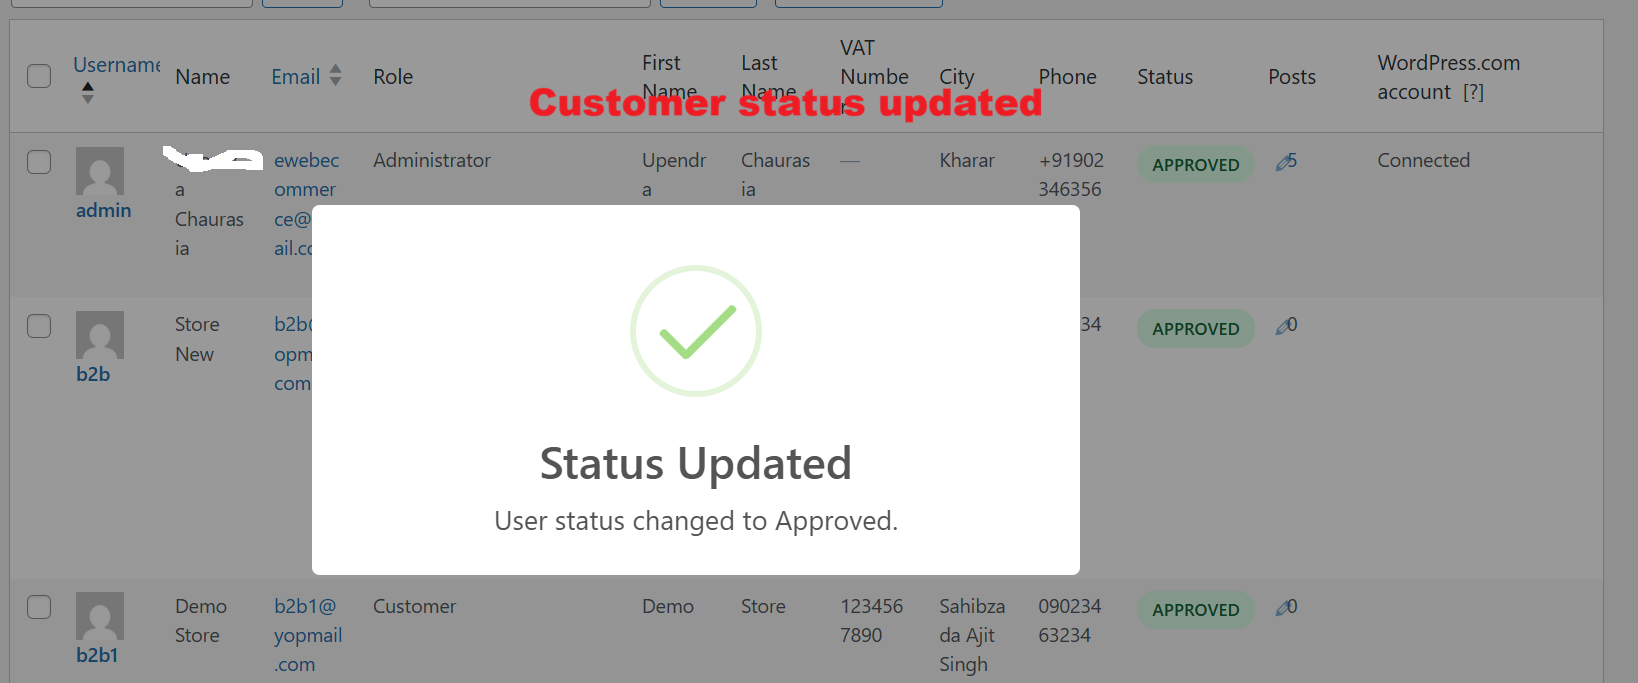
Confirmation: Customer Status Updated
What this shows: A confirmation dialog box indicating that the user status has been updated successfully.
After changing a customer's status, a confirmation box reassures the admin that the update was successful. This feedback mechanism is crucial for user experience, reducing errors and ensuring that changes are correctly applied within the system.
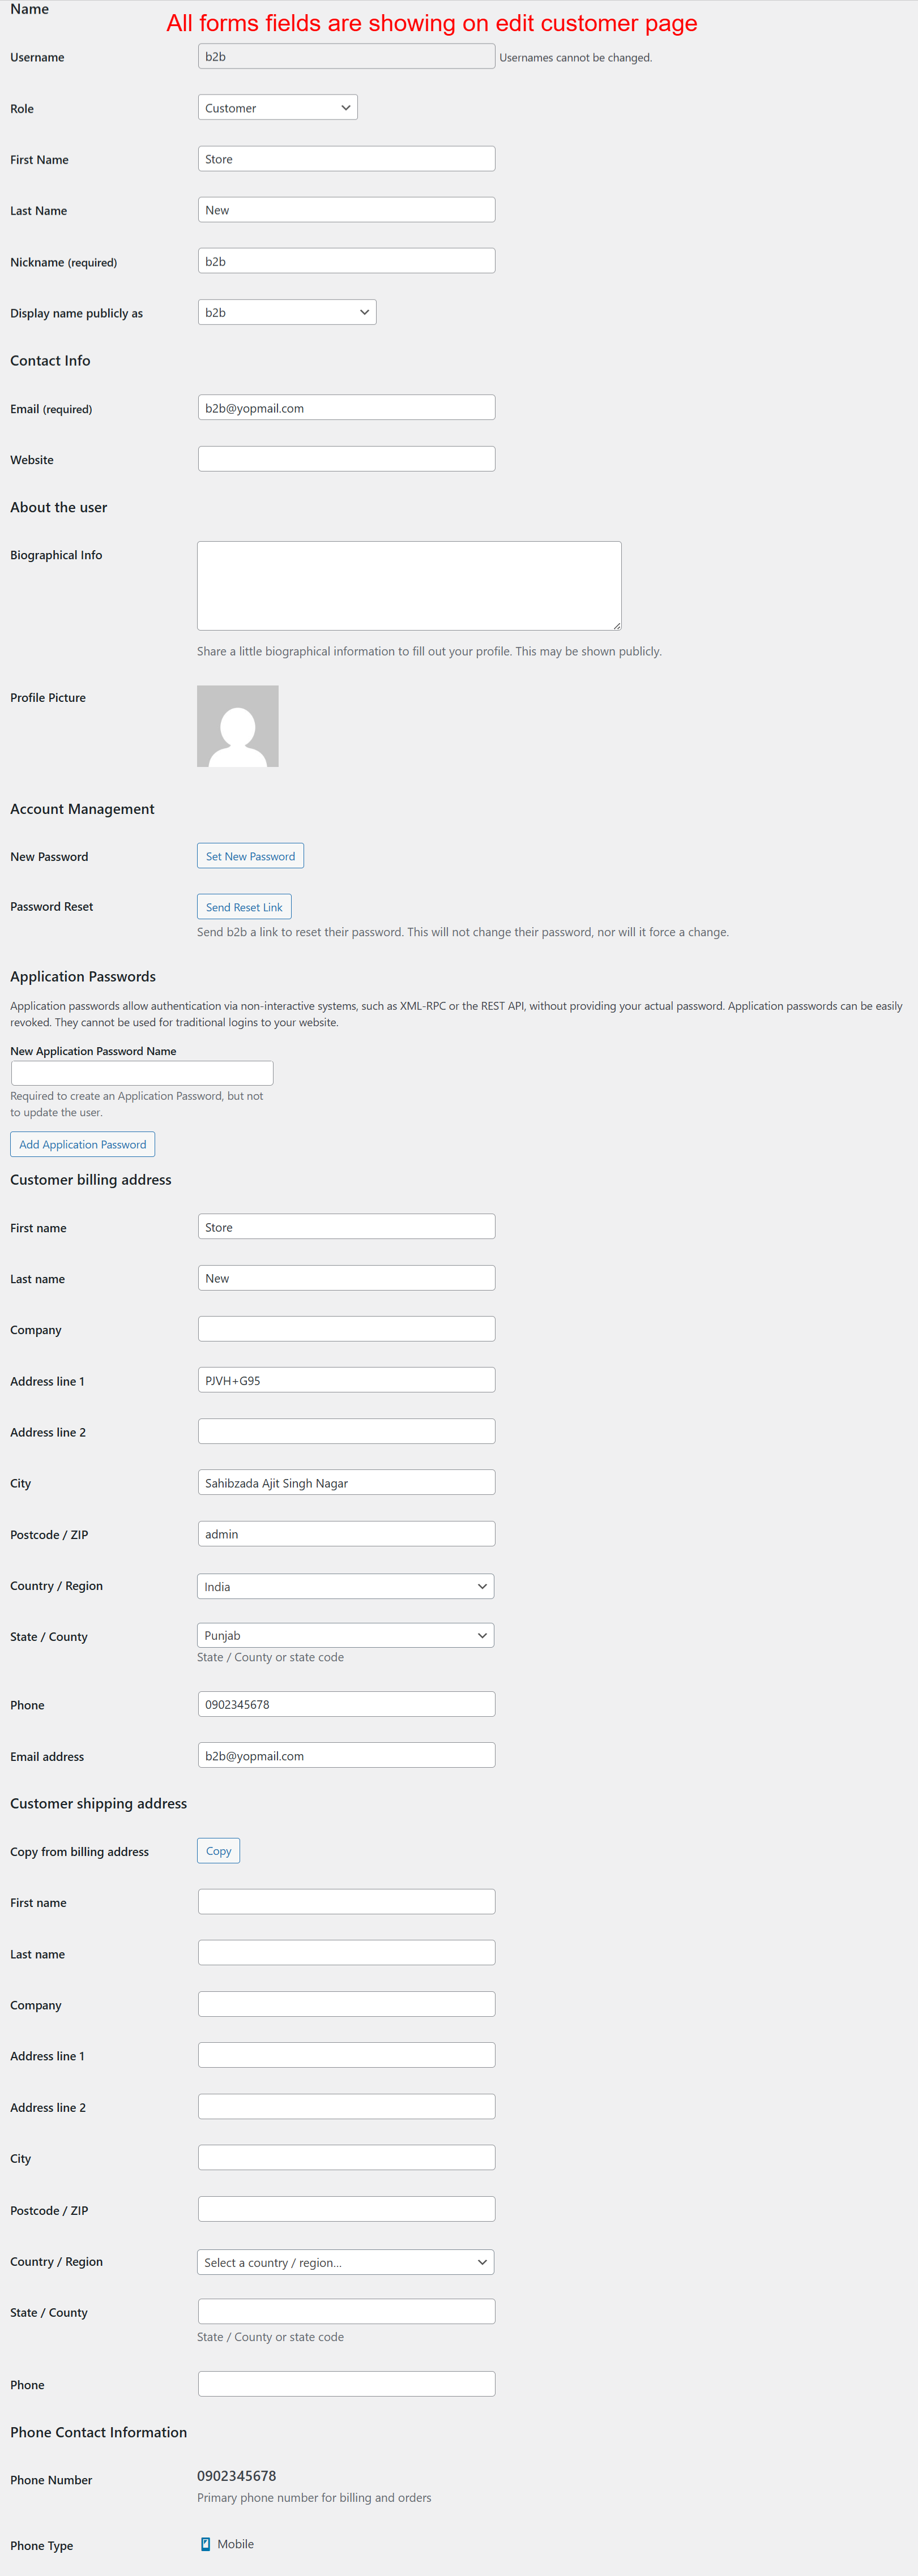
wp-admin: Edit Customer Details
What this shows: A detailed form for editing customer information, including fields for personal, contact, and billing details.
Admins can edit comprehensive customer information, which includes personal details, contact info, and both billing and shipping addresses. This screen showcases the plugin's flexibility in managing individual customer records, supporting varied business needs.
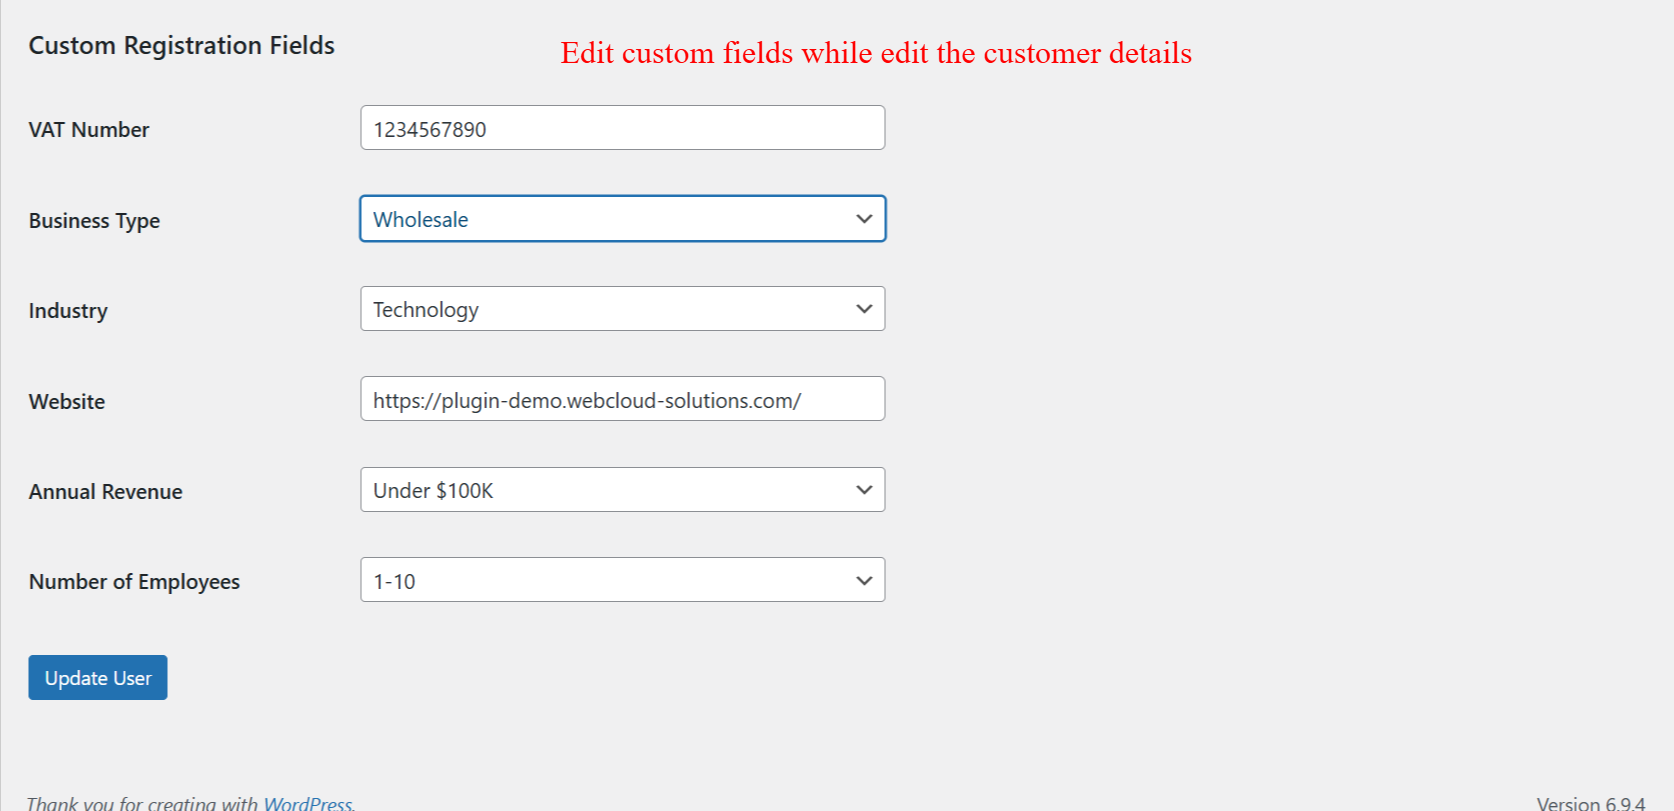
wp-admin: Edit Custom Registration Fields
What this shows: Editable fields for custom registration information like VAT Number, Business Type, and Industry, with an 'Update User' button.
The ability to modify custom registration fields enables admins to capture specific, business-related data about customers. This flexibility enhances the plugin's utility by allowing custom fields to be updated seamlessly within the customer profile view.
Frontend: Header Navigation with Registration Links
What this shows: A website header featuring navigation links including 'DOCTOR REGISTRATION' and 'CREATE B2B REGISTER', followed by a login and registration form.
The header navigation provides easily accessible links for specific registration types and a streamlined login/register interface. This setup facilitates direct customer registration actions and improves user navigation across the site, effectively utilizing the Registration Field Suite's frontend integration.
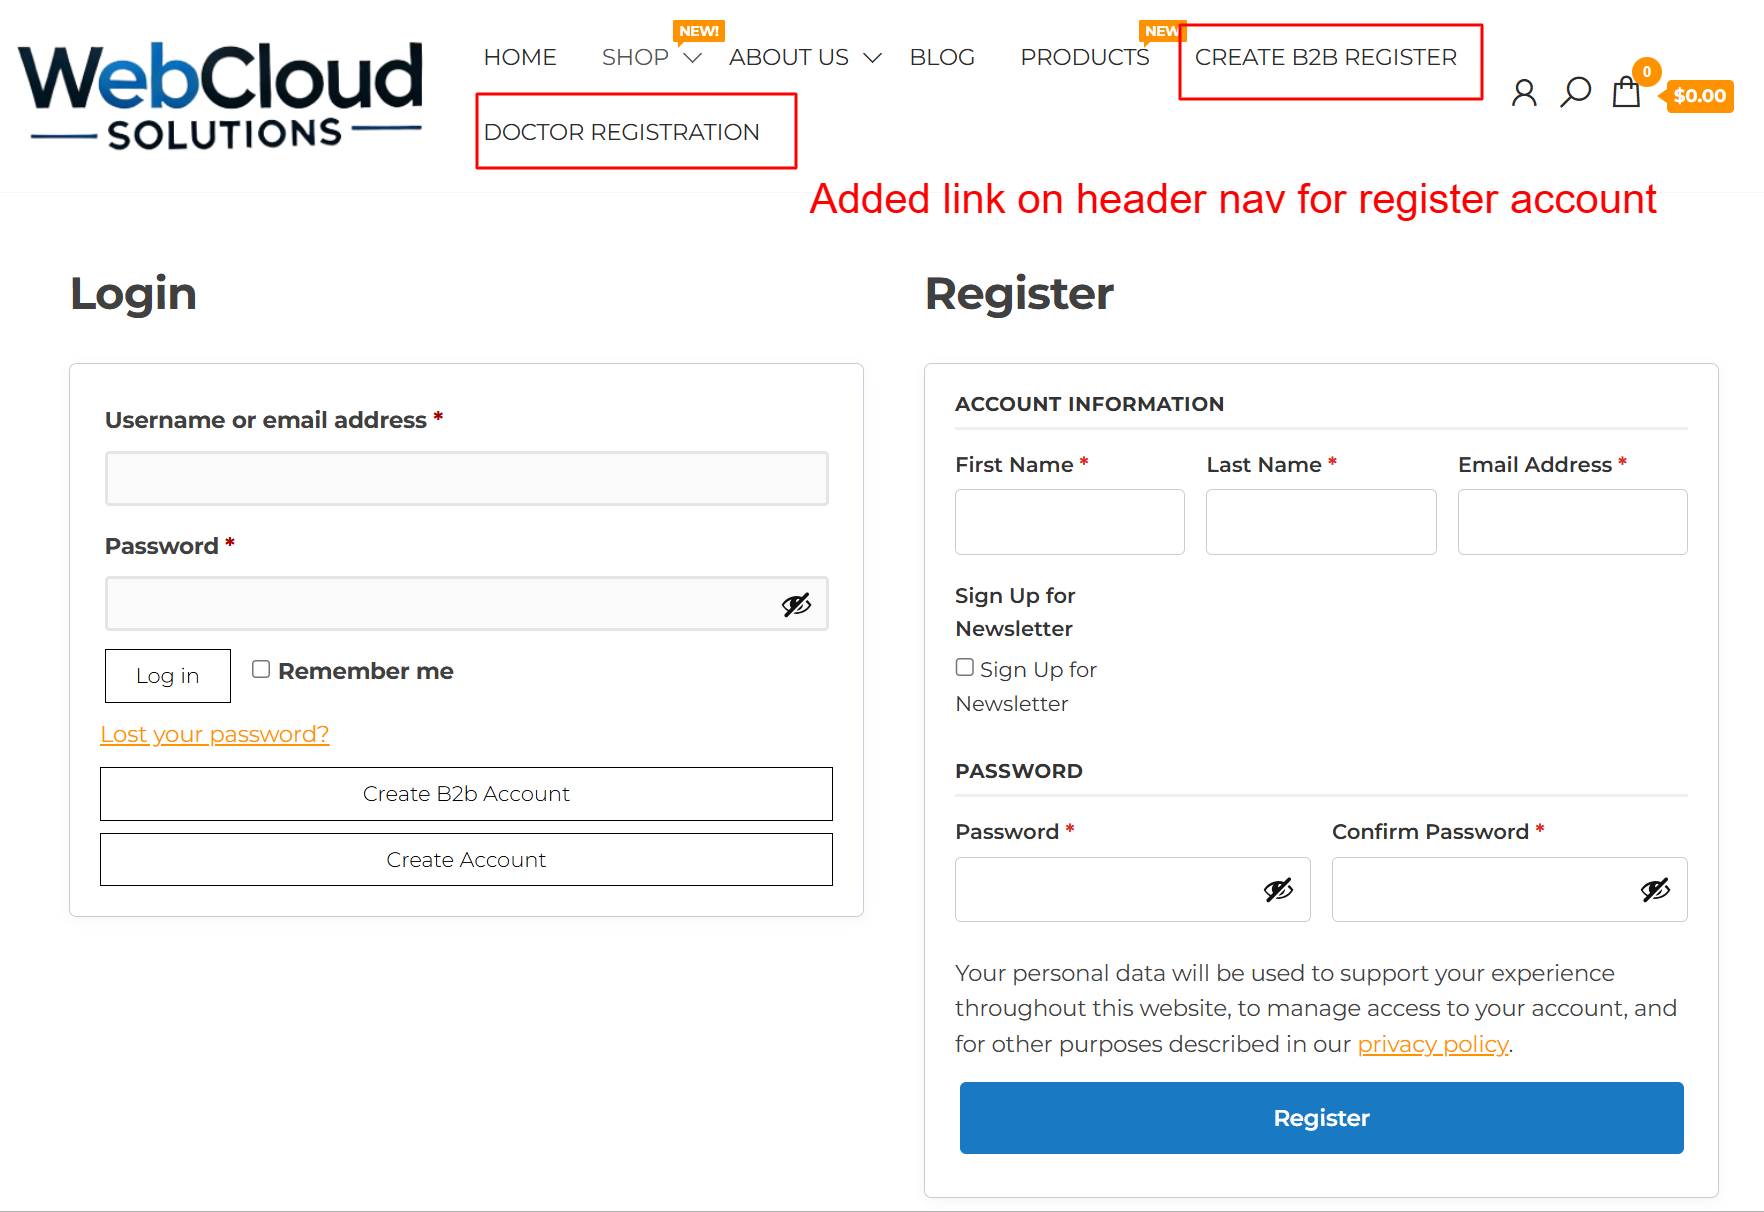
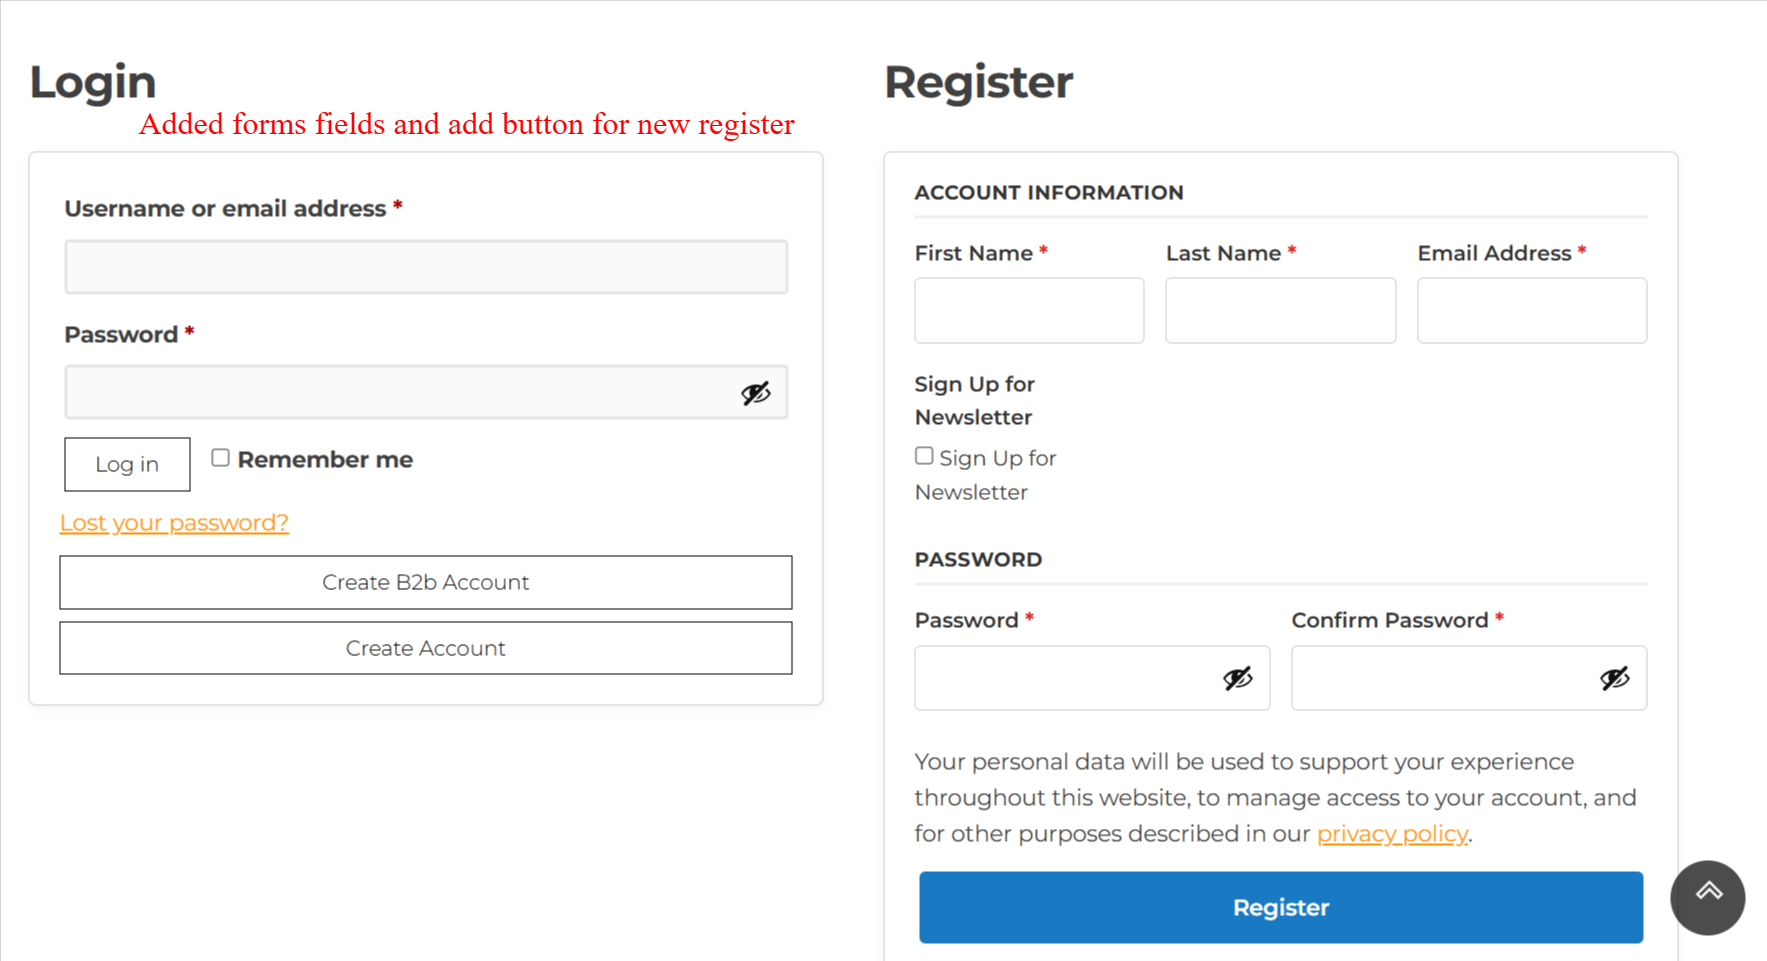
Frontend: User Login and Registration Page
What this shows: A dual-pane view with a login form on the left and a registration form on the right, featuring input fields for user credentials and account creation.
The login and registration page is designed to cater to both existing users and new registrants. This setup supports user account management and encourages new user sign-ups, demonstrating the conversion-friendly features of the Registration Field Suite plugin.
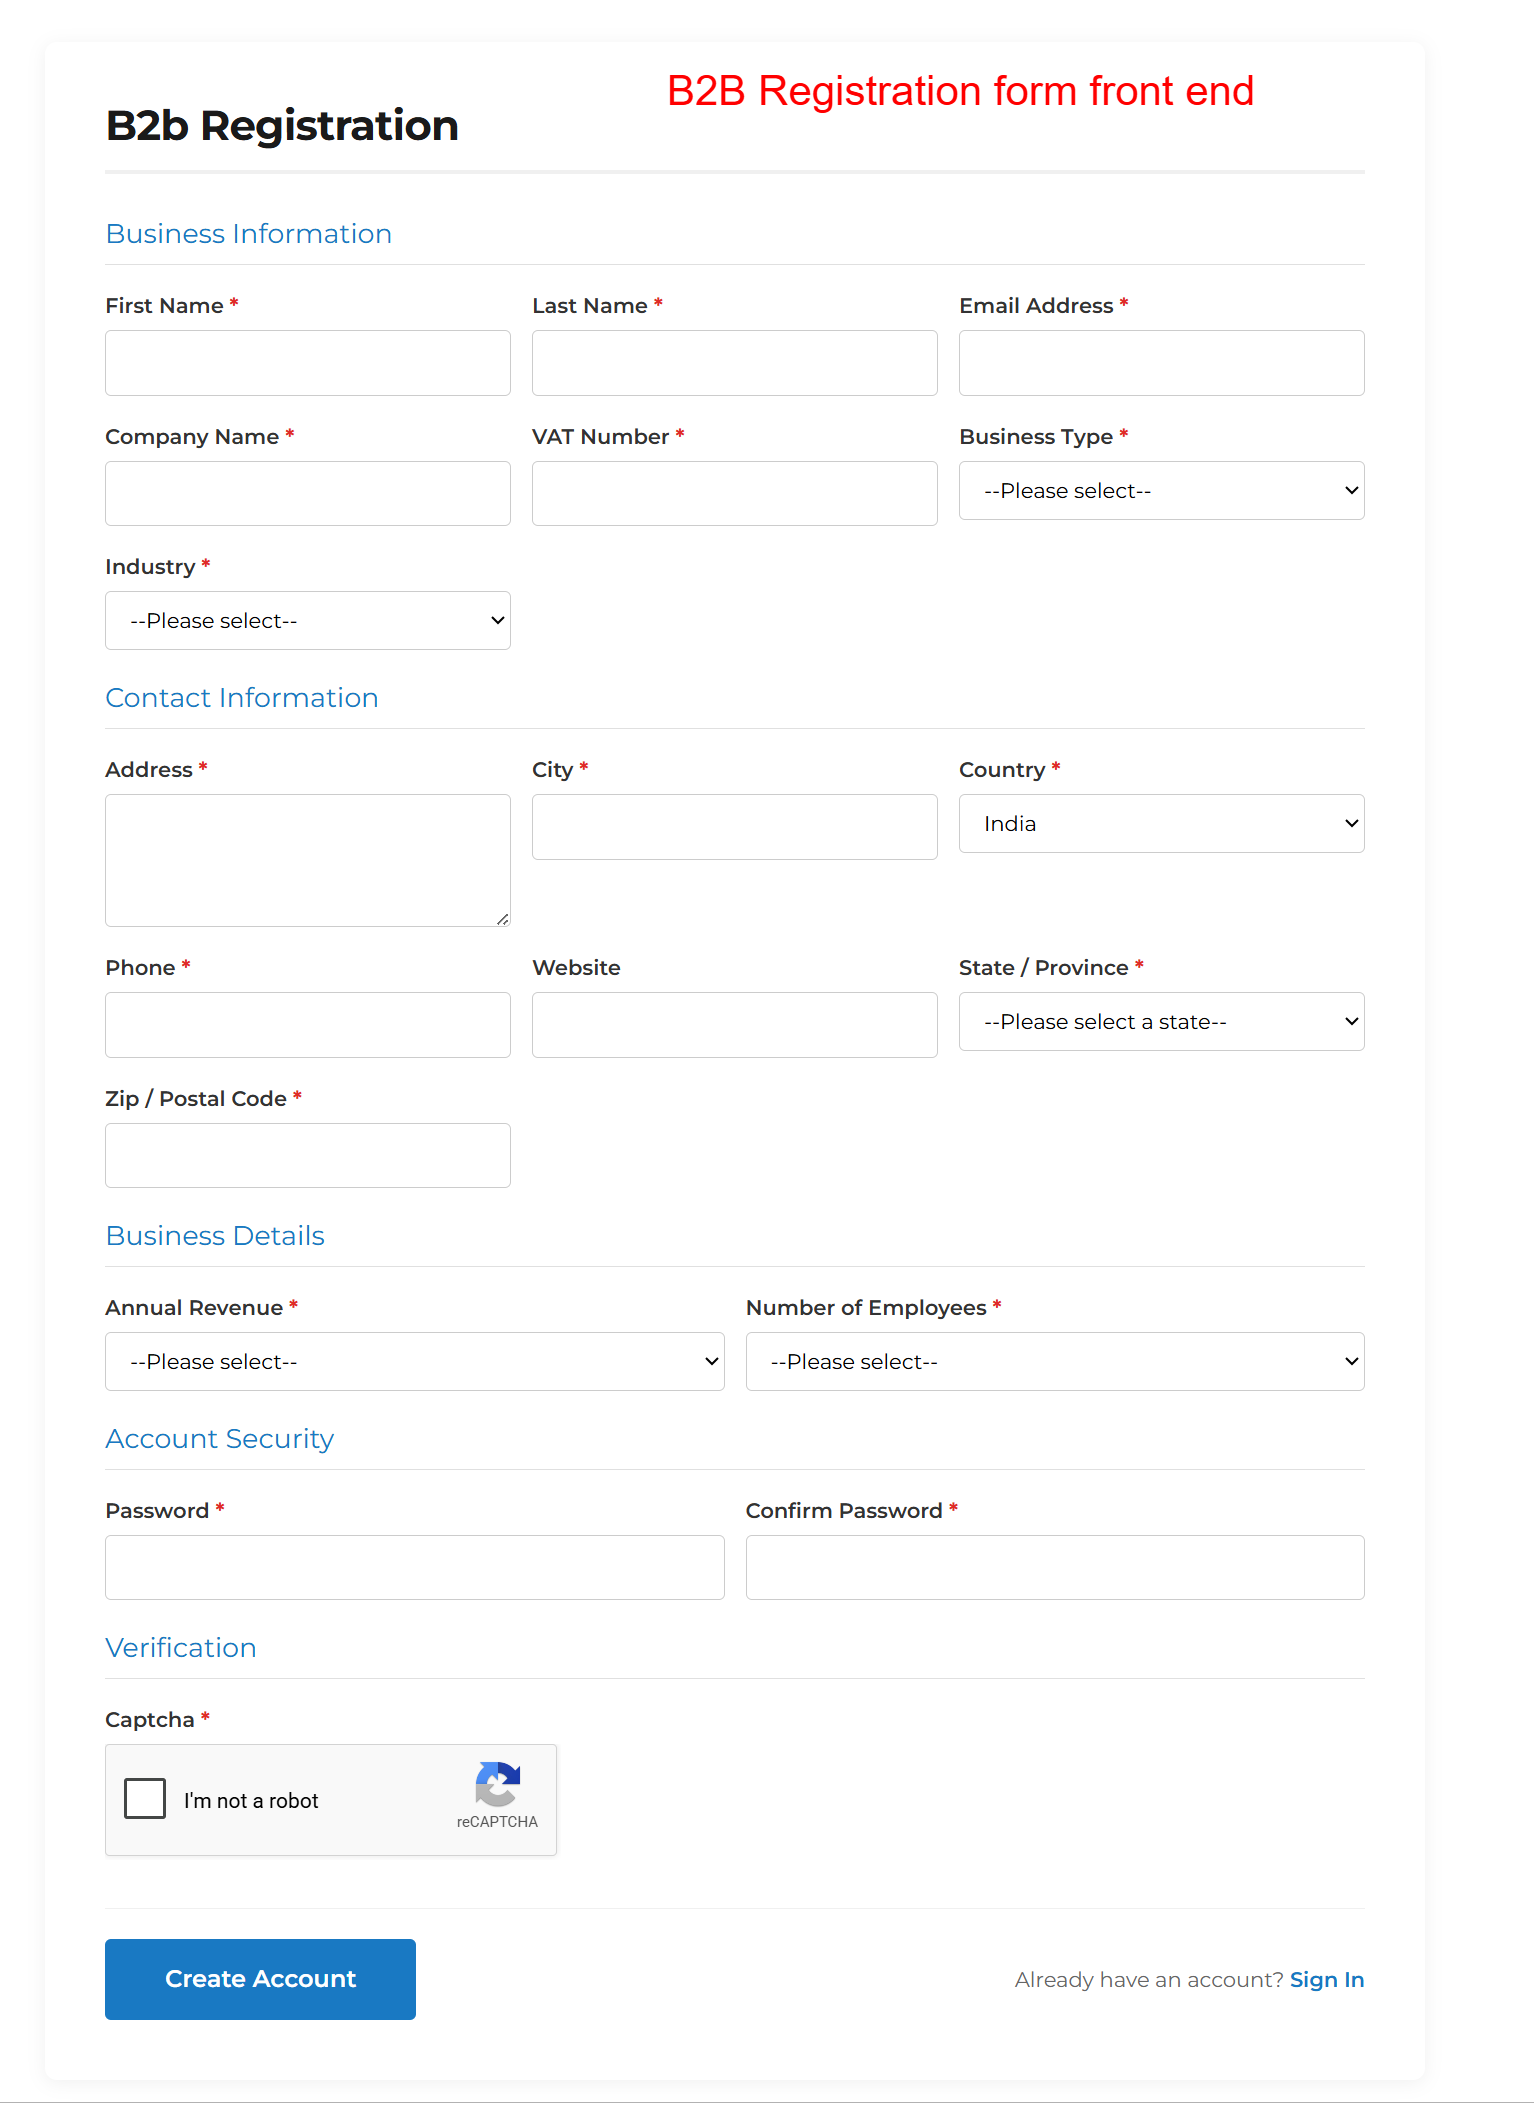
Frontend: B2B Registration Form
What this shows: This screen shows a form for B2B registration with fields for First Name, Last Name, Email Address, Company Name, VAT Number, Business Type, Industry, and contact information. A captcha for verification is also present.
The B2B registration form collects comprehensive business and contact information to set up a new B2B account. Users must fill out fields like First Name, Company Name, and Industry to ensure all necessary business details are captured accurately. This step is crucial for businesses to get started with the Registration Field Suite v2.0.0, offering a seamless registration experience.
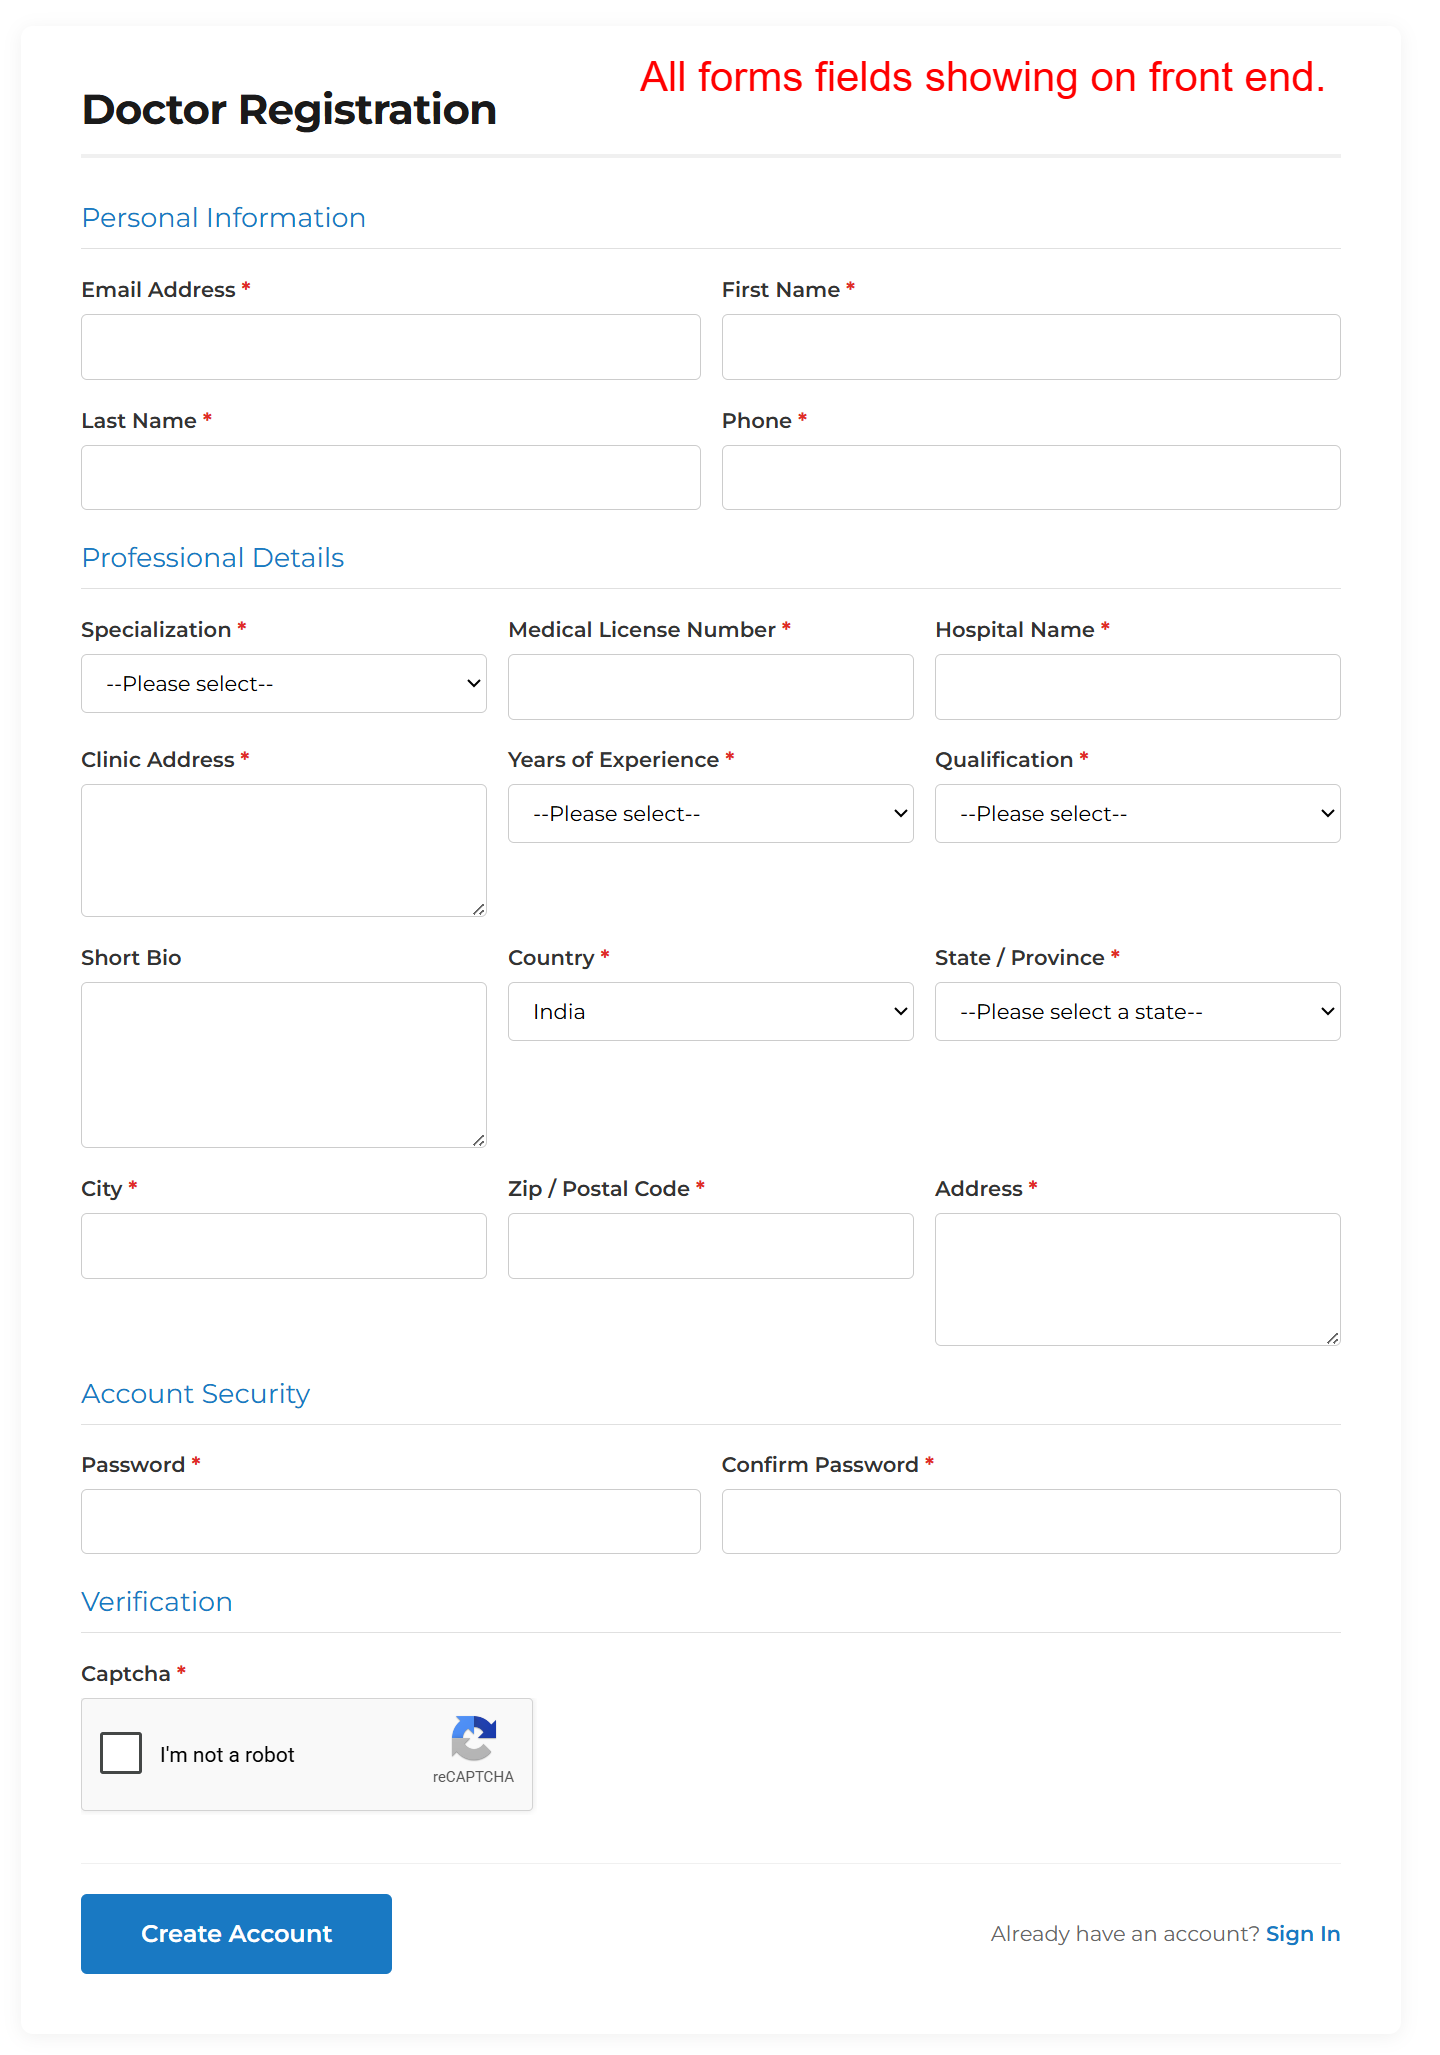
Frontend: Doctor Registration Form
What this shows: This screen displays a Doctor Registration form with fields for Personal Information, Professional Details, Account Security, and Verification. Fields include Email, Specialization, Medical License Number, and Password.
The Doctor Registration form enables medical professionals to register by providing personal and professional details. Important fields like Medical License Number and Specialization ensure that all necessary credentials are captured, creating a validated account through the Registration Field Suite v2.0.0.
Frontend: B2B Account Registration Populated
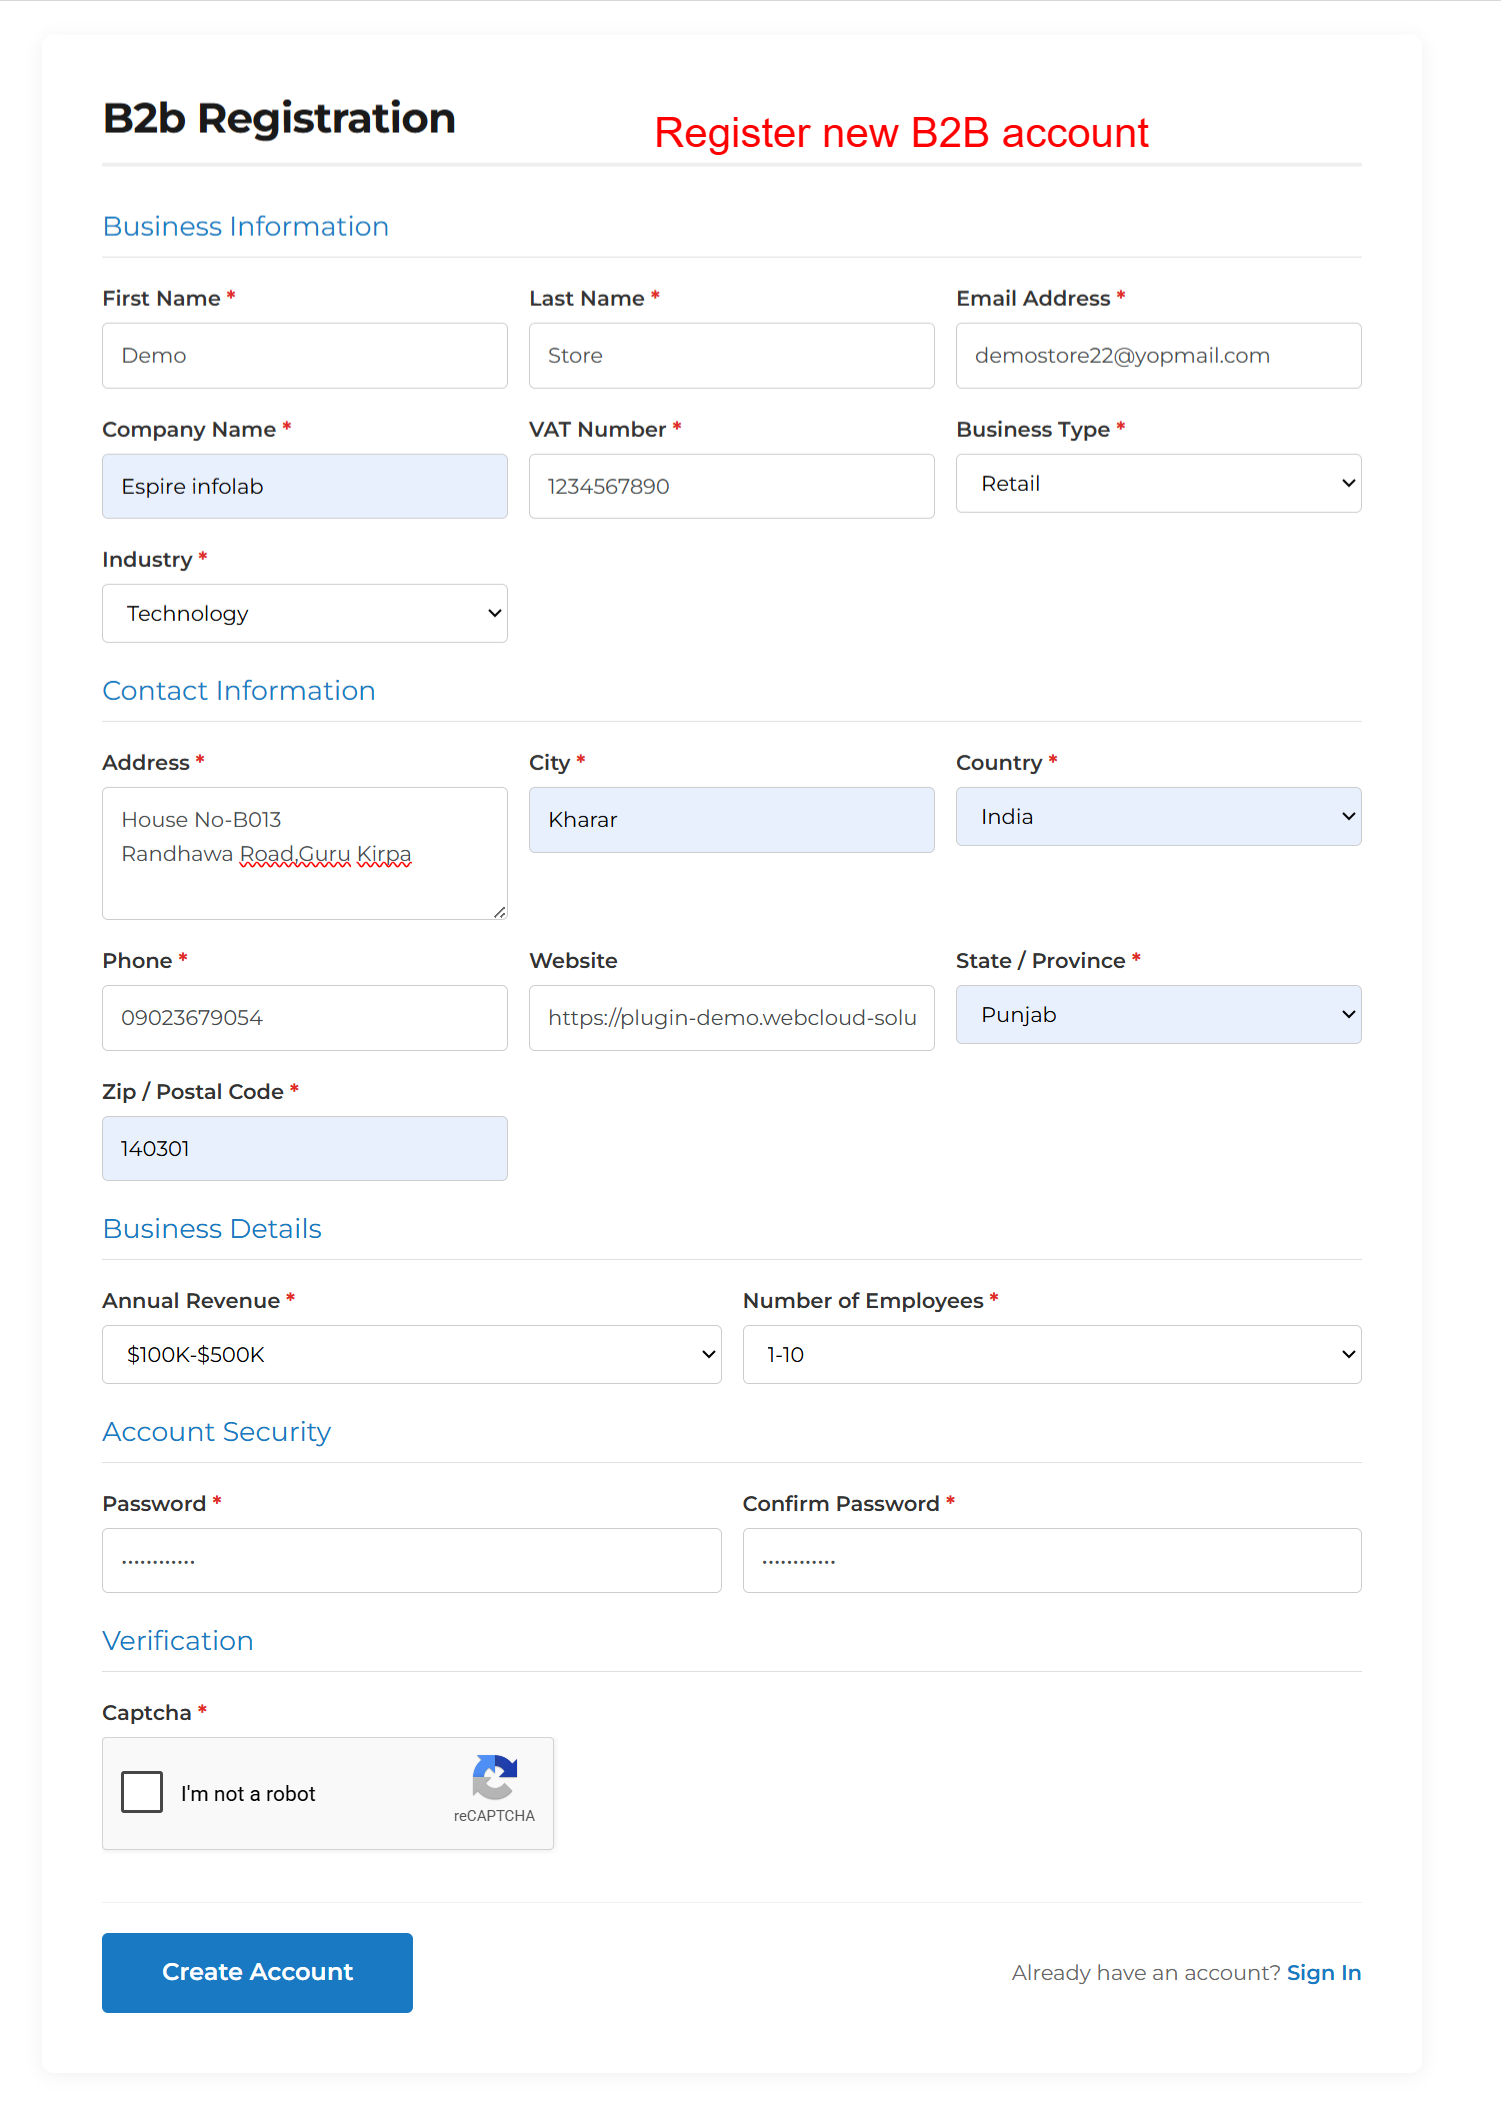
What this shows: The screenshot shows a filled B2B registration form with data entered in fields like First Name, Company Name, Address, and Industry. The 'Create Account' button is ready to submit.
After completing the B2B registration form with details like Address and Business Type, users can review the information for accuracy. Submitting this form is a critical action that initiates the account creation process, highlighting the efficiency of the Registration Field Suite v2.0.0.
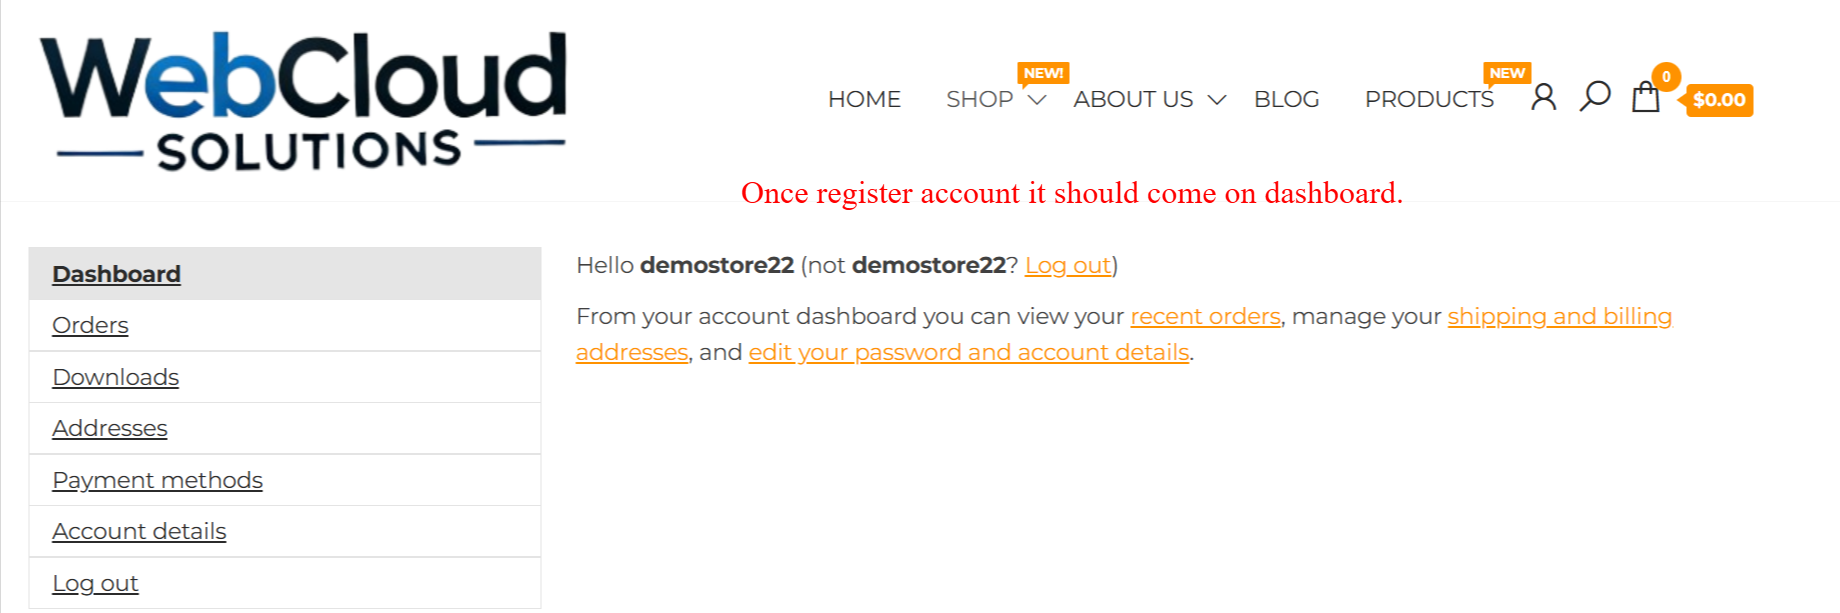
Frontend: Account Dashboard Overview
What this shows: The dashboard lists options like Orders, Downloads, Addresses, Payment Methods, and Account Details. A welcome message includes the username.
Upon successful registration, users are directed to their Account Dashboard, where they can manage various aspects of their account, such as viewing orders or editing details. This screen is a pivotal point for user interaction within the Registration Field Suite v2.0.0, enhancing user engagement post-registration.
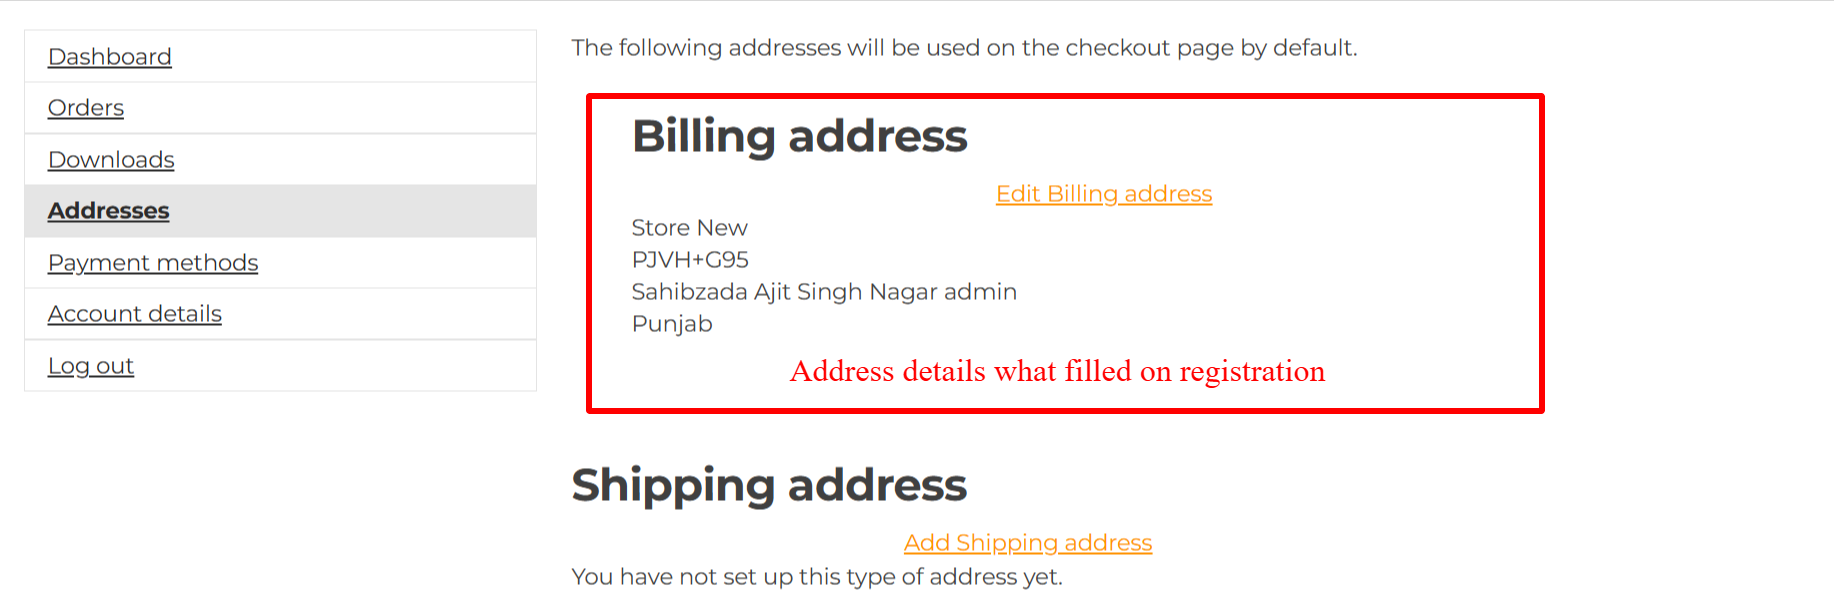
Frontend: Account Address Details
What this shows: The screen shows a section for Addresses with current Billing and Shipping addresses that can be edited. The default addresses will be used at checkout.
Users can view and update their Billing and Shipping addresses within their account. This allows for accurate order fulfillment and shipping processing, emphasizing the adaptability of the Registration Field Suite v2.0.0 in supporting complex user needs.
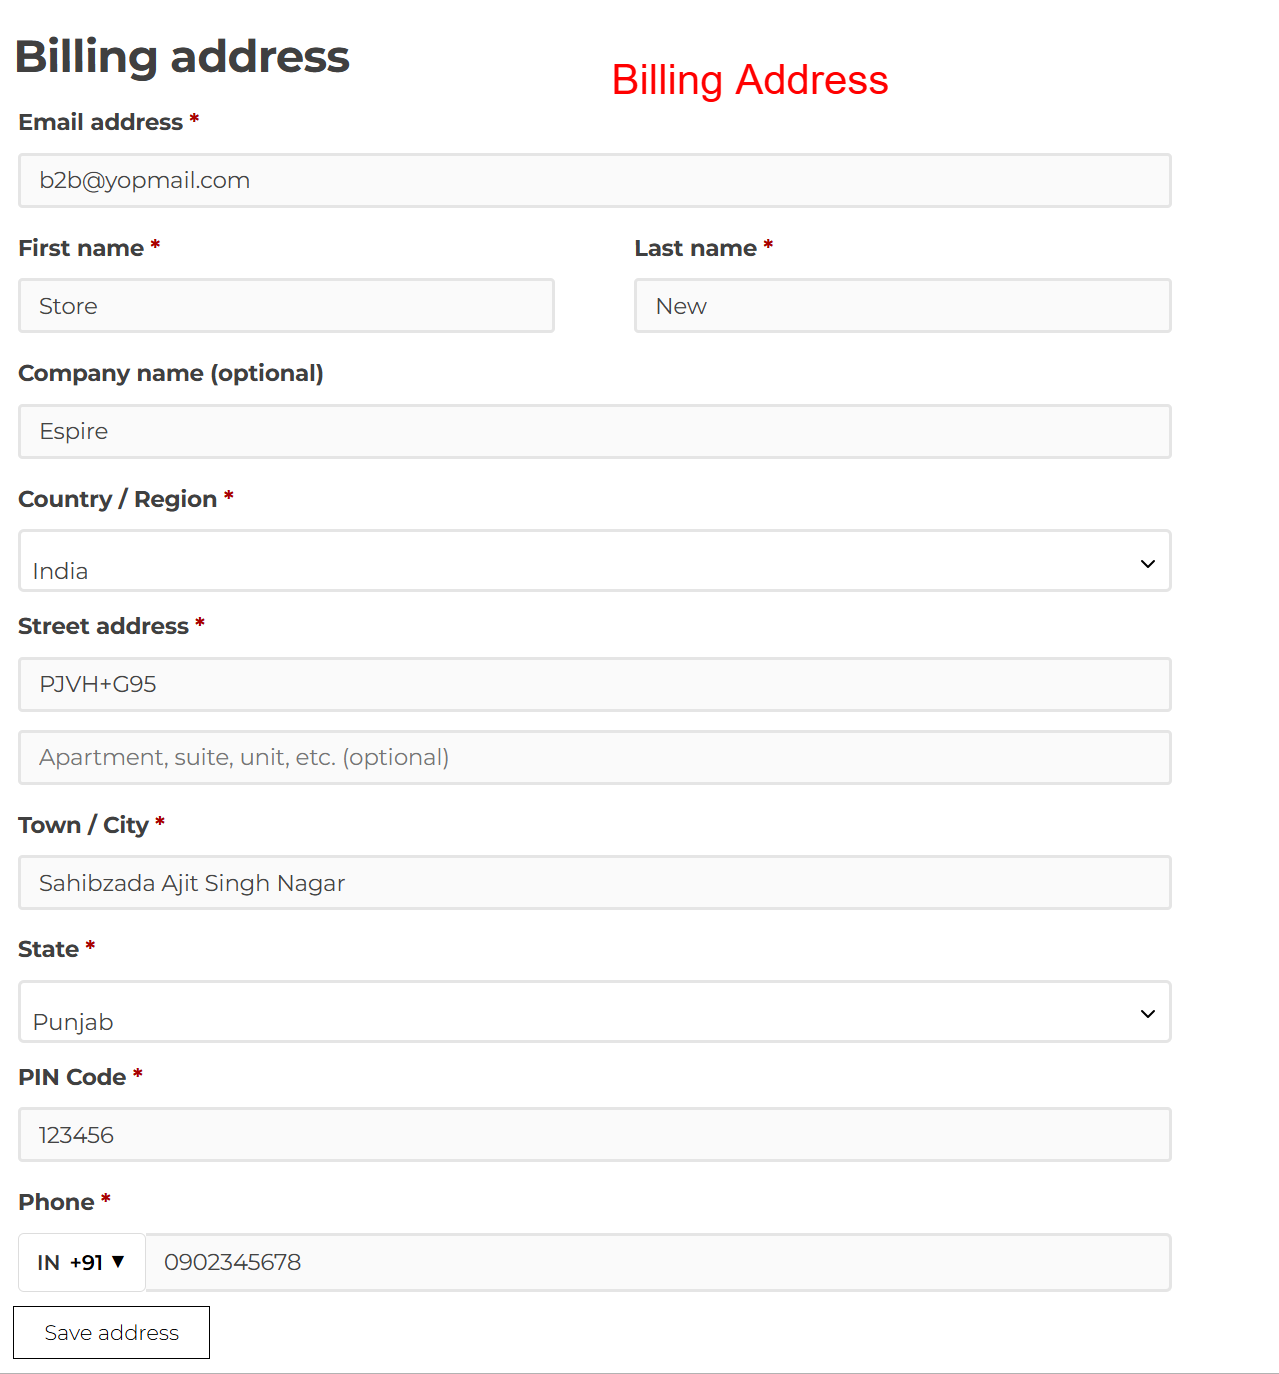
Frontend: Edit Billing Address Form
What this shows: The form displays editable fields for Billing Address information, including Email Address, First Name, Street Address, and Phone Number. A 'Save Address' button is present.
The edit form allows users to modify their Billing Address details to ensure that their account information remains current and accurate. This is essential for businesses that frequently move or update contact information, showcasing the flexibility of the Registration Field Suite v2.0.0.
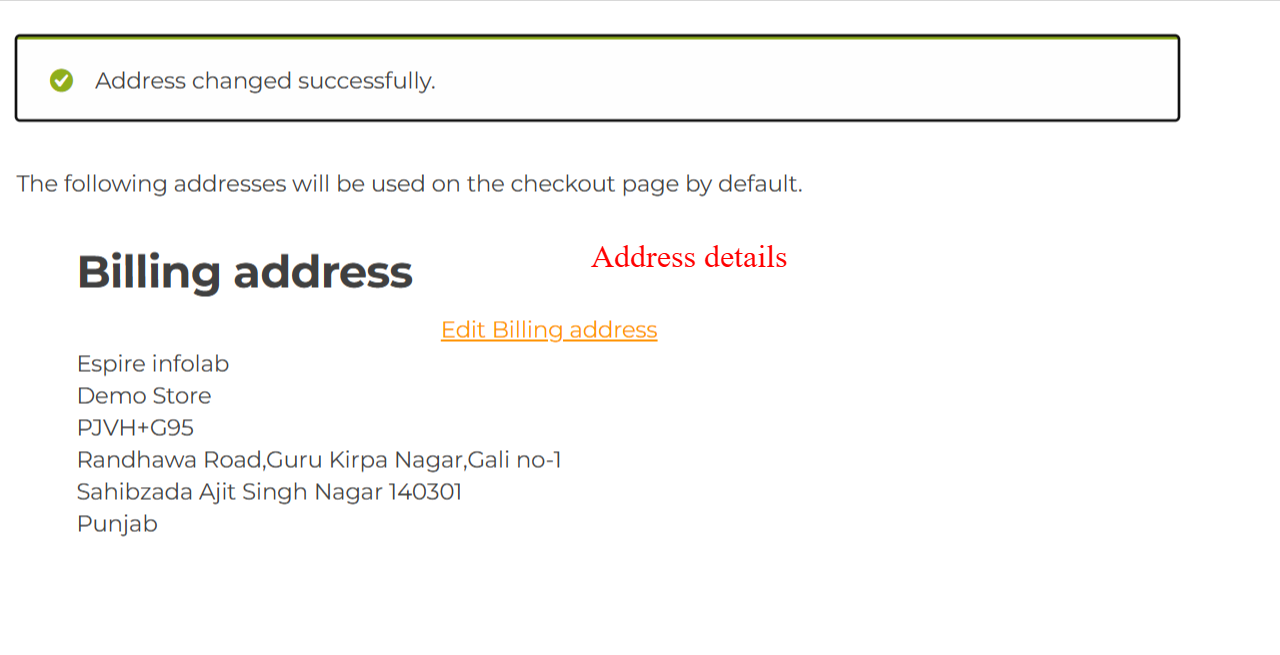
Frontend: Address Update Success Message
What this shows: An alert box confirms that the address change was successful. The updated Billing Address details are displayed below.
The confirmation of a successful address update reassures users that their changes have been recorded accurately and will be used for future transactions. This feature is vital for maintaining trust and user satisfaction with the Registration Field Suite v2.0.0.
Frontend: Edit Account Details with Custom Fields
What this shows: This edit form includes personal details like First Name and changes for Password. Business Information and Contact Information fields are also present.
Users can update their account details and keep information like VAT numbers and Business Type current. Custom fields ensure that the Registration Field Suite v2.0.0 meets advanced user requirements for detailed data management.
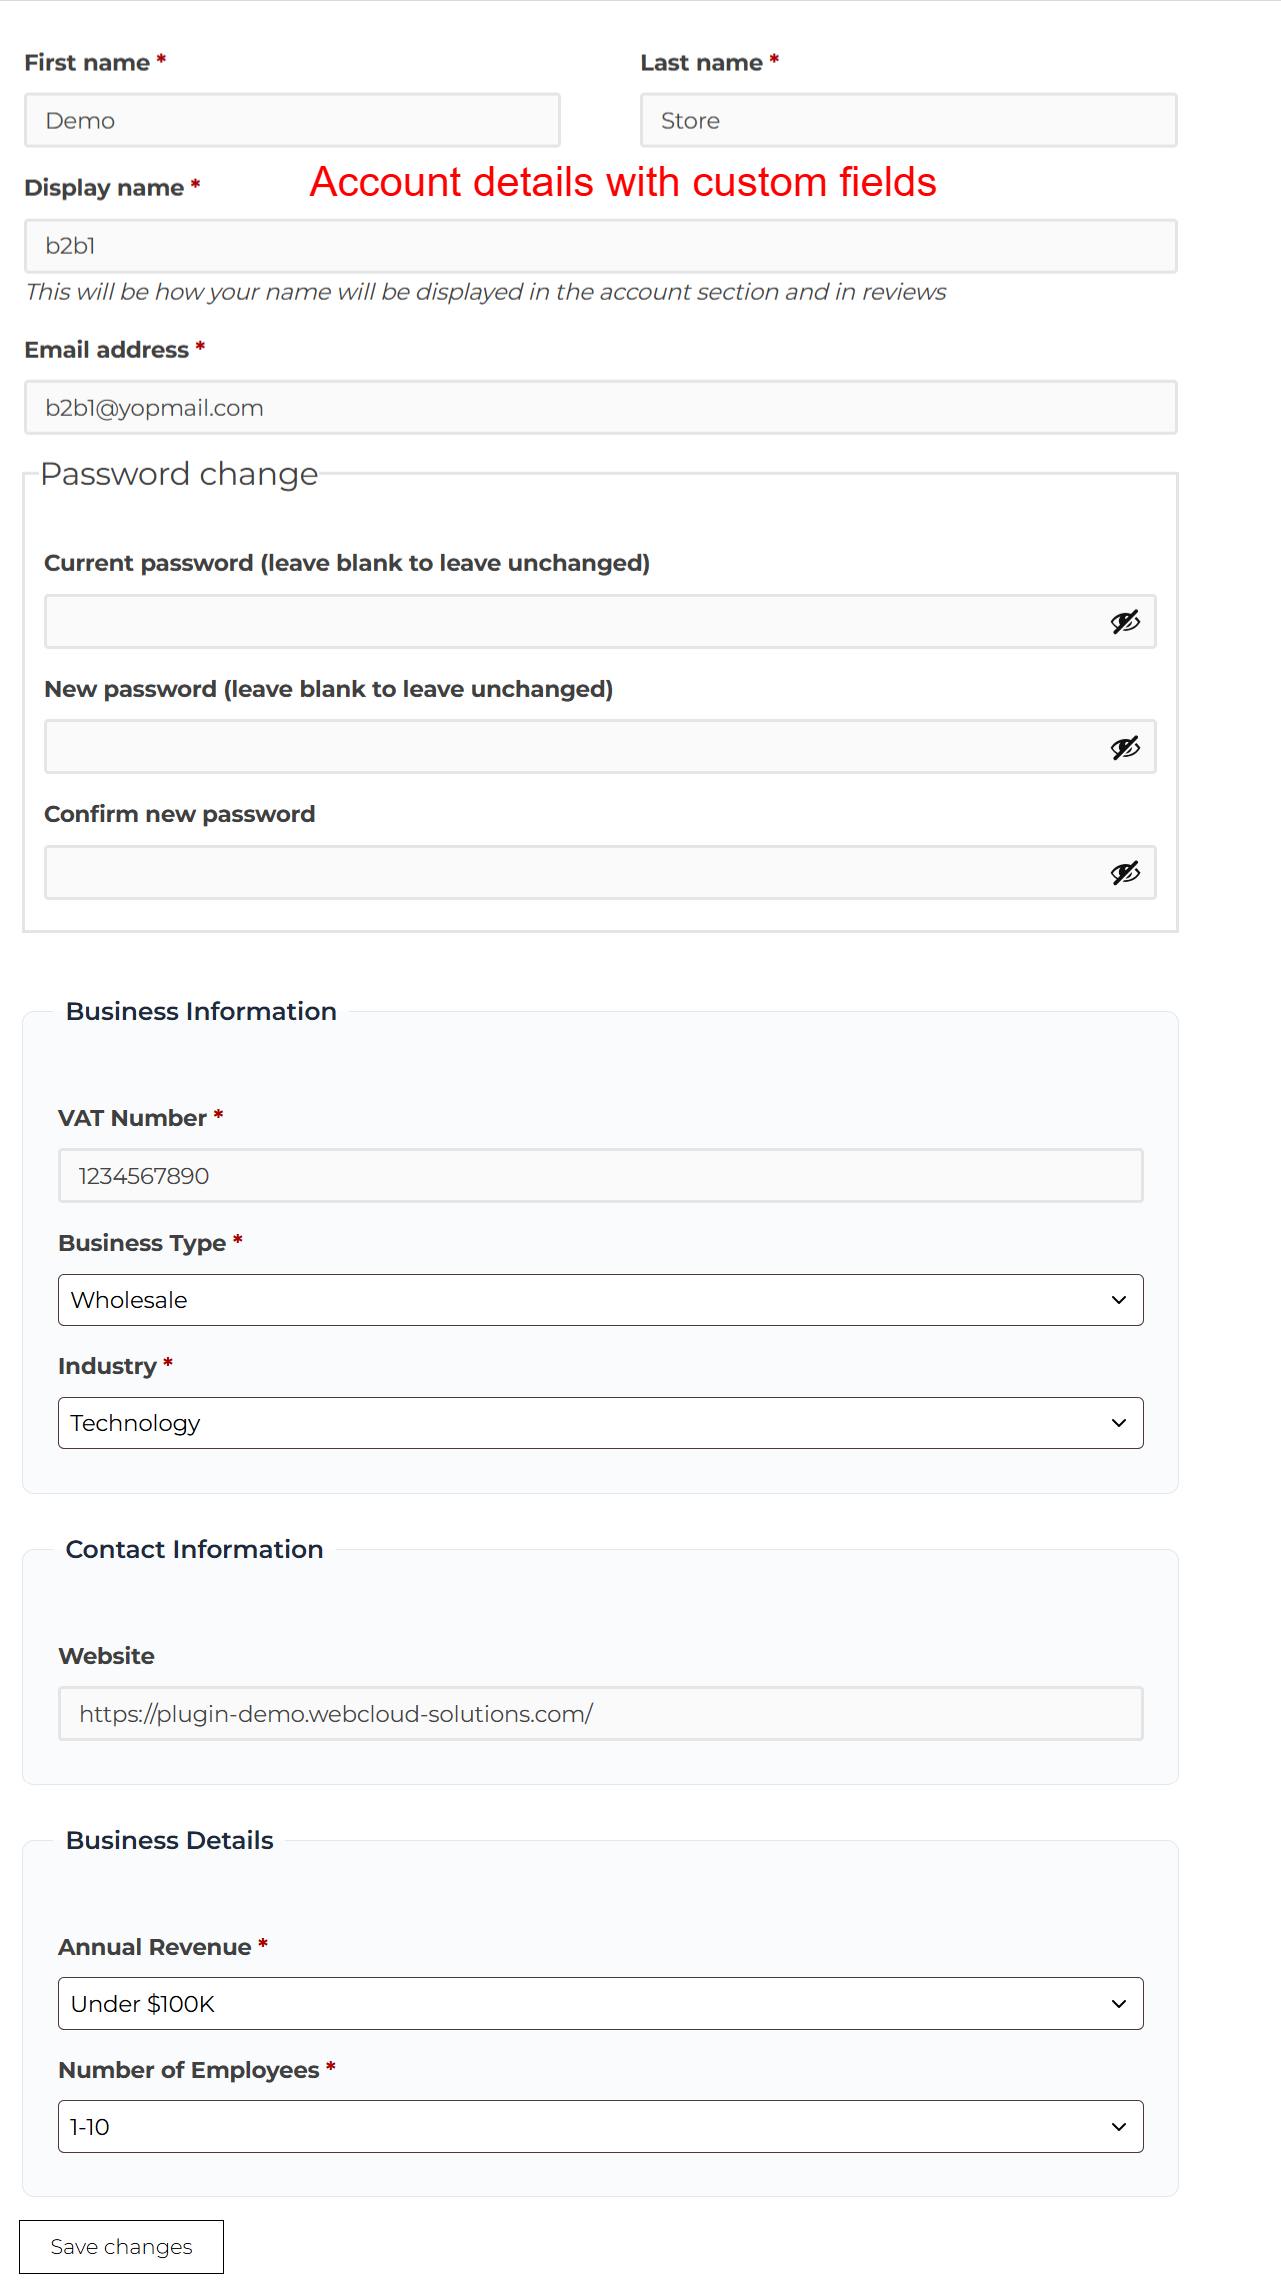
Account Details: Custom Form Fields
What this shows: The screenshot displays form fields under sections like Business Information, Contact Information, and Business Details, including text fields, dropdowns, and a 'Save changes' button.
This screen allows users to input detailed business-related information such as Company Name, VAT Number, and Business Type. Users can also enter contact details and specify business attributes like Annual Revenue and Number of Employees. This is crucial for businesses using the Registration Field Suite v2.0.0, providing an enhanced registration experience in WooCommerce. By accurately filling out these fields, businesses can ensure better personalization and compliance with registration processes.


Reviews
There are no reviews yet.